 |
T-Mog Made Easy |
|
Now, I use version 6 of Photoshop, but it doesn't really make that much of a difference what package you use to fiddle with the tones and colours, as long as you know what you're doing with the T-Mog. So, hopefully, I'll be able to explain the mog to you and then you can go and thrill the world with your fabulous objects making me thoroughly ashamed that I never bothered to show you how to make new objects...er...not that I ever seem to have mastered that myself of course ;o) |
During the course of
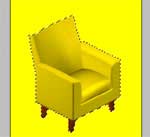
all this, you will be turning this ugly, and yet well loved sim original
chair, 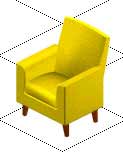 <---
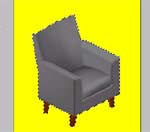
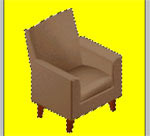
from that, to this ---> <---
from that, to this ---> 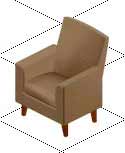 |
|
Sorry to all those flamingo lovers out there, but I just don't "do" flamingoes I'm afraid ! :o) You will need : the latest version of t-mog with a Magic Cookie, and a graphics package, preferably photoshop :o) OK, you're saying, lemme at it...well, first, we need to begin with Stage One, so here we go! Stage One |
|
Now, in order to start, there are a few basics that you need to know about the T-Mog, and Photoshop. Both of these handy lil bits of software (particularly the graphics packages such as Photoshop) are incredibly resource hungry. This means that before you even open either the mog or your graphics package, you really need to have everything else apart from the Windows Explorer shut. This then frees up all your computers memory for the greedy software you're about to run. It also helps packages such as these to have a nice clean system. Regular scandisks, defrags and general clear outs will make things run smoothly for everything else anyway, so you might as well get the most from your machine. Besides, who wants the blue screen of death halfway through a delicate recolour eh ?! Second on our list of preparation is to create yourself a nice handy folder somewhere on your hard drive to store all the files that T-mog and you will be creating. I usually have a folder in "My Documents", in which I put more folders named appropriately. So, go knock yourself out on doing that since you've got your windows explorer open anyway :o) Now, we all know that theft of objects has become a problem in the sims community, so all us Moggers have to be very careful these days. The basic rule is : If it didn't come with the game, don't clone it. |
|
There are, of course, exceptions to the rule, but the basic premise is a good one. Should an artist give you permission to clone, then go on ahead, but most artists worked hard on their objects and are very protective of them. Personally, even if it's for personal use, I don't reclone someone elses work, purely because you never know who you might offend should you post a picture on a forum and have the original creator spot it. And YES, it DOES happen !!! People are crazy, what can ya say ! ;o) So, we move onto the protection side of things. In order to prevent cloning someone elses work, it's a good idea to remove ALL custom objects from the game. There are three reasons for this, as we have discussed, you save yourself from a possible tonguelashing, secondly, both the game and the T-Mog will open soooooooo much quicker without all the other stuff in them, and thirdly, it shows you what came with the game, so you can clone without having to search through and try to remember. Trust me on this, I have well over 1000 objects in the game and trying to open the t-mog was taking up to 5 full minutes load time untill I removed custom stuff ! Bunny Wuffles is going to
interrupt your viewing just for a moment here :0) In line with the Recolourers Resource Project, there are many objects out there which are safe to clone. To organise your files properly from the start (believe me, you WILL thank me eventually for this) I have put some basic instructions in Housekeeping about this which I strongly recommend you follow. Trust me on this one. Carm wrote this tutorial six years ago and some things were a little different then. And, LOL, some things haven't changed one bit.... Now you've done all that boring prep work, it's on to the fun bit ! Stage Two |
|
Take a deep breath, we are now ready to open both the T-mog and Photoshop, so go ahead, kick them up :o) |
|
Once you've clicked on that name in the list, you will see another list in the right hand window of the mog. You can see this in the picture on the right. The yellow chair is listed as "Chair - Living Room - Expensive 1". You can see it highlit in grey in the white box on the right.
|
|
Ok, now we need to copy or clone the object so that we can fiddle about with it's colours. To do this, we need to press the button on the right hand side of the mog, labled "Clone Object File". I circled it in a tasteful red on the picture for those of you who are still missing it, hopefully you're colour blind as well so you won't mind the red ! ;o) |
|
When you press the button, an option window appears, as you can see in the picture on the left. In it, you will be asked to name your copy of the chair, I suggest using your name at the start, I have named mine carmdemochair. Even if you never intend to distribute your objects, it's much easier for you to find them if you always put your name at the start of them like this. The t-mog will automatically give you a name for the object, but they're generic, and I tend to lose the object in the list when I use the generated names. |
|
As you can see, the t-mog has automatically selected the chair we wanted to clone, so all that's left to do is check your cookie number and correct it or enter one as necessary, and we're onto the next move.
Hit the ok button at the bottom of the window, and the clone is done :o) See how easy that was ?! ;o)
|
|
Exporting your Sprites Now we've cloned the object and the copy is in the T-mog, we need to export the objects sprites. Sprites are the images that make up the objects. At this stage, things start to get complicated if you're going to change the shape of an object, and I really don't suggest that you attempt to do this until you have at least completed this tutorial :o) Since all we're going to do is fiddle with the colour, it's easy......no, honestly, it really is ! :o) |
|
The first thing we have to do is extract the images from the t-mog to the folder we made in Step One. As you can see, the t-mog has already selected our copy of the object, so we can move onto exporting. To do this, we need to click on the "Export Object File" button on the right hand side of the t-mog, and I've circled the button in that lovely red again for you. |
|
Frankly, I've never seen the point in altering every single image for a recolour, so in this tutorial, we'll be sticking to the default selection that you see in the Export Whizzer. This means that the "Just Change Colors" box must be ticked, and that the "One Zoom, One Channel" option box is selected as in the picture. |
|
Hit the ok button on the Export Whizzer, and choose the folder you made earlier in the "Save As" window that pops up. Once you've found the folder in the list, click "save", and watch as the T-Mog blitzes the images to your destination folder :o) Once again you should get the "Transmogrifier Successfully Finished Exporting!" message, and an ok button. Just click OK and we're onto the next step ! :o) Now that's all the initial fiddling with the t-mog done, and we move on to......... Stage Three |
|
|
|
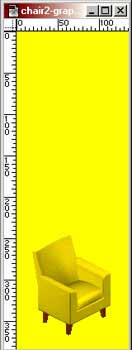
If you double click on the sprite0300 folder, you're shown two files, one of which is the front image of the chair, and another, which is the back. To start, we'll alter the front of the chair, so select "Chair2-graphic_large_front_p". This naming is part of the t-mog way of labeling things for us. From this name we know that this is the second chair from its group, the image is of the largest zoom, that it shows the front of the chair, and that it is the "picture file". In more complicated t-mogging you would also have "Z buffers" and "Alpha Files", but we're not worried about those since all we're doing is a recolour. |
|
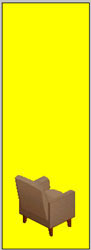
So, once you've selected the front image, click OK, and take a look at the image. What you should have is something resembling the picture on the left here. A tall yellow box, with the ugly yellow chair sat in the lower half of it. This is the front sprite to our chair. This is the image we will be altering. In order to make sure that we don't overwrite our chair too early with some horrible miscolour, the first thing we need to do is save the picture under a different name for safe keeping. This means that, should we make a mistake, we haven't destroyed the original image, and we won't have to go back and go through all the things we've already done to get a clean copy again. I'll assume
that you know you're way around the file---save routine well enough
to not need me to show you how, the only thing you must do is to save
the picture as a PSD or Photoshop file, because later, we will be using
things that only the photoshop file format allows. :o)
Now we have our image open, we need to change it to an RGB Pallete. This means that we're going to change the number of colours the image is made up of so that we have a greater variety to play with. To do this, we need to go to the Image menu, and select Mode, then choose RGB Color. You can see this in the picture below. |
|
Now we need to save the image to the same place as last time since you have now changed it. |
|
Using the Magic Wand tool, click anywhere on the yellow back ground colour of the image to produce running ants around the chair and outside of the picture as in the picture on the left. This has selected the entire image, now we need to select just the chair part of the image so that we can alter it, and leave the background yellow. The game uses this yellow colour as a base colour for every object. This is the reason that objects have a "yellow haze" when Anti-Aliasing is turned off in the game. |
|
Now, to select the chair only, we
need to hold down Ctrl and Shift and press i. This will Invert the selection to just running ants around the chair, as in the picture above. Now we have the chair selected, we can begin to alter it. I firmly believe that the mark of a poor recolour is when things that should not be the same colour as the object, ARE. For instance, in the case of this chair, it has wooden legs, therefore they wouldn't end up being bright pink, or dayglo green along with the rest of the chair would they ?! Because of this, I like to make sure that any woodwork, or say taps on a sink, remain the colour they were meant to be, after all, who has dayglo green bathtaps ?!
|
|
To use Layers, we need to have the layers menu open, if it's not already, you can open it by going to the window menu and choosing Show Layers. The picture on the left shows you what the layers menu looks like. As you can see, at the moment, all we have is a background layer. What we need to do is copy the chair we have selected, and paste it onto a new layer, sort of like a colour photocopy, that we can use to keep the legs the same colour as they started out. This is an easy bit, so if everything so far has you a little wary of photoshop, this will put you at ease, because all we're going to use is the old fashioned copy/paste shortcuts. :o) All you do is, with the running ants still going in lil circles around your chair, use your shortcuts and go Ctrl C and then Ctrl V. Voila, we now have two layers, one the background layer, with the tall yellow background, and one a layer with just the chair on it, and a transparent background. Don't worry if the transparent background shows up as little grey and white checks, this is how photoshop shows transparency :o) |
|
|
 Now we need to select the legs of the chair, to do this, we're going to
use the Polygonal Lasso Tool. Believe me, the name is excessively
complicated considering what the thing does ! Basically, this lil gizmo
allows you to select things click by click. That's it. A big showy name
for an itty bitty tool ! Anyway, you can see what the tool looks like
in the picture - it's the odd shape that looks like a knot. It's possible
that your tool is still set on the ordinary lasso, which is a round version
of the little knot. If it is, then just click on the lasso tool, and hold
down the mouse button to reveal the other lasso tools, all you need to
do is just select the Polygonal lasso from there.
Now we need to select the legs of the chair, to do this, we're going to
use the Polygonal Lasso Tool. Believe me, the name is excessively
complicated considering what the thing does ! Basically, this lil gizmo
allows you to select things click by click. That's it. A big showy name
for an itty bitty tool ! Anyway, you can see what the tool looks like
in the picture - it's the odd shape that looks like a knot. It's possible
that your tool is still set on the ordinary lasso, which is a round version
of the little knot. If it is, then just click on the lasso tool, and hold
down the mouse button to reveal the other lasso tools, all you need to
do is just select the Polygonal lasso from there. |
|
You should have running ants going around the area you selected, as in the picture. Now we've selected the legs of the chair, we're going to use Ctrl C and Ctrl V to paste them onto a fresh layer. The legs you just pasted on might need a bit of adjustment to get them into the right place, so that they exactly match the picture beneath them, and you do this with the Move Tool, the little arrow at the top of your floating menu. All you do is select the tool, and then click on the legs you pasted in, hold down the mouse, and move them till they match exactly. |
|
Now we've got three layers, one with the original image, one with the first copy we made of the whole chair, and one of just the legs. Obviously we don't need all three, we only need the original, and the pristine wood effect legs, so we need to delete the middle layer. You can see all three layers in the picture on the left.
To delete the middle layer,
we need to select it by clicking on it in the layers menu, this will
highlight it. Then we need to right click on the highlit layer in the
layers menu and select delete layer from the menu that appears.
Hit yes on the box asking if you are sure you wish to delete,
and we're back to our two layers again, all ready for the next stage.
At this point, I suggest saving the image again since we have now made
several changes.
|
|
Stage Four
Now we need to select the chair so that we can start the recolouration, and leave all that yellow background yellow. Our first step is to pick our Magic Wand tool from the floating menu as before, and click on the yellow background of the image again. Once we have the same running ants as we had before, we're going to invert the selection in exactly the same was as we did earlier, using the Ctrl/shift/i keys. Once you've done this, you should end up with an image like the one on the left, with running ants around our chair. Now for the real dramatic transformation !! Before we can apply the colours we want to the chair, we need to take that ugly yellow off it. We do this by using Desaturating. This process basically converts the image to greyscale, thereby allowing us to tint it with any colour or tone we want. |
|
To desaturate, we need to choose the Image menu, and then Adjust and then Desaturate. You can see where this option is in the picture on the left:
|
|
Now that the chair is a nice grey, we're going to make it that lovely chocolate coloured velvet by using the Variations tool. This is a gizmo that allows you to tint an image using variations of colours. This tool is sinfully easy to use, and it's by far and away the best way to get a nice colour range to choose from, short of hand colouring every pixel ! :o) You can see a picture of this tool to the right. To access it, we go back to the Image menu we already used for the desaturation, and from there select Adjust and then Variations. Once you have the window up, you can see that there are lots of possible versions of our chair, all in different colours. All we have to do, is choose what colours we'd like the chair to be. In this case, we're making the chair that lovely chocolatey velvet, so we need to add one dose of red, and one dose of yellow to the chair. |
|
All you do to add the doses is to click on the "More Red" box once, watch the central image of the chair change, and then repeat the process with the "More Yellow" box once. It's THAT simple, voila, one re-coloured image ! |
|
We're on the home stretch now ! But first, we need to conclude our business with Photoshop. The first thing we need to do is deselect the chair. If you haven't already made the chair image a full window by clicking the little square in the top right hand corner of the chairs window, then do so now. To deselect the chair, we first choose our magic wand tool, and click anywhere in the grey background that surrounds the yellow rectangle the chair sits in. This should make the running ants vanish. Next we need to zoom out from the image, so we select the Zoom tool, and click on the image whilst holding down the ALT key. This makes the magnifier zoom out rather than in. |
|
Our image is almost finished, but first, we have to Merge the layers together so that the t-mog will understand the file. All this means is that we're going to glue all the bits of tracing paper together. To do this, we need to use the layers menu.
In the top right hand corner of the menu is a small circle with an arrow in it. I've circled it in the red again on the picture above for you. All you need to do to merge the layers is click on this little circle, and from the menu that appears, choose Merge Visible. Once that's done, we now have one layer named "Background". |
 So now we have our completed image of the front of the chair. Next, we
need to change it to a file format that the T-Mog will recognise. To do
this, we need to put it back to the colour range it was before we started
fiddling with it earlier. So, we click on the Image menu, and choose
Mode---Indexed Color. You can see from the picture where these
commands are. Just click OK on the Indexed Color Box, choose "Selective"
from the pop-up menu which then appears, and it's changed back to it's
original format. So, the image is done, all we need to do now is overwrite
the original file that still contains the ugly yellow chair.
So now we have our completed image of the front of the chair. Next, we
need to change it to a file format that the T-Mog will recognise. To do
this, we need to put it back to the colour range it was before we started
fiddling with it earlier. So, we click on the Image menu, and choose
Mode---Indexed Color. You can see from the picture where these
commands are. Just click OK on the Indexed Color Box, choose "Selective"
from the pop-up menu which then appears, and it's changed back to it's
original format. So, the image is done, all we need to do now is overwrite
the original file that still contains the ugly yellow chair. |
|
Overwriting the file is easy, I promise ! ;o) All we do is save this new one with the same name, thereby replacing the original. So, we go to the File menu and choose Save As. Once we have up the save as box shown in the picture on the right, we go to the Sprite0300 folder and open it if it's not already, we then select the file Chair2-graphic_large_front_p.bmp, and make sure that the Format list is set to BMP.
|
|
That's it, we just click OK, click OK again on the "Are you sure you want to replace it ?" box, and yet again on the bitmap options box, and it's all done ! You can now close the window with the chair in it, and choose not to save it since we already have. You have now completed the first half of your chair ! Well done ! :o) Now, we need to repeat everything we did to the front image of the chair, and do it to the back image as well ! Tiresome I know, but it's the only way ! Once it's all completed to the back image, it should end up looking something like the picture on the left. :o) There we have it, both images of the chair fully re-coloured, now we move back to the T-mog, so you can now close Photoshop :o) |
|
Stage Five This is the last part of the process, and it's remarkably easy, the T-Mog does practically everything for you, all you need to do is occasionally click a mouse button :o) OK, so, now we've closed Photoshop, we should still have the T-Mog open in the background, so bring it up. Now, it should still have our chair selected as we left it, all we need to do now is Import the chair. As you can see on the picture to the left, all we need to do to import the files is press the Import button. I've been at that red ink again so you can see where it is in the t-mog :o) |
|
When the import button is pressed, we get a window asking us where to find the XML file. You can see this window in the picture above. The XML file is the lil thing that the T-Mog needs to be able to use the images we just altered. When we extracted the chair, the T-Mog automatically extracted this file along with the bmp files that we altered. So, all we need to do is find the folder to which our files were saved, and click on the file that ISN'T contained within the Sprite0300 folder. This is the XML file. |
|
Once the file is selected, click OK, and watch as the mog imports before your eyes ! |
|
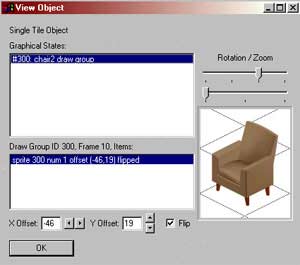
Now this is the really good bit where you get to sit back and look at your handy work !! This is the first time we can see our object actually as it will appear in the game. To do this, we just need to click on the View Object button that I've circled in the red again. |
|
Isn't it beautiful ?! A lovely chocolatey brown chair that YOU, yes YOU, made ! :o) Well, in honour of all this incredible t-mogging talent that you've displayed, you now need to add a description to your chair, so close the viewing window by clicking OK, and you end up back at the main window of the mog. |
|
All you need to do to alter the chairs' description, is click the Edit Object button that's next to the View Object button. Once you're done altering the name and description, just click OK, and that's it. We're done, you have now completed your first object and it's in the game ready for you to use ! :o) I hope you didn't have any trouble using this tutorial, and that you're happy now to go and try recolouring everything else in sight :o) Thanks for reading, Carmilla. ;o) |


|
 This
tutorial consists of several steps, all hopefully easy to follow, and
in theory laying out for you the easiest way to recolour an object using
the T-Mog, and Photoshop.
This
tutorial consists of several steps, all hopefully easy to follow, and
in theory laying out for you the easiest way to recolour an object using
the T-Mog, and Photoshop. 
 The
first step in recolouring is cloning. All this means is that
you're going to copy the existing ugly yellow chair, and make another
one that's exactly the same. To do this, we first have to find the chair
in the T-Mog list. It's listed under chairslr1tile.
The
first step in recolouring is cloning. All this means is that
you're going to copy the existing ugly yellow chair, and make another
one that's exactly the same. To do this, we first have to find the chair
in the T-Mog list. It's listed under chairslr1tile. 
 Once
you've renamed the file, hit ok. The mog will now clone the object before
your very eyes in a blur of text that will mean nothing to you, and
that you don't need to see as long as once it's done, you get this nice
green message "Transmogrifier Successfully Finished Cloning!" and an
ok button like the one in the picture on the right:
Once
you've renamed the file, hit ok. The mog will now clone the object before
your very eyes in a blur of text that will mean nothing to you, and
that you don't need to see as long as once it's done, you get this nice
green message "Transmogrifier Successfully Finished Cloning!" and an
ok button like the one in the picture on the right:
 <---When you press the button, you get the Export Whizzer up. From this
window, we decide what things we'll need to alter our object, and how
many zooms we need to export. Every time you use the magnifying
glass tool in the game, it uses a different image of an object, this
means that when you recolour or change the shape of an object, you need
to decide whether you want to alter the image for every zoom, or only
alter the picture for the largest image and let the game do the rest.
In recolour cases, it's generally ok to just alter the largest zoom's
image and let the game take the strain. If however, you want really
top notch Claw type objects, then you gotta get busy and alter every
image for every zoom.
<---When you press the button, you get the Export Whizzer up. From this
window, we decide what things we'll need to alter our object, and how
many zooms we need to export. Every time you use the magnifying
glass tool in the game, it uses a different image of an object, this
means that when you recolour or change the shape of an object, you need
to decide whether you want to alter the image for every zoom, or only
alter the picture for the largest image and let the game do the rest.
In recolour cases, it's generally ok to just alter the largest zoom's
image and let the game take the strain. If however, you want really
top notch Claw type objects, then you gotta get busy and alter every
image for every zoom.  So here we are all ready to move into alteration. If you haven't already,
then kick up Photoshop and go to File---Open. From here, find
the folder you created, and take a look at what it contains. As you
can see from the picture you should have another folder within it, called
something like "Mychair_sprites". Double click to open the folder,
and you find yet another folder named "Sprite0300". This
folder contains the images we need to alter the chair colour.
So here we are all ready to move into alteration. If you haven't already,
then kick up Photoshop and go to File---Open. From here, find
the folder you created, and take a look at what it contains. As you
can see from the picture you should have another folder within it, called
something like "Mychair_sprites". Double click to open the folder,
and you find yet another folder named "Sprite0300". This
folder contains the images we need to alter the chair colour. 
 Now for the fun part !!! :o) In order to change the image, we need to
select it. To do this, we use a neat little gizmo in Photoshop called
the "Magic Wand Tool". You can see where this is located on the floating
menu in the picture on the left.
Now for the fun part !!! :o) In order to change the image, we need to
select it. To do this, we use a neat little gizmo in Photoshop called
the "Magic Wand Tool". You can see where this is located on the floating
menu in the picture on the left. 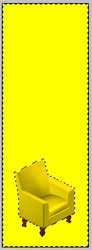

 In order to make sure that the legs on our chair remain the colour they're
meant to be...ahh...don't ya love wood effect ??...we need to make a
copy of them as they are, that we can glue back onto the chair when
we've changed its colour. To do this, we need to use Layers.
Layers are exactly as the name suggests. Try to imagine them as layers
of tracing paper over a drawing. You can see through them, and you can
put them in any order you like.
In order to make sure that the legs on our chair remain the colour they're
meant to be...ahh...don't ya love wood effect ??...we need to make a
copy of them as they are, that we can glue back onto the chair when
we've changed its colour. To do this, we need to use Layers.
Layers are exactly as the name suggests. Try to imagine them as layers
of tracing paper over a drawing. You can see through them, and you can
put them in any order you like. 
 Now we're going to select the legs of the chair on our copied layer
so that when we're done recolouring the chair, the legs remain the same
wood effect they were to start with ! To do this, we need to use the
zoom tool. You can see what it looks like in the picture on the
left, it's the little magnifying glass. Once you've got the zoom tool,
click on the chair once to enlarge it to a size you can actually see,
rather than squint at it. Usually one click is enough, especially if
you have a screen size any larger than 800x600! ;o)
Now we're going to select the legs of the chair on our copied layer
so that when we're done recolouring the chair, the legs remain the same
wood effect they were to start with ! To do this, we need to use the
zoom tool. You can see what it looks like in the picture on the
left, it's the little magnifying glass. Once you've got the zoom tool,
click on the chair once to enlarge it to a size you can actually see,
rather than squint at it. Usually one click is enough, especially if
you have a screen size any larger than 800x600! ;o) 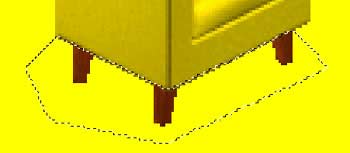 The Polygonal lasso is dead easy to work, all you do is click at the
edge of the thing you wish to select, and then just trace the shape
you want to cut out using mouse clicks everytime you want a bend in
the line. It's a bit like working with an electronic pair of scissors.
In the end, you should end up with something resembling the picture
on the left.
The Polygonal lasso is dead easy to work, all you do is click at the
edge of the thing you wish to select, and then just trace the shape
you want to cut out using mouse clicks everytime you want a bend in
the line. It's a bit like working with an electronic pair of scissors.
In the end, you should end up with something resembling the picture
on the left. 
 So, now we've made sure that the legs are going to remain the colour
Will Wright intended, we can recolour the ugly yellow bit of the chair.
First step is to make sure we're on the right layer. To do this, we
need to make sure we're on the background layer of the Layers menu by
clicking on the layer that says "Background".
So, now we've made sure that the legs are going to remain the colour
Will Wright intended, we can recolour the ugly yellow bit of the chair.
First step is to make sure we're on the right layer. To do this, we
need to make sure we're on the background layer of the Layers menu by
clicking on the layer that says "Background". 
 This should now have made your chair go greytone, and your yellow background
and chair legs remain as they were. You can see what this looks like
in the picture on your left. :o) You also still have the running ants
around the outside of your chair to show that it's only this part of
the overall image that you're altering, and not the whole thing.
This should now have made your chair go greytone, and your yellow background
and chair legs remain as they were. You can see what this looks like
in the picture on your left. :o) You also still have the running ants
around the outside of your chair to show that it's only this part of
the overall image that you're altering, and not the whole thing. 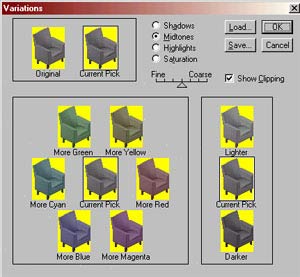
 So, just hit the OK button on the Variations window, and we're back
to our chair, all beautifully re-upholstered in chocolate brown velvet,
and still surrounded by running ants ! :o) At this point, save the image
we're working on, just to make sure, and remember, we're still saving
it as a photoshop file, PSD format. You may find that you haven't picked
up all the yellow of the chair because of the yellow background, so
you may need to select some of the chair-yellow-part manually (using
the magic wand, then Adjust & Variations) to correct this. Picking
up the yellow will be easier on a closer zoom.
So, just hit the OK button on the Variations window, and we're back
to our chair, all beautifully re-upholstered in chocolate brown velvet,
and still surrounded by running ants ! :o) At this point, save the image
we're working on, just to make sure, and remember, we're still saving
it as a photoshop file, PSD format. You may find that you haven't picked
up all the yellow of the chair because of the yellow background, so
you may need to select some of the chair-yellow-part manually (using
the magic wand, then Adjust & Variations) to correct this. Picking
up the yellow will be easier on a closer zoom. What you should have after all of that, is something resembling the
image on the left here.
What you should have after all of that, is something resembling the
image on the left here. 
 Again,
we see a whole load of gobbledegook, and that welcome mis-spelling "Transmogrifier
Successfulluy Finished Importing!" in green at the bottom. Just click
OK, and we've finished importing the object. Told ya it was easy ! :o)
Again,
we see a whole load of gobbledegook, and that welcome mis-spelling "Transmogrifier
Successfulluy Finished Importing!" in green at the bottom. Just click
OK, and we've finished importing the object. Told ya it was easy ! :o)
 The picture on the right is the Edit Object window. In this window,
you get to give your beautiful chair a name, and a description that
will show up in the blue boxes when you click on the object from the
list in the game. It's generally a good idea to put your name in the
description, and any credits you need to give when you use a free-to-clone
object and give your chair a nice price and name.
The picture on the right is the Edit Object window. In this window,
you get to give your beautiful chair a name, and a description that
will show up in the blue boxes when you click on the object from the
list in the game. It's generally a good idea to put your name in the
description, and any credits you need to give when you use a free-to-clone
object and give your chair a nice price and name. ![]()