
The Third Mog Tutorial
By Bunny Wuffles
 This
tutorial consists of several steps, all hopefully easy to follow, and
I am assuming you followed Carmilla's first tutorial in recolouring, and
my second tutorial on Easel making. If you didn't, you really should take
a look at least.
This
tutorial consists of several steps, all hopefully easy to follow, and
I am assuming you followed Carmilla's first tutorial in recolouring, and
my second tutorial on Easel making. If you didn't, you really should take
a look at least.
I use Photoshop 5.5, but I think the basics are pretty much the same (if not easier) in PSP. I am again assuming that you may not be too familiar with many of the Photoshop tools I am using - so forgive me in advance if I sometimes sound a little too basic ;o)
During the course of all this, you will learn how to reshape objects to change the look of them. This is your first real foray into making entirely new objects, and combined with the skills you have already learnt, you can now officially be called a Sims Object Master - and have more than enough skills to start your own sims site - or at least submit quality items to TSR :oD
So to recap: first time, we did a recolour. Last time, we did a retexture, and this time we are doing a reshape. In the sims world, "recolouring" has become a word to describe objects made by just altering the hue / saturation channels like we did with the brown chair; "retexturing" has become a word to describe objects made with a little more time, attention and a layered image, like our easel, and "reshaping" is increasingly being used to describe an existing object made to a different shape.
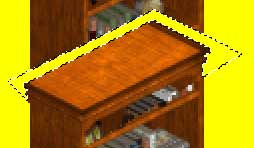
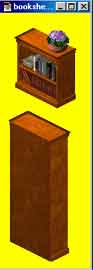
I thought we could start with the moderate bookcase from the game, make it smaller, and put some nice plants on the top. Of course, your sims won't be able to interact with the plants, but then that means no more watering which HAS to be a good thing, but they will still be able to read and learn from the bookcase as normal.
 OK,
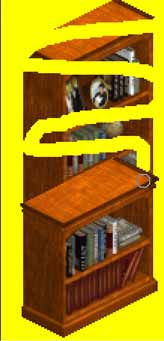
first fire up photoshop and TMog. By now you won't need me to give you
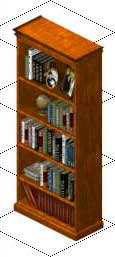
a picture to show you how to find your bookcase in TMog - but I will tell
you that the one we want is marked "bookcases / bookshelf - moderate"
and looks like the one on the left.
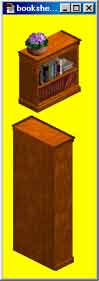
OK,
first fire up photoshop and TMog. By now you won't need me to give you
a picture to show you how to find your bookcase in TMog - but I will tell
you that the one we want is marked "bookcases / bookshelf - moderate"
and looks like the one on the left.
Check your cookie is there, clone your bookcase and give it your unique file name. You will recall from last time that I said it's a good housekeeping point to name all your objects starting with the same thing. You can find them easily in your folders that way, and if you intend distributing your objects (please do!) then it acts as an easily identifiable "makers mark" on your object. At the time of writing this tutorial, all my objects started with mif_, so I am naming my object mif_tutbookshelf.
If you recall, we now have to export the sprites to the folder we made for the brown chair and easel stuff. Click on the "Export Object File" button and you get the Export Whizzer window up. From this window, we decide what things we'll need to alter our object. And now comes a different instruction to what we are used to.
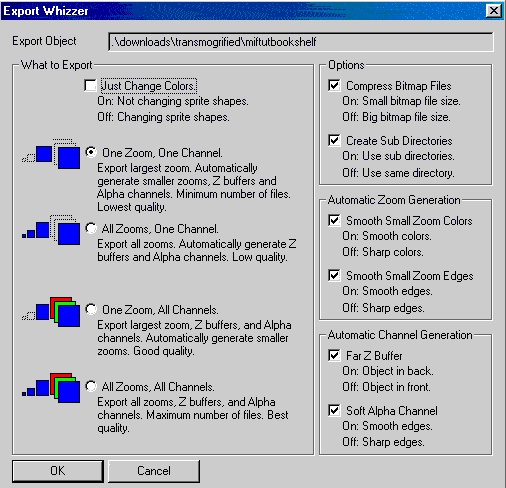 Previously,
we were not changing the shape of the object, so you
will recall that both times we checked the "Just Change Colors"
and "One Zoom, One Channel" options.
Previously,
we were not changing the shape of the object, so you
will recall that both times we checked the "Just Change Colors"
and "One Zoom, One Channel" options.
This time we are going to UNCHECK the "Just Change Colors" box. You will notice that all sorts of other boxes are now available for us to play with.
You will be relieved to learn that we can leave them as they are, so long as the "One Zoom, One Channel" box is checked again.
We are still not into the rarified dizzying heights of the Claw world of object making, so although it says "Lowest quality" do not let that put you off.
There are one or two other things we could do at this stage but I am trying to keep steps to a minimum here for the moment. However, later on in the series I will go into using the other options to make our objects even better than they are at present.
Once your export whizzer looks like this, press OK. We are now finished with the mog for the moment, so you can minimise or close it, depending on your preference / the speed & performance of your computer.
Go to Photoshop, open up your sprites folder, where inside you will find Sprite0400 with two files inside called bookshelf_large_back_p.bmp and bookshelf_large_front_p.bmp. Open them both up.
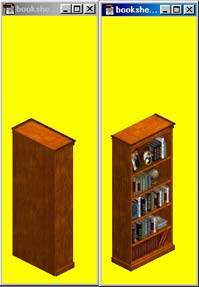
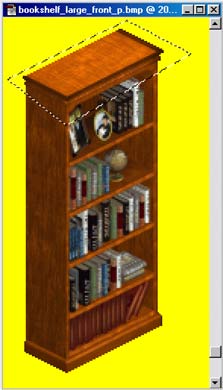
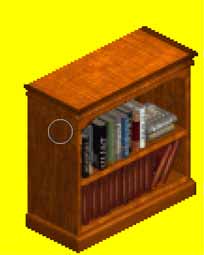
And here we are. Old faithful, the bookcase of aspiration and path to learning of many a sim.
While many a time during gameplay, I am sure you must have wondered how good it would be to have more rotations on the game. But now you're an object maker yourself, I am equally sure you are very thankful indeed that there are only four, and that most objects only have two views, and therefore only require two sprites to be altered. Despite appearances, the game objects are flat images, not 3D, and have fixed angles to work with. This makes life much easier for those of us only beginning to work with image manipulation :oD.
Although we are not going to be doing much colouring in today, you still need to change your two sprites to an RGB Palette, as we did before - using the Image menu, then Mode, then RGB Color. Do them both, but for now we are only going to be working from the front view. Doing this means that we can work in layers (remember our tracing paper book?) and if we make a mistake, we can easily delete a layer and / or use the History Palette to retrace our steps.
Before we go any further you should realise that, hateful as it is at times, that lovely shade of bright yellow in the sprite is your friend. Personally, I would be glad never to see it again, but as it is ABSOLUTELY necessary we have the EXACT shade of yellow as our background throughout our sprite, take your eyedropper tool, select the yellow and you will see it has become your default colour. Use the exchange colour arrow to put it as a background default. You should also do the same to make this yellow your foreground default as well for this exercise. We are going to be using this yellow a lot from now on.
In both of our previous ventures, by checking the "Just Change Colors" box, TMog would only pick up what was on the image shape. If you had a chair shape, and you scribbled ALL over the sprite, TMog would only show a chair with a few scribbles on. This time, by UNchecking the "Just Change Colors" box we have instructed TMog to pick up EVERYTHING within our sprite. So if you had a chair shape, and you scribbled ALL over the sprite, TMog would pick up a whole lot of scribble - which would look nothing like a chair.
In fact, TMog will now pick up everything within the sprite that isn't that exact shade of yellow. And it will. Believe me. Ever downloaded an object which has a yellow line around it? Yes, me too. Now we are starting to make entirely new objects, we will need to do certain things to our Photoshop tool defaults to insure against this happening to us. So let's just take a short detour into Photoshop land before we go any further.
More Photoshop tools, and a brief introduction to why anti-aliasing is NOT your friend.
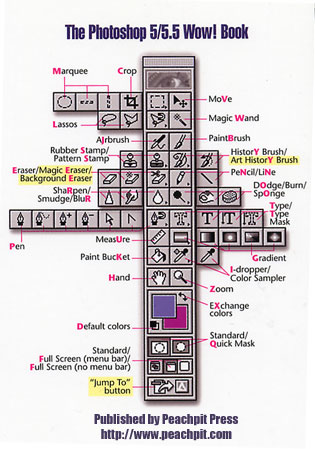
Can't remember which tool is which? Here's our reminder again. I am not being paid by them to say this, which is a great shame, but nevertheless I really can't recommend the Peachpit press WOW! books highly enough. They may be a little more pricey than most, but they take things step by step, are in full colour AND come with a tutorial disk.
I am sure that by what I have just said above you will have figured out we went the LONG way round to make our brown chair. You are absolutely correct, but hey, didn't it teach you to use your magic wand AND start you off on layers?
And now we are going to do a similar thing here. We are going to turn our anti-aliasing off in photoshop, even though it is not essential for this project (though a great help) but it will be invaluable for our next stage. So it is a good thing to get used to working this way, no? ;o)
Bunny Wuffles! Help! You said you weren't going to get technical, and now you are telling me about anti-aliasing?!
OK, don't worry.
Anti-aliasing is just a fancy technical term for the lovely fading blurry edges you get when using something like the smudge tool, for instance. But to TMog, the smudge tool is NOT your friend. In making any new object, that exact shade of yellow is essential for the background and any nice looking blurred / smudged version of it will show up in your game as a bright yellow edge.
A perfect new object actually would look strange in the P Sprite, as there is no blurring on the edges, just blocky pixels. And that effect is what we now need to achieve for our edges to be free from yellow blurring. Yes, it may look awful, and it is not something which you would do if you were reproducing a nice watercolour, but believe me, once TMog has finished with them, your objects will look great in the game, and not blocky at all.
Let's have a look at what I mean.
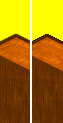 Here
are two bookcase images side by side. The one on the far left looks much
nicer than the one on the right; it blends in to its background and isn't
at all blocky. Let's have a closer look as to why this is.
Here
are two bookcase images side by side. The one on the far left looks much
nicer than the one on the right; it blends in to its background and isn't
at all blocky. Let's have a closer look as to why this is.
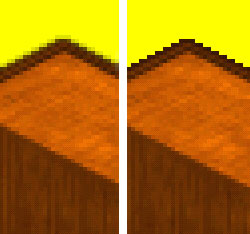 I
have enlarged the image to 400% to have a close look, and you can see
that the left hand image is blended in, while the right hand one is stepped
/ blocky.
I
have enlarged the image to 400% to have a close look, and you can see
that the left hand image is blended in, while the right hand one is stepped
/ blocky.
To the eye, the blended image is the better, but to TMog, the blocky one is the better one. This is because the blurred part of the image in the left hand object in TMog would end up as a yellow haze around our object which we do not want, whereas the blocky part would end up smooth in the game. There are other things we can do to our image to make the edges even smoother in the game and we will go on to address these in later tutorials.
Now just wait a minute there, Wuffles - some sites say that you should turn anti-aliasing off in the game to get rid of the yellow lines. Well, that may or may not be true; what I do know is that I prefer playing my game with anti-aliasing on and don't want to turn it off just for one or two objects. Besides, we are going to be GREAT object makers, aren't we. When was the last time you downloaded something of Claw's which had even the teentsiest bit of yellow edge? Nope, me neither. ;o)
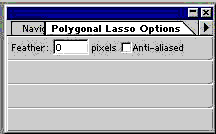
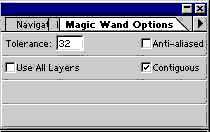
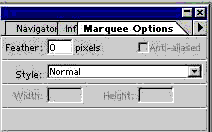
So, double-click the polygonal lasso tool to display its Options palette. Uncheck the Anti-aliased box in the Options palette. This double-click will bring up the options palette for any selected tool.
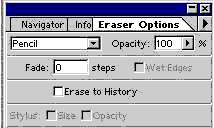
 You
will now notice that your polygonal lasso tool will only select in "stepped"
shapes. Great! That is exactly what we want. I have reset all my frequently
used tools like this so that I don't forget at a crucial moment and get
a slightly off-yellow shade somewhere in my sprite, so I suggest you do
the same to the following tools. Note that for me to be able to turn my
anti-aliasing off in my Marquee option, I had to select the circular marquee
first. This may just have been a glitch in my system, but I say this in
case you may have to as well ;o)
You
will now notice that your polygonal lasso tool will only select in "stepped"
shapes. Great! That is exactly what we want. I have reset all my frequently
used tools like this so that I don't forget at a crucial moment and get
a slightly off-yellow shade somewhere in my sprite, so I suggest you do
the same to the following tools. Note that for me to be able to turn my
anti-aliasing off in my Marquee option, I had to select the circular marquee
first. This may just have been a glitch in my system, but I say this in
case you may have to as well ;o)


With me so far? Then on to:
Stage Two
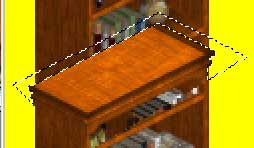
Chopping up that bookcase good and proper.
OK, we can now attack the bookcase. I am going to shorten this bookcase to only two shelves. The sims won't mind, as they only usually select books from the second shelf up anyway :o) So, I am going to use the magnifying glass zoom tool to get up close and personal with the sprite, then use our old friend the Polygonal lasso tool to get the lil ants to slice the top off the bookcase for us, like so:
 Notice
even through the poor quality of this screenshot that those obedient ants
have selected a stepped shape now our anti-alias is off.
Notice
even through the poor quality of this screenshot that those obedient ants
have selected a stepped shape now our anti-alias is off.
Use ctrl-c and ctrl-v to copy and paste the ant-defined section onto another layer. You can now use the move tool to put this layer into the desired position.
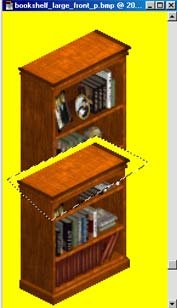
You will find that the yellow we have picked up with the bookcase "top" is making that a little difficult to do precisely.
Well, now we can use our anti-aliased magic wand tool to select all the yellow off our new layer and delete it, leaving us with just the bookcase top shape. Deselect the layer to give the running ants a rest, select the magic wand, click anywhere in the yellow next to the bookcase top and press delete.
 Turning
the anti-alias off has meant that we now have none of that yellow in places
where it shouldn't be. We can now deselect our running ants and position
our bookcase top a little more precisely.
Turning
the anti-alias off has meant that we now have none of that yellow in places
where it shouldn't be. We can now deselect our running ants and position
our bookcase top a little more precisely.
Because we did not select the top of our bookcase precisely, we still are left with some of the bookcase image we don't want. To get rid of this, it is much easier to move our new layer back onto the yellow background of the first layer, and use our shiny new anti-aliased-off-pencil-shaped eraser tool to just rub out the bits we don't want.
 Notice
how it erases in a pixelated shape with no blurry edges. As we said above,
this is not pretty, but TMog likes it that way. Use the zoom tool to get
as close as you need to. Because we are working in layers, the yellow
underneath is untouched.
Notice
how it erases in a pixelated shape with no blurry edges. As we said above,
this is not pretty, but TMog likes it that way. Use the zoom tool to get
as close as you need to. Because we are working in layers, the yellow
underneath is untouched.
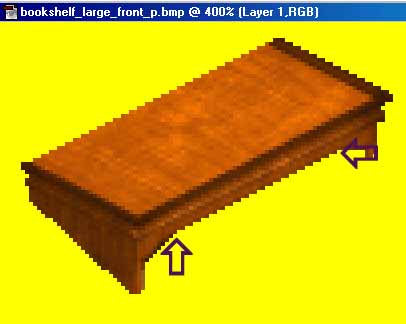 The
way the game is constructed, you will note from the top of the bookcase
that the stepping is two pixels wide each time for a straight edge.
The
way the game is constructed, you will note from the top of the bookcase
that the stepping is two pixels wide each time for a straight edge.
This is a useful thing to remember when we go on to create a brand new object as ALL straight edges in the game are two pixels wide, but for now you should ensure that this is the case on the underside of the bookcase, like so:
If you click your eraser at one point, hold down the shift key and move your cursor to the second point (or wherever you want it), you will erase in a straight line to that point. With practice you will be able to do a two-pixellated line in no time :o)
OK, now we have erased all the stuff we don't want, we can position the top of the bookcase exactly where we want it to be.
 Now
I don't know about you, but I don't like the way the wood doesn't blend
between the "old" bookcase and the "new" one. The
poor quality screenshot means this image here doesn't look too bad, but
the contrast in the wood grain and colour on my real sprite one is awful
and I am pretty confident that yours is too.
Now
I don't know about you, but I don't like the way the wood doesn't blend
between the "old" bookcase and the "new" one. The
poor quality screenshot means this image here doesn't look too bad, but
the contrast in the wood grain and colour on my real sprite one is awful
and I am pretty confident that yours is too.
However, you can't blend them together just yet as we are still working in layers, so we will come back to this in a moment.
Firstly, we have to get rid of the old bookcase. Go to your Layers palette and select background. Now grab your eyedropper tool, select the lovely yellow, select your pencil tool, choose your brush size and scribble away at the bits you don't want anymore!
 Don't
forget we are still working in layers, so you can scribble beyond the
edges of your new bookcase top to ensure you have gotten rid of everything
we don't want. But don't go too far down, because we still need the bottom
two shelves! Once you are satisfied, select Layer/Flatten Image
from your action bar to "glue" the two layers together.
Don't
forget we are still working in layers, so you can scribble beyond the
edges of your new bookcase top to ensure you have gotten rid of everything
we don't want. But don't go too far down, because we still need the bottom
two shelves! Once you are satisfied, select Layer/Flatten Image
from your action bar to "glue" the two layers together.
 Now
we can do something about that badly joined wood. Select the Rubber
Stamp tool from your toolbar. If you position that somewhere lower
on your image and alt-click, you will have put a small amount of
that wood image into your rubber stamp. Now click on somewhere where the
join is visible.
Now
we can do something about that badly joined wood. Select the Rubber
Stamp tool from your toolbar. If you position that somewhere lower
on your image and alt-click, you will have put a small amount of
that wood image into your rubber stamp. Now click on somewhere where the
join is visible.
When you press click, a tiny little white cross will briefly show up on the point where you did the alt-click. This is telling you that the rubber stamp is copying that portion of your image to where you are clicking now. Try clicking somewhere else with your rubber stamp - notice how the little white cross moves? This is so you can use the rubber stamp to blend with different images, and not use the same one everywhere you click. And don't worry if you make a mistake - that is what the history palette is for. Don't rubber stamp too near the edge of the bookcase though - you will get some smudges on that yellow which will show up in the game.
Now you have finished doing that, save your work. If you remembered from previous tutorials at the onset, you should have saved the original image under a new name, just in case of irreversible errors. Save this one as bookshelf_large_front_p.bmp because we want TMog to eventually read this one - that is, unless we give up totally and rename our original. But we aren't going to do that, are we.
No bunny, we aren't.
Good.
Let's press on then.
Bunny Wuffles, you said we were going to put some plants on our bookcase. And that is right, so we are. Open up your TMog again, and this time we are looking not to clone anything, but to export some sprites into our storage folder.
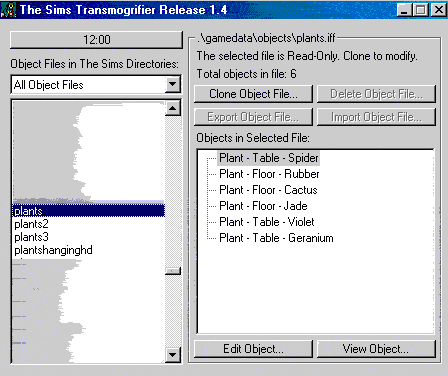 You
will see that from my copy of TMog, I will have to clone to modify. That
is because I made my files Read-Only to make my game load faster.
You may not have to do this; it may well be that your Export Object
File button is not greyed out and so all you need to do is Export
the sprites of your chosen plant to your usual storage folder.
You
will see that from my copy of TMog, I will have to clone to modify. That
is because I made my files Read-Only to make my game load faster.
You may not have to do this; it may well be that your Export Object
File button is not greyed out and so all you need to do is Export
the sprites of your chosen plant to your usual storage folder.
Although at present the Spider plant is highlighted, I am going to use the violet.
If yours is Read-Only as well, you need to clone the object file and then Export as normal. This will mean you now have two violets in your game, which of course you don't want. What I do in these cases is give the clone a new name starting with the word Sprite. I do this so that every so often I can go through TMog and delete any objects starting with the word "Sprite" safely knowing I am not deleting something important.
I will therefore not be calling the new file mif_violet, but Spritesviolet. If you have had to do this, once you have exported the sprites, use TMog to find the object file Spritesviolet and use the Delete Object File button to get rid of it. You will still have the image sprites in your usual folder for future reference, but not have to have two violets in your game. Phew. You may also gain some amusement from the pop-up box when you click the Delete Object File button - I know I do ;o) Don Hopkins certainly understands simmers.
I actually keep all sprites that I export in this way for future reference in a separate folder. Saves me having to go through all the rigmarole of cloning, exporting, deleting every time I want to make reference to that object again. But that's my preference, you may have your own system of organising all the spare sprite maps & .xml files (the recycle bin.....)
In Photoshop, find & open up your violet sprites folder and be amazed at just how many sprites one little plant needs. Four folders! But each only contains one sprite, and the only ones we are interested in are the pot and the plant. Now it is my choice to want a healthy looking plant on my bookcase. But there are those of you who may want something a little more realistic - like the dead version. That is your choice, but for the purposes of this tutorial, I am going to select the sprites within the folders sprite0150 (the pot) and sprite0151 (healthy_large_all_p.bmp).
 And
now it's magic wand time.
And
now it's magic wand time.
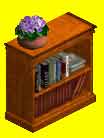
You don't need to convert the violet sprites to RGB, just magic wand somewhere in the yellow, right click & select inverse, ctrl-c to copy, and ctrl-v paste the pot to your bookcase. Now do the same with the plant. We have created two more layers on top of our bookcase. Remembering to select the appropriate layer from the layer palette, position the plant and its little clay home wherever you want it. Preferably on top of the bookcase. Of course, for your alien home, it can go anywhere within the yellow - put it near the top and in your game it will appear to be hovering in mid air. But again, for the purposes of this tutorial, I am assuming this bookcase is to be for Mr & Mrs Average Sim, and so mine looks like this:
You can repeat this process as many times as you like. Want three pot plants? Have three pot plants. Want a geranium as well as a violet? Just export the geranium sprites and do the same with that. Want an alarm clock and a geranium and a violet? Dirty dishes? Well, you get the picture by now. Don't forget, the sims don't need to water these plants, and the alarm clock won't wake up even the most sensitive sim. And even the most dedicated flies will leave those dishes alone (but so will Servo).
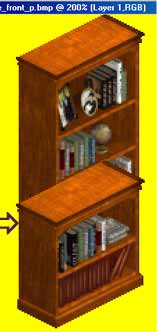
Happy with your results? Then glue the image together with Layer/Flatten Image from your action bar, change the colour mode back from RGB to Indexed / Selective (image/mode/indexed/selective) and save. Don't forget, you have to save your image as bookshelf_large_front_p.bmp otherwise TMog will ignore it - and all your hard work - completely. Want to have a look at what your new bookcase will look like in the game? Open up the mog again, and find your new bookshelf under the name you saved it as, then press the import object file button, and then choose view object.
It is at this point where you realise we have not done anything to the BACK of the bookcase ;o) But doesn't it look good from the front! Click on the white grid in TMog to make it a black background. No yellow anywhere? On any rotation or scale? Great!
Nearly done now, because.....
Stage Three
Is back of the bookcase time.
You now have a choice as to what you want to do to the back of the bookcase, and that all depends on your style of gameplay, and what you anticipate your downloading audience will want for their games as well.
Some gamers don't like to see the backs of objects in their games, and prefer the backs to be blank / invisible / "backless". Many artists have been doing pictures / tapestries like this for some time, and there are a number of sites which now offer tall bookcases and other tall objects in the same way. As this is only a small bookcase, it won't obscure gameplay; will be pretty from the back; AND as I am a hard taskmistress and you need to know how to do this anyway, we will do this the hard way round - as you would expect me to say at this point. But because I am a generous bunny as well, I will show you both options :o) A third option which is gaining popularity is to make the back of a large object transparent or "see-through" - I will go on to show you how to do this in a later tutorial and perhaps even workshop.
Go back to Photoshop, and maximise / open your bookshelf_large_back_p.bmp sprite.
- To make the bookcase invisible from the back: Just colour the whole sprite in with that lovely yellow. Yes, all you need do is select your pencil tool, choose a big brush size and scribble away until nothing remains! Change the colour mode back from RGB to Indexed / Selective (image/mode/indexed/selective) and save your image as bookshelf_large_back_p.bmp. Open up the mog again to find your bookshelf, press the import object file button, and then choose view object. You should see a grand old nothing on two rotations. No yellow squares, no bookcase, nothing. In fact, TMog should only show a small white square for two rotations, instead of our familiar grid. If backless is what you really want from a bookcase, you're now finished! All you need do now is change the description using the Edit Object button on the TMog, and your bookcase is all ready to be bought by a grateful sim.
To make your bookcase visible from the back: Have both your sprites open side by side - the front view and the back view. We are going to be using layers again, so in your front view sprite, using your magic wand, just click somewhere in the yellow, right click & select inverse, then ctrl-c to copy the little bookcase image. In your back view sprite, ctrl-v paste your front view. Your back view sprite should now look something like this:
Do the colours of the front view look weird? If so, check that you changed the colour mode of the back view to RGB. If you didn't, use the history palette to get rid of the front view image, change the mode now, and ctrl-v the new layer on again. Working in your new layer (the front view), go to the action bar and edit/transform/flip horizontal. Your sprite should now look like the one on the right:
Use the move tool to bring the front into the exact position with the bottom right hand corner of the back view. Again, I like to get up close and real personal when lining images up, so use your magnifying glass zoom tool to get as close as you like.
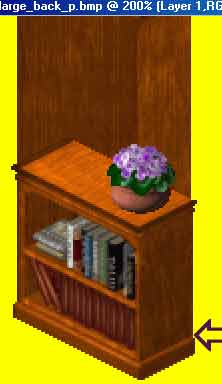 Move
into position so it looks like the image on the left.
Move
into position so it looks like the image on the left.
The purple arrow shows the point where the two images should meet exactly.
They are both the same shape at this point, so it is a good point to choose to line them up against each other.
Now, we
take our eraser tool, and rub out the front bookcase image up to the new
top of the bookcase. Like so: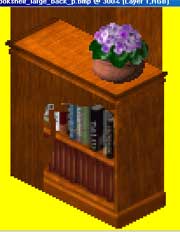
Now is a good time to get some practice in with that erase-in-a-straight-line trick we learned earlier. You might like to get up even closer with your zoom tool. I like 400% for detailed work like this, but of course, that is up to your own personal preference. Remember, each "straight" (but really diagonal) line in the sims is two pixels wide each step.
OK, now we're almost done! On your layers palette, choose the background layer, and get that yellow pencil scribbling again over the back of the bookcase, ensuring that like last time, you don't scribble out what we need. You can't hurt your plant as you are working on the background layer - behind the plant. But don't go too low down behind the top layer, or else you will take out some of the bookcase back that we DO need. Remember, you can always use the history palette to go back on any mistakes.
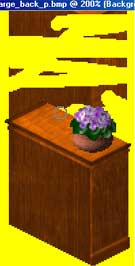
Once you are satisfied, select Layer/Flatten Image from your action bar to "glue" the two layers together, change the colour mode back from RGB to Indexed / Selective (image/mode/indexed/selective) and save. Don't forget, you have to save your image as bookshelf_large_back_p.bmp otherwise TMog will ignore it. Open up the mog again, find your new bookshelf, press the import object file button, and then choose view object. OOOOOO! A shiny new, reversible small bookcase! Complete with plant / plants / plant & alarm clock / plant and dirty dishes / plant and whatever else you chose. Click the grid to turn it to black, check for any yellow squares (there shouldn't be any, but you never know - they can be very determined little pixels at times) - make sure it is fine from all rotations and angles and you're finished! All you need do now is change the description using the Edit Object button on the TMog, and your bookcase is all ready to be bought by a grateful sim.
If you have downloaded the useful and amusing tool The Sims Menu Editor (linked to from my first page) you can change the name of the interactions that appear on the pie menu! The instructions are very simple to follow. Open it up, and it should look like this:
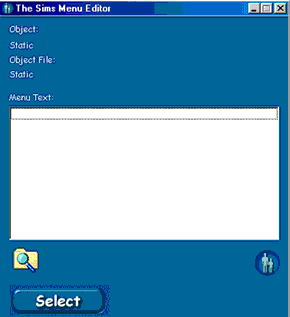 I
really cannot give the instructions in plainer English than the official
site do - truly! - so here they are in full:
I
really cannot give the instructions in plainer English than the official
site do - truly! - so here they are in full:
Step
1:
-------
Click on select and load the .iff file you want to change the name of
the interactions of. You can also drag the .iff file from the Windows
Explorer to The Sims Menu Editor. A list of the available interaction
names will appear. Note that sometimes interactions that are never available
will also be included. Changing these will have no effect.
Step
2:
-------
Double click on the interaction name you want to change. It will ask you
for the new name for this interaction. Enter it and click on OK. Click
on the close button ( X ) to cancel.
Step
3:
-------
After you make all your changes click on Save.
You're
Finished!:
-----------------
Next time you load the game and click on this object the new interaction
names will appear.
Now you know how to make a shiny and spankingly brand new reshaped object with a new pie menu. Wahey! The sim world is now your oyster. Or whelk, at least. Like my other tutorials, the principle is the same for changing any object in the way prescribed. If you want to change the colour of the wood of the bookcase but not the books or plant, use the skills in recolouring in layers and precise use of the polygonal lasso tool you learned in the chair tutorial. If you want to put a new texture on the wood, use the skills in skewing and resizing an image you learned in the easel tutorial. If you want a three shelved bookcase....well, you know what to do by now!
Next time, we will make a totally brand new object!