
Brick Work with Bunny Wuffles
 This
tutorial consists of several steps, all hopefully easy to follow, and
I am assuming you followed the first three tutorials. If you didn't, you
really need to, as I will be constantly referring back to key skills you
learnt each time.
This
tutorial consists of several steps, all hopefully easy to follow, and
I am assuming you followed the first three tutorials. If you didn't, you
really need to, as I will be constantly referring back to key skills you
learnt each time.
I use Photoshop 5.5, but I think the basics are pretty much the same (if not easier) in PSP. I am again assuming that you may not be too familiar with many of the Photoshop tools I am using - so forgive me in advance if I sometimes sound a little too basic ;o)
During the course of all this, you will learn the first steps in how to make an entirely new object.
To recap: first time we did a recolour, second time we did a retexture, third time we did a reshape, and this time we will do a new object. In the sims world, these definitions have emerged to distinguish object types from each other:
- "recolouring" has become a word to describe objects made by just altering the colour with hue / saturation & other similar channels as we did with the brown chair;
- "retexturing" has become a word to describe objects made with a little more time, attention and a layered image as we used in our easel;
- "reshaping" is increasingly being used to describe an existing object made to a different shape as with our bookcase;
- "new object" is used to describe an object which is an entirely new shape from the base object it was cloned from.
I thought this time we could do something nice for a roof garden - a pine tree in a large brick planter. As you no doubt have found out by now, normal outdoor plants & trees in the game cannot be placed indoors or upstairs. To make my indoor palm trees and roof garden plants, I basically cloned a sculpture and pasted a sprite of a plant on top - so although they LOOK like trees, the game thinks they're statues. Cooptwin has made a droppable sculpture base, and for larger plants like this one will be, you may want them dropped/invisible when you play with walls cutaway or down.
That is your choice totally, and if you do, in the BunnyWufflesTutorialKit zip file I have given you with Coop's kind permission the base object (called DropLion and priced at §1 in the game) to install in your Safe To Clone folder. If you want your object droppable, unzip & install this BEFORE opening TMog, otherwise it won't show up there. If you don't want your object to be droppable, use the normal Vegas stone lion as the base; it won't look any different for the purposes of this tutorial.
We are going to be using some of the retexturing skills we learnt in the easel tutorial, and for this we need some nice brickwork, and some soil texture or ground cover texture. Again, you have a choice here.
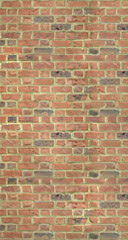
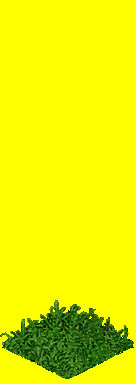
I am using my brick template from a digital photograph which I took of a real wall & siminised for my Brunel theme, and a texture I have saved in my sprites folder of Koromo's original ground cover which I used extensively in my Palm House theme. You can also use these if you like (just right click the images on the left and save as), but because you are using somebody else's images and base object (if you want it droppable) with permission, you should abide by the rules laid down in the Recolourers Resource Page - for ease of reference, all you need to do if you use these images is copy and paste the following or similar into your object description & on your web page:
Undergrowth image from Koromo at http://members.lycos.co.uk/persimmongrove/ ; brick image from Miffy at http://sas.woobsha.com/. Base object hacked by Cooptwin at Another #%*& Sim Site http://www.angelfire.com/retro/vinylp_ants/Stuff.html
Even if you don't intend putting your stuff on a web site, this is a good habit to get into because you never know when or where you might distribute the object. And should the time come when you actually DO put your stuff up on a web site, you won't have to think about going back and re-editing the description. Which is tedious and soul-destroying. Take it from one who knows. :o(
OK, now we have your textures, it's time to fire up Photoshop and TMog. By now you won't need me to give you a picture to show you how to find stuff in TMog - but I will tell you that the object we are looking for is either marked "droplion" or "sculptures2 / sculptures Vegas3", depending on whether you want it droppable or not. Mine will be droppable, due to popular demand, but that is entirely up to you and your style of gameplay and what your anticipate your target audience's gameplay will be. From now on the process will be exactly the same and the sprite names are identical.
Check your cookie is there, clone your chosen lion and give it your unique file name. You will recall from each previous time that I said it's a good housekeeping point to name all your objects starting with the same thing. I am sure by now you are realising the wisdom of doing this, as you can find your own stuff very easily in your folders that way, and as I encouraging you to distribute your objects, this acts as an easily identifiable "makers mark" for your stuff. At the time of writing this tutorial, all my objects started with mif_, so I am naming my object mif_brunelrooftree. I will add this tree to the Brunel theme set, as you can see by the name.
As you should be familiar with the process by now, you should know that you now have to export the sprites to the folder we made for the brown chair, easel stuff & tiny bookcase. Click on the "Export Object File" button and you get the Export Whizzer window up. From this window, we decide what things we'll need to alter our object.
Remember last time we used a different instruction to what we had done before? Before our bookcase, we were not changing the shape of the object, so we checked the "Just Change Colors" and "One Zoom, One Channel" options. As we obviously ARE changing the shape of the object, we are again going to UNCHECK the "Just Change Colors" box.
Once again you will notice that all sorts of other boxes are now available for us to play with. You will be relieved to learn that we can STILL leave them as they are, so long as the "One Zoom, One Channel" box is checked. Much as we have improved greatly in our TMogging skills, we are still not into the rarified dizzying heights of the Claw world of object making, and a new object created in this way is ideal for the TMog to handle rather than us trying to do it ourselves. That part comes later in our progress, and for the moment I am keeping things to the minimum to get you used to each part of the process at a time.
Here is the graphic from last time, to remind you what should and what should not be checked in your options. Ignore the bit where it says miftutbookshelf; the export options are identical.
Once your export whizzer looks like this, press OK. We are now finished with the mog for the moment, so you can minimise or close it, depending on your preference / the speed & performance of your computer.
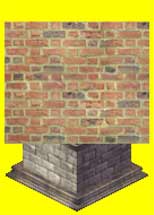
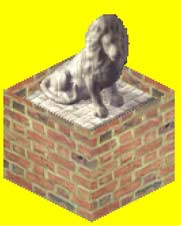
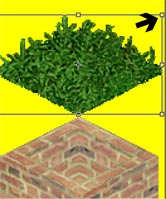
Go to Photoshop, open up your lion sprites folder, where inside you will find Sprite0800 with two files inside called Vegas-3_large_back_p.bmp and Vegas-3_large_front_p.bmp. Open them both up and they should look like this:
 This
is a good base object to start with for new objects, and the reason for
this is because if you look, the base of the statue takes up nearly a
whole tile in the game. For my mock gables and sectional roof garden pieces,
this was an ideal place to start to learn how to fill one entire tile
without any gaps. There are other tricks which are useful for filling
an entire tile which I will teach you in further tutorials, but for now,
this lion is really a good thing to start with. And unlike some other
sculptures, it fits against a wall at all four rotations.
This
is a good base object to start with for new objects, and the reason for
this is because if you look, the base of the statue takes up nearly a
whole tile in the game. For my mock gables and sectional roof garden pieces,
this was an ideal place to start to learn how to fill one entire tile
without any gaps. There are other tricks which are useful for filling
an entire tile which I will teach you in further tutorials, but for now,
this lion is really a good thing to start with. And unlike some other
sculptures, it fits against a wall at all four rotations.
Change your sprites to the RGB Palette, as we always do - Image/Mode/RGB Color. Do them both, but for now we are only going to be working from the front view. You will recall that doing this means that we can paste an outside image in and retain its original colours, and also work in layers (remember our tracing paper book?) . And as always, don't forget that if we make a mistake, we can easily delete a layer and / or use the History Palette to retrace our steps.
We need to have that lovely yellow background again throughout our sprite, so take your eyedropper tool, select the yellow and you will see it has become your default colour. Use the exchange colour arrow to put it as a background default. You should also do the same to make this yellow your foreground default as well for this exercise. We are going to be using this yellow a lot from now on in this tutorial.
If you need to remind yourself why, this is because by unchecking the "Just Change Colors" box in the export whizzer we have instructed TMog to pick up everything within the sprite that isn't that exact shade of yellow. And it will. Believe me. Ever downloaded an object which has a yellow line around it? Yes, me too *sigh*. You will recall I went into significant detail last time as to why we should do this, and I will go on trust that you understand this without my having to go into so much detail again here :o) Photoshop should have remembered your settings from last time, but just in case, here is what the option menus on the main tools we will be using should look like:
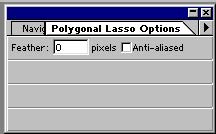


To get to the options menu, either double-click on the selected tool or choose the file-card tab top on the appropriate palette. Note that for me to be able to turn my anti-aliasing off in my Marquee option, I had to select the circular marquee first. This may just have been a glitch in my system, but I say this in case you may find you have to do this as well.
As we are still prepping up our workspace, we now need to go get our sprites for our pine tree. We will do this in the same way as we did the violet plant for our bookcase. Open up your TMog again, and this time we are looking not to clone anything, but to export some sprites into our storage folder. You will recall that I advised you to keep all sprites that you export in this way for future reference in a separate folder. I do this because it saves me having to go through all the rigmarole of cloning, exporting, deleting every time. But that's my preference, you may have your own system of organising all the spare sprite maps & .xml files (the recycle bin.....)
![]()
Because my files are Read-Only, my Export Object File button is greyed out, which means I will have to clone the pine tree first. You may not have to do this, but in any event, the object we are looking for is Trees / Trees - Pine . Export the sprites to your storage folder. You don't need to uncheck the "Just Change Colors" button, as we are not going to reimport this tree.
If your pine tree file is Read-Only as well, you need to clone the object file and then Export as normal. This will mean you now have two identical pine trees in your game, which of course you don't want. What I do in these cases is give the clone a new name starting with the word Sprite. So I will not be calling the new file mif_pine, but Spritespine. I do this because I invariably forget when I clone an object just for its sprites, and when at a later date when wandering through TMog I come across an object called Spritessomething I know I can safely delete it. Once you have exported the sprites, use TMog to find the object file Spritespine and use the Delete Object File button to get rid of it. You will still have the image sprites in your usual folder for use now and for future reference.
In Photoshop, open up your spritespine_sprites folder and you will find a further four folders inside. Each only contains one sprite, but we need to open them all up. The pine tree is a multi-tiled object, and you will see how that is from the positioning of each tree image within the sprite box.
Stage Two
Say goodbye, Vegas Lion, and hello, Brick
Planter.
I am sure you must have wondered while playing The Sims how good it would be to have more rotations on the game. But now you're an object maker yourself, I am equally sure you are very thankful indeed that there are only four, and that most objects only have two views, and therefore only require two sprites to be altered on a one tiled object. And, another good thing is that despite appearances, the game objects are flat images, not 3D, and have fixed angles to work with. How this is all going to change for Sims2 is anybody's guess, but I am reasonably confident that some form of TMog 3D will be developed for our use. After all, Maxis/EA know full well that the interest in The Sims has only really been maintained for so long because of its relatively easy customisability, and they would be shooting themselves in the foot if they didn't carry that onward to the next generation of simming.
In the meantime, we can use the fixed angles and small amount of rotations to our advantage!
You should now have your two lion sprites open in Photoshop, along with your brick image, your groundcover image and your four Pine sprites. You should also have changed your lion sprites into RGB mode. Before starting, if you are using another brick image and the bricks are not the correct scale for your sims game now is a good time to siminise / tile the image together. I am assuming you have made a couple of walls in your time and have experience in doing this :o)
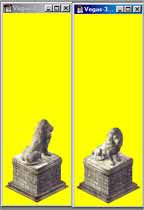
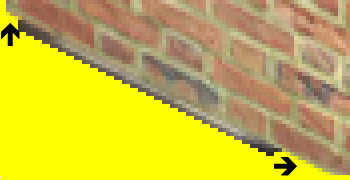
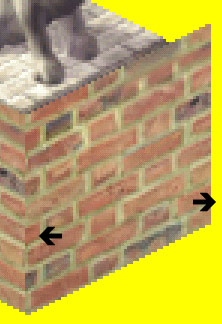
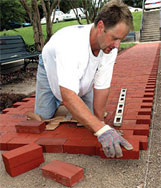 You may have discovered this by now, but objects in Real Life™ and
Sim objects are not always the same proportion. Just look at this bricklayer
on the left for example. The brick he is holding is almost dwarfed by
his hand. Now take a look at the picture on the right.
You may have discovered this by now, but objects in Real Life™ and
Sim objects are not always the same proportion. Just look at this bricklayer
on the left for example. The brick he is holding is almost dwarfed by
his hand. Now take a look at the picture on the right.
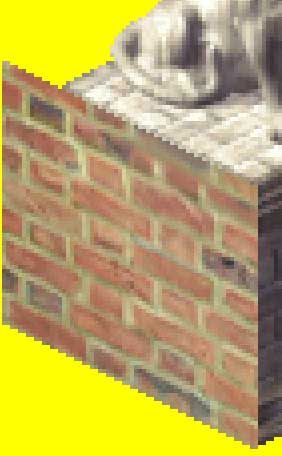
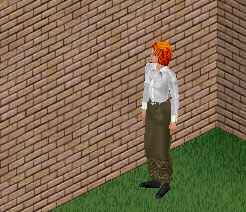 A sim, yesterday. Those bricks in the image on the right are some of the
smaller ones from the Maxis wall selection, and woah nelly they are a
LOT bigger than her hand. But they look in good proportion; any smaller
and the wall would be blurry and not too well defined. I have experimented
tons of times to try and get bricks in the game to be roughly the same
proportion as RL™ ones would be and they simply don't look that good.
A sim, yesterday. Those bricks in the image on the right are some of the
smaller ones from the Maxis wall selection, and woah nelly they are a
LOT bigger than her hand. But they look in good proportion; any smaller
and the wall would be blurry and not too well defined. I have experimented
tons of times to try and get bricks in the game to be roughly the same
proportion as RL™ ones would be and they simply don't look that good.
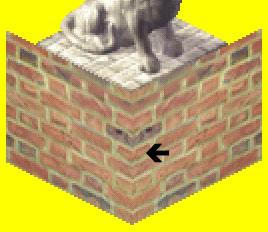
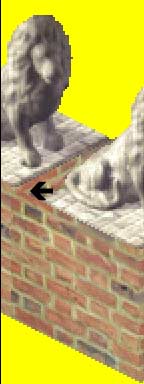
 But
having said that, it is important to get them in SOME approximate proportion,
unlike this picture of the same sim who has been transported to some awful
nightmare dimension where either she has shrunk dramatically or objects
around her have grown. A lot.
But
having said that, it is important to get them in SOME approximate proportion,
unlike this picture of the same sim who has been transported to some awful
nightmare dimension where either she has shrunk dramatically or objects
around her have grown. A lot.
I can safely say in all confidence that that is an AWFUL wall. Hideous. Appaling. The person who made that should be thoroughly ashamed of herself. Well, I would be if I actually made the wall as opposed to mocking the picture up which I actually did ;o)
The moral of this story is that if you are going to be working hard on an image, it is good to get the image right first, and spending a few moments scaling the bricks to a good proportion will make all the difference between a good object and a bad one.
 OK,
lecture over, and we can now start to layer our image together. Select some
of your brick image using the marquee tool, ctrl-c copy and ctrl-v paste
it on top of your front lion sprite. We now have two layers which should
now look something like this.
OK,
lecture over, and we can now start to layer our image together. Select some
of your brick image using the marquee tool, ctrl-c copy and ctrl-v paste
it on top of your front lion sprite. We now have two layers which should
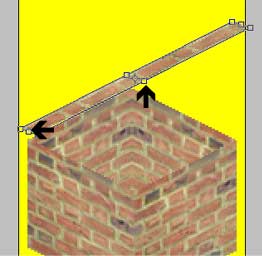
now look something like this.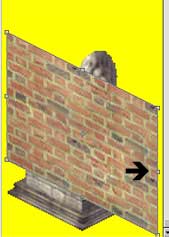 At
the moment, these bricks are of no use to us at all, as they are facing
forward and not at our 45° angle. We need to grab them but this time
using the Edit menu, then Transform, then Skew. This
gives us a boundary box around the bricks, with little boxes at strategic
points. Remember, we did this with the pictures for our easel. You can
skew the image up and down in different ways using these boxes, but as
I want to retain the overall shape, we will use the box marked to skew
the image down until it matches the angle of the picture in the background.
Like so:
At
the moment, these bricks are of no use to us at all, as they are facing
forward and not at our 45° angle. We need to grab them but this time
using the Edit menu, then Transform, then Skew. This
gives us a boundary box around the bricks, with little boxes at strategic
points. Remember, we did this with the pictures for our easel. You can
skew the image up and down in different ways using these boxes, but as
I want to retain the overall shape, we will use the box marked to skew
the image down until it matches the angle of the picture in the background.
Like so:
Deselect and move the brick layer into position. We are lining the bricks up with the bottom left hand corner of the base of the statue. You might like to get up close and personal with your lion sprite to do this; I like to zoom in at least 300% or 400% when lining things up, to get a precise match.
 If
you ARE in that close, you may also be noticing something which should
be setting little alarm bells off in the small but growing TMog Expert
corner of your brain.
If
you ARE in that close, you may also be noticing something which should
be setting little alarm bells off in the small but growing TMog Expert
corner of your brain.
EEK! Do I spy off-yellow pixels? I certainly do! These will most certainly show in your game. Why did this happen? Because the skew command anti-aliased the image. This can happen even if you have unchecked all the anti-alias boxes as instructed. If yours look like this or if you just want to check, flatten your image, save it under the original name as a .bmp image and import it back into TMog. Click in the white grid to view your object with a black background and just marvel at how much damage a slight variation of that lovely yellow can cause. Use the history palette to unflatten your image and "unsave" it back into a layered .psd document once you have had enough of torturing youself.
We learned a useful skill with the eraser tool in our last tutorial - If you click your eraser at one point, hold down the shift key and move your cursor to a second point you will erase in a straight line to that point. This is easier if your eraser is set at the smaller settings. You will recall that the pixellated stepping for "straight" lines in sims objects is two at a time, and now is a good time to get some practice in precise two-pixellated erasing, because we are going to be doing a lot of that later! :o)
 While
you're erasing, you can trim your wall to fit the left hand side of the
statue, like I have done in the image on the right. You can also see that
I have used my skills in two-pixellated editing along the top of the wall,
as I have decided to keep the planter the same height as the base of the
statue; this is a matter of personal taste, but as I try to get some realism
going in my objects, I reckon that a pine tree would probably need at
least that much depth in which to grow.
While
you're erasing, you can trim your wall to fit the left hand side of the
statue, like I have done in the image on the right. You can also see that
I have used my skills in two-pixellated editing along the top of the wall,
as I have decided to keep the planter the same height as the base of the
statue; this is a matter of personal taste, but as I try to get some realism
going in my objects, I reckon that a pine tree would probably need at
least that much depth in which to grow.
It is entirely up to us how tall we want our tree and planter to be. What you must bear in mind is that if any of the image goes beyond the sprite either at the sides or top, it will not show up in the game. And it is no good trying to increase the canvas size either; this sprite represents one square tile in the game and that is all there is to it.
Ew. If a bricklayer had made joins like those in my house, it would have fallen down long ago. A normal, everyday, common-or-garden housebrick is narrow at one end and long at the other. And so will our sim bricks be. It's up to you, you can keep it like this or not; but whichever way you decide on I think it is a good time to save our image. Remember the way we save our work - under the original sprite name but as a .psd document, so that we can continue working in layers.
 If
you want to make a good object, you need to have realistic sim bricks
so use the History Palette to get rid of the horizontally flipped wall
as we are going to go all the way back to the top of this page, to where
we select some of your brick image using the marquee tool. Ctrl-c copy
and ctrl-v paste it on top of your front lion sprite. We now have three
layers which should now look something like this.
If
you want to make a good object, you need to have realistic sim bricks
so use the History Palette to get rid of the horizontally flipped wall
as we are going to go all the way back to the top of this page, to where
we select some of your brick image using the marquee tool. Ctrl-c copy
and ctrl-v paste it on top of your front lion sprite. We now have three
layers which should now look something like this.
Use your Edit/Transform/Skew skills and your skills in two-pixellated editing (don't forget to do the off-yellow line along the bottom of the new layer) to trim and move the new layer into place, matching up your edges so that for each long brick section on the left hand side, we have a small brick section on the right hand side. You may need to trim the left hand side of your new layer to get this effect, which should end up looking something like this:
Now THAT is more like it. Make sure that the yellow gap at the right hand side is the same size as the yellow gap at the left hand side. All OK? Good, now we can Layer/Flatten the image to blend the join in the middle together a bit better. You can use the smudge tool for this, or the rubber stamp skills you learned last time. Use a small stamp size for the best effect. OK, we have two walls completed!
We need to put the next two walls into place behind the lion. To do this, I'm going to show you a new and very useful trick in working with layers. With your magic wand tool, click anywhere in the yellow, right click/select inverse, ctrl-c copy and ctrl-v paste. You now have two layers, the background with your lion/wall and one with just your lion/wall. They should be lined up exactly on top of each other, but in case they aren't, line them up now.
Now go to your layers palette, and select background, as if we were going to be working in the background image. Instead, press ctrl-v again, to paste a THIRD layer. Hey presto, the new lion/wall layer is between the other two images! Move it about and you can see that it is behind the main lion image. Put it into position with the top left hand corner of the wall to make a third wall, like so:
And now you can happily delete the new lion statue AND the excess wall on the left hand side of the sprite. Once you are satisfied, repeat this process for the fourth wall.
Which should now all look like this:
It's starting
to take shape, isn't it? OK, now we need to get rid of that lion. 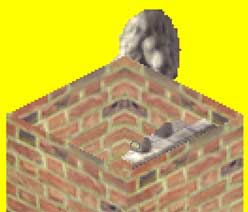 On
your layers palette, go back to Layer 1. Grab your eraser tool, and rub
out that lion and his base! Be VERY CAREFUL not to go too mad with the
eraser - because you will remember we flattened our image after adding
our first two bits of wall, and we don't want to rub out any of THAT hard
work, do we? Underneath your lion you will magically find your newest
layers of bricks - and another lion. This second lion is from your Background
image, and you should now choose Background from your layers palette and
carefully pencil over all traces of this lion with your lovely yellow
pencil.
On
your layers palette, go back to Layer 1. Grab your eraser tool, and rub
out that lion and his base! Be VERY CAREFUL not to go too mad with the
eraser - because you will remember we flattened our image after adding
our first two bits of wall, and we don't want to rub out any of THAT hard
work, do we? Underneath your lion you will magically find your newest
layers of bricks - and another lion. This second lion is from your Background
image, and you should now choose Background from your layers palette and
carefully pencil over all traces of this lion with your lovely yellow
pencil.
Now we
need to make those bricks look a little more like real bricks, because
at the moment, they appear to be paper-thin. We are going to give them
some depth - one brick wide. 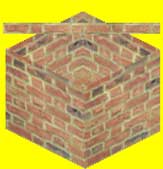 Go
back to your brick image, marquee off one row of bricks and ctrl-c copy.
On your brick sprite, ensure through checking your layers palette that
you are on layer 4, and ctrl-v paste the one row of bricks as another
new layer. Which should now look like this:
Go
back to your brick image, marquee off one row of bricks and ctrl-c copy.
On your brick sprite, ensure through checking your layers palette that
you are on layer 4, and ctrl-v paste the one row of bricks as another
new layer. Which should now look like this:
 We
need to grab this row using Edit/Transform/Skew. Use the boxes
marked to skew the image down until it matches the angle of the picture
in the background. Like so:
We
need to grab this row using Edit/Transform/Skew. Use the boxes
marked to skew the image down until it matches the angle of the picture
in the background. Like so:
Once you are satisfied, move it into position, deselect, erase the excess brickwork, and repeat for all four walls. Because we are doing a multiple skew, you may well find that when you get up really close to your image, it is surrounded by the off-yellow pixels we may or may not have had in our last skewing exercise. Time for the two-pixel eraser again! Getting the angle of the skew is made easier by judging it against the angle of the existing bricks.
When you are finished, you should have 8 layers, and your overall image should look like this:
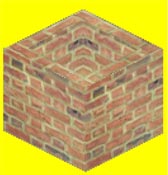 Can
you see that the bricks look far more realistic and 3D now they have a
top on? If you really want to be precise which I wasn't here, you should
line up the mortar between the bricks in the side and top views. But I
think this is fine for now; the object won't get too much scrutiny once
it is in the game.
Can
you see that the bricks look far more realistic and 3D now they have a
top on? If you really want to be precise which I wasn't here, you should
line up the mortar between the bricks in the side and top views. But I
think this is fine for now; the object won't get too much scrutiny once
it is in the game.
Still with me? Ready to add some greenery? YAY!!!
Stage Three
Gardener's World. Without the mulch.
 Ok,
it's time to plant our ground cover. First, on your Layers Palette, select
layer 5. This should have been the first of your small top layer of bricks,
and we want to plant the ground cover underneath these layers. Go to your
ground cover image, and if you are using the sprite I provided, use the
magic wand / right click / select inverse procedure to select the greenery
away from the yellow. Crtl-c copy the image, and ctrl-v paste it onto
your brick box. You should have now created layer 9, and your image should
look somewhat out of proportion - like so:
Ok,
it's time to plant our ground cover. First, on your Layers Palette, select
layer 5. This should have been the first of your small top layer of bricks,
and we want to plant the ground cover underneath these layers. Go to your
ground cover image, and if you are using the sprite I provided, use the
magic wand / right click / select inverse procedure to select the greenery
away from the yellow. Crtl-c copy the image, and ctrl-v paste it onto
your brick box. You should have now created layer 9, and your image should
look somewhat out of proportion - like so:
 If
you want to scale it down a little, and I do, then we need to grab the
greenery using Edit/Transform/Scale. Use the box marked to skew
the image down while holding the shift key down to scale in proportion
to your liking; like so:
If
you want to scale it down a little, and I do, then we need to grab the
greenery using Edit/Transform/Scale. Use the box marked to skew
the image down while holding the shift key down to scale in proportion
to your liking; like so:
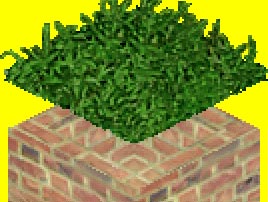
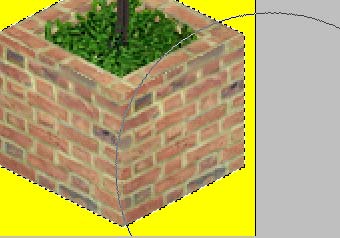
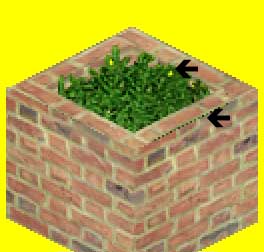 And
once it is slightly smaller, deselect and move the image down. Notice
how it magically goes "inside" the box! But also notice how
we have some yellow bits, and some other tidying up to do.....
And
once it is slightly smaller, deselect and move the image down. Notice
how it magically goes "inside" the box! But also notice how
we have some yellow bits, and some other tidying up to do.....
If we left the yellow bits as they are, they would show up as invisible in the game. You would have holes in your planter! Instead, it would be nice to see the bricks through the greenery, so use your eraser to get rid of the yellow AND the off-yellow. Also I need to get rid of the dark line where I have obviously been over-enthusiastic with the eraser on a previous layer. Don't forget, you are working in layers, so you can erase the lower greenery layer without affecting your top brickwork. Once you have finished, this might be a good time to save the image - do this as a .psd document as we will still be working in layers.
A slight digression here - but if you like the look of this planter as it is, you can flatten & save it now, copy and paste the image onto the other lion sprite, import back into TMog and you have a shiny new brick planter. If you want to have one like this AND one with a tree or something else in, it will be FAR easier to clone THIS object because all you will have to do then is add the tree/flowers/whatever else you are putting in it. And with no more messing around with bricks :o) In fact, like our bookcase, you can clone this as many times as you like and put as many different plants (or other things) in as you like.
But for now as I am sure you would expect me to say, we are pressing on with adding our tree.
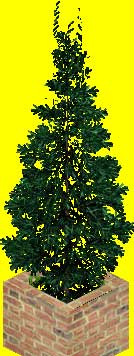
On your layers palette, make sure that layer 6 is highlighted. This will ensure that we don't paste our tree behind any brickwork we don't want to. Open up your four tree sprites, and select the tree bits using magic wand / right click / select inverse / ctrl-c and pasting them individually on top of your greenery brick box, which should end up looking something like this sorry specimen on the left:
Aww, poor tree. He obviously didn't get the right kind of nutrients when he was a sapling.
Let's do something about that, shall we? I'm going to leave you to play on your own a little bit here. Move the tree sprites round, until you are satisfied with the overall shape. Feel free to erase bits to get it to this point. Make sure you get rid of any and all yellow / off yellow bits that are below the box line. I don't recommend rescaling any of the bits, as this may produce some of that off yellow which is the bane of any TMogger's life. Make sure that some of your greenery layer is showing too. Don't forget, whatever bits of the tree go beyond the top or sides of the yellow sprite layer won't show up in the game. And you always have your history palette to go back on anything you decide you don't want after all.
Once you are satisfied with the shape, flatten your image, and continue working on your tree using tools like your yellow pencil & rubber-stamp until you are satisfied that it looks like the kind of tree you would want in a brick box in your roof garden. You have learned all those skills in the other tutorials and earlier in this one, so this should not present too much of a problem :oD
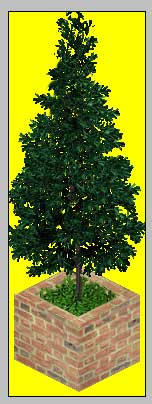
Mine looks like this:
A little different from a stone lion, eh? Save the image as a .bmp with the original name.
And now we have to do this all over again with the other lion sprite.
Well, OK, no we don't.
Only joking.
Bad bunny.
All you need do is go back to your sprite in Photoshop, Select/All then ctrl-c the image, ctrl-v the image onto the second lion sprite, Edit/Transform/FlipHorizontal and there you go! A nice new tree surrounded by nice greenery in a nice new brick planter. Flatten the image and save under the original name as a .bmp file.
Only one
more thing to do, and then we are ready to wind up the whole process.
This is a lovely 3D looking brand spanking new object, but there is something
else we can do to make it even more realistic - we are going to add some
shadows. If you recall the original lion statue, all that time ago, you
will remember that the shadow is on the right hand view.  With
your magic wand, click anywhere in the yellow underneath the brickwork,
right click and select inverse. We are now going to use a new tool - the
Burn tool.
With
your magic wand, click anywhere in the yellow underneath the brickwork,
right click and select inverse. We are now going to use a new tool - the
Burn tool.
If your box shows a different picture to this, don't forget that the holding the mouse-click over it will bring up different burning options. This symbol shown is the one you are looking for. Opinion is divided as to what this symbol actually is. DIY-ers may think it looks like a hot-air paint stripper, beauty queens may think it looks like a hairdryer, and the gourmand may think it looks like a hand with the thumb and forefinger together in the Universal Gesture of Lip-Smacking Approval. For myself, I have no idea what it IS, but what it DOES is wonderful.
 Have
a look at the Options palette for your burn tool. I keep my settings like
this, as they are all-purpose:
Have
a look at the Options palette for your burn tool. I keep my settings like
this, as they are all-purpose:
 Choose
a nice large brush; I like the 200 one, which I position like this. Because
we did the magic wand / select inverse thingy, our old friends the running
ants prevent us from altering the essential but eye-boggling yellow of
our background. Whatever we do while our ants are on the racetrack will
not affect the yellow one bit - almost like working in layers.
Choose
a nice large brush; I like the 200 one, which I position like this. Because
we did the magic wand / select inverse thingy, our old friends the running
ants prevent us from altering the essential but eye-boggling yellow of
our background. Whatever we do while our ants are on the racetrack will
not affect the yellow one bit - almost like working in layers.
And click. Once, twice, three times - to your taste. I like three times, but sometimes I settle for two depending on the object. Doesn't that give a lovely realistic shadow effect?
And best of all, we have finished with this sprite! Deselect your running ants, change the colour mode back from RGB to Indexed / Selective (image/mode/indexed/selective) and save under the original .bmp name. TMog won't recognise a .psd document, so be careful to change the mode to bitmap when saving.
Repeat this magic wand / burn / colour mode / save process with the other sprite. The shadows are in the same place for both sprites, that is why we have to do this now, rather than burning the shadow before we did the flip/horizontal actions.
Once you are satisfied, open up TMog again, find your new planter, press the import object file button, and then choose view object. Ohhh doesn't that look gorgeous. Click the grid to turn it to black, check for any yellow squares - of which you are bound to have some, if not lots. Why is this? Well, that is because those particular yellow bits are "off yellow", and so TMog doesn't recognise that they should be invisible.
Go back into your sprites and use our old friend the Polygonal Lasso Tool to select a random small shape of tree image, and using the move tool, copy & paste it over all the offending yellow bits. Although I mention it above, I don't really recommend rubber-stamping as this can actually make the yellow bits multiply - which you don't want. I have been a little naughty in telling you to do this above, but getting rid of the yellow bits is something you need to learn sooner or later and better sooner than later.
It helps to have Photoshop itself open on the screen but slightly minimised, so you can see the TMog image at the same time. You can then pick out what yellow can be kept from the yellow which must go. Once you have done this to your satisfaction, save and import again into TMog. Repeat as necessary :o)

I have prepared a standalone Masterclass with a number of ways for getting rid of yellow bits; rather than copy and paste the whole lot here, I suggest you continue for now and amend your object later. Unless of course you have already printed the tutorial off (well done! you're an angel!) and you can therefore just refer to it now.
There is only one more thing we need to do before we can wrap up our shiny new object and put it into our catalogue. Can you see where the square of the box does not match up with the square of the grid? This will mean that the object is not placed centrally in the tile once it is in the game, and that in turn will mean the object will not tile with itself or other square objects properly - and may also mean that the base of your object will "zebra stripe" when placed on a floor tile.
We can move the object within the grid by using the X and Y offset buttons to the left of your image. X & Y offsets are a topic all on their own and is something we will look at in more depth in later tutorials, but for the moment all you need do with this particular object is this:
 Experiment
with the buttons until the bottom of your box is exactly lined up with
the bottom of the grid. You will need to do this for ALL rotations, and
for ALL zooms. And now is the time that you retract all those wishes that
you could get closer / further away from your sims, and are grateful for
only having three zoom options ;o)
Experiment
with the buttons until the bottom of your box is exactly lined up with
the bottom of the grid. You will need to do this for ALL rotations, and
for ALL zooms. And now is the time that you retract all those wishes that
you could get closer / further away from your sims, and are grateful for
only having three zoom options ;o)
Once you are happy with this, all you need do now is change the description and price using the Edit Object button on the TMog, and your new tree planter is all ready to be bought by a grateful sim.
You are now ready to stun the world with your amazing offerings. You have the key skills now to make lots of gorgeous and unique things so go ahead and experiment! Build up a portfolio of stuff in styles which you like, or you think are missing from your game. And I would be delighted to see you start your own sims website with your new creations :o)