
Dress
up a Desk
By Bunny Wuffles
 This
tutorial consists of several steps, all hopefully easy to follow, and
I am assuming you followed the first four tutorials. If you didn't, you
really need to, as I will be constantly referring back to key skills you
learnt each time. Also, from this tutorial onwards, I do not take you
through the ENTIRE process; I will be leaving you to finish your work
by yourself once I am sure you have gained the key skills in which to
do so.
This
tutorial consists of several steps, all hopefully easy to follow, and
I am assuming you followed the first four tutorials. If you didn't, you
really need to, as I will be constantly referring back to key skills you
learnt each time. Also, from this tutorial onwards, I do not take you
through the ENTIRE process; I will be leaving you to finish your work
by yourself once I am sure you have gained the key skills in which to
do so.
Again, I suggest you print a hard copy of this so that you can make your own notes for your own reference (saves my bandwidth as well, and also your time waiting for the images to load up every time :o) )
I use Photoshop 5.5, but I think the basics are pretty much the same (if not easier) in PSP. I am again assuming that you may not be too familiar with many of the Photoshop tools I am using - so forgive me in advance if I sometimes sound a little too basic ;o)
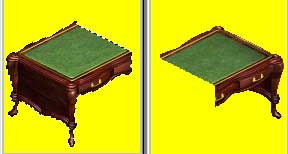
During the course of all this, you will learn how to retexture a two tiled object using Photoshop Layers and the Merge Down command. To do this, I thought we could take the Castle desk from Livin' Large and turn it into something more suited to the Turkish Baths theme.
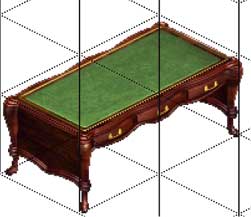
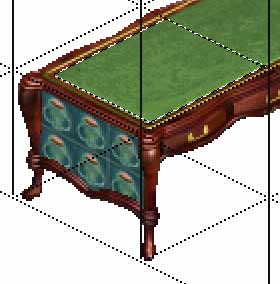
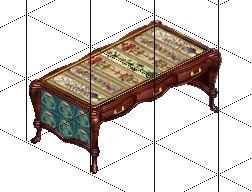
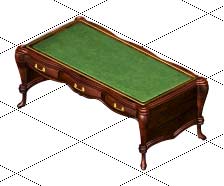 And
here it is. The style & shape of the object will fit in quite well
with that theme, so all it needs is a new top, and maybe something on
the sides as well.
And
here it is. The style & shape of the object will fit in quite well
with that theme, so all it needs is a new top, and maybe something on
the sides as well.
The easy way to do this would be to use the techniques learned in the two-tiled picture tutorial and the retexturing small objects masterclass. As we are only recolouring, we will be checking the Just Change Colors box to export, and you will remember that when we do this, we can put whatever we like into the yellow sprite colour as TMog will only pick up what lies within the original desk shape when importing. Or you could magic wand the yellow, create a new layer and paste whatever you like underneath that layer.
But I would like to introduce you to some new techniques which will help you in the creation of your own unique multi-tiled objects, so, like the brown chair tutorial, we will seem as if we are going the unnecessarily long way round at times, but my intention is that not only will you learn new key skills in Photoshop and TMog, but the more you practice, the quicker you will get.
Now the way I do multi tiled objects is probably very different to how others do them. As I said on the entry page to The Bunny Wuffles School of Sims Transmogrification, there are probably as many ways to make objects as there are object makers. But what you will see here is a way I discovered for myself as being the easiest for me as a visual person to line up the image for the sprites so that there is a seamless join. I am sure that by now you have experimented with TMog enough to find your own methods. For me, the more methods I know about the better, as I can combine, mix & match them to suit my own style of working. If my methods appear unconventional, then I apologise in advance, but I can honestly say that as a novice I get very good results from them easily and quickly - and so will you.
This may look complicated at first. But then, so did the brown chair tutorial when you first opened it all that time ago. Bear with me, take this one step at a time doing things as I do them, not trying to jump ahead or do several things at once, and this WILL get easier the next time you do it. That comes with the Bunny Wuffles Guarantee.
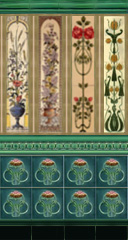
The texture I am going to use is from one of my walls for the Turkish Baths theme. You do not have to use this of course, but for ease of reference in this tutorial I will assume that you are.
These walls are based on a number of sources; a reproduction ceramic tile catalogue which I scanned & digital photographs which I took of real tiles in varying locations. You can also use this if you like (just right click the image and save as a .bmp), but because you are using somebody else's siminised images with permission, you should abide by the rules laid down in the Recolourers Resource Page - for my part, I am happy for you to put the following or similar into your object description & your web page:
Ceramic tile images by Bunny Wuffles at Architectural Supplies for Sims
Even if you don't intend putting your stuff on a web site, this is a good habit to get into because you never know when or where you might distribute the object - or want to go back to the site to find more stuff to match. And should the time come when you actually DO put your stuff up on a web site, you won't have to think about going back and re-editing all the descriptions. Which is incredibly tedious and time consuming. Take it from one who knows. :o(
OK, now we have a texture, it's time to fire up photoshop and TMog. The object we are looking for is desks2 - Desk-Castle:
 Check
your cookie is there, clone your desk and give it your unique file
name. You will recall from each previous
time that I said it's a good housekeeping point to name all your objects
starting with the same thing. I am sure by now you are realising the wisdom
of doing this, as you can find your own stuff very easily in your folders
that way, and as I encouraging you to distribute your objects, this acts
as an easily identifiable "makers mark" for your stuff.
Check
your cookie is there, clone your desk and give it your unique file
name. You will recall from each previous
time that I said it's a good housekeeping point to name all your objects
starting with the same thing. I am sure by now you are realising the wisdom
of doing this, as you can find your own stuff very easily in your folders
that way, and as I encouraging you to distribute your objects, this acts
as an easily identifiable "makers mark" for your stuff.
All my objects start with bun_, so I am naming my object bun_turkishladydesk. I will add this to the Turkish Baths set, as you can see by the name.
As you should be familiar with the process by now, you should know that you now have to export the sprites to the folder we made for the brown chair, easel stuff, tiny bookcase & tree in planter. Click on the "Export Object File" button and you get the Export Whizzer window up. From this window, we decide what things we'll need to alter our object.
As we are not changing the shape of the object, make sure the "Just Change Colors" and "One Zoom, One Channel" options are checked, press OK, and as we are now finished with the mog for the moment, so you can minimise or close it, depending on your preference / the speed & performance of your computer.
Go to Photoshop, open up your desk folder, where inside you will find two folders - Sprite0100 and Sprite0101 both with two files inside called something like left_large_back_p.bmp. Open them all up and they should look like this:

Change your sprites to the RGB Palette, as we always do - Image/Mode/RGB Color. Do them all, but for now we are only going to be working from the front view. You will recall that doing this means that we can paste an outside image in and retain its original colours, and also work in layers (remember our tracing paper book?) . And as always, don't forget that if we make a mistake, we can easily delete a layer and / or use the History Palette to retrace our steps.
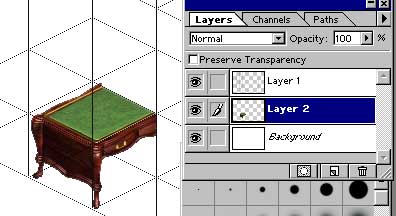
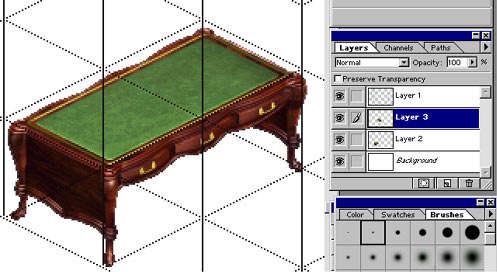
With me so far? Good :o) Time to go on to.........something completely different in the methods used so far. So far in our work with Photoshop layers we have only being using them for editing the image we are working on. But there are plenty of other uses, some of which we will learn about in this tutorial. There is one particular .psd document I made which I use as a base now all the time when constructing multi-tiled objects, which is this:
Recognise this? I have recreated the grid from TMog - only larger. This helps me position the sprite images exactly where they need to be in relation to each other, play with them to my hearts content and copy the final image back to the sprite with the minimum of fuss. How do I do this? By taking full advantage of the tracing paper effect. Remember we learnt in the second tutorial that Photoshop Layers are like working with a tracing paper book?
 What
you can see above & on the left is a .psd document containing two
layers - a transparent layer containing the grid dots, and a plain white
background. I included this file for you in the BunnyWufflesTutorialKit,
and you should save this document in your usual folder where you keep
your frequently referenced files. It is called 000BWGrid5x3.psd.
What
you can see above & on the left is a .psd document containing two
layers - a transparent layer containing the grid dots, and a plain white
background. I included this file for you in the BunnyWufflesTutorialKit,
and you should save this document in your usual folder where you keep
your frequently referenced files. It is called 000BWGrid5x3.psd.
The final bit of preparation is ensuring that Photoshop remembered your settings from last time. Just in case, here is what the option menus on the main tools we will be using should look like:
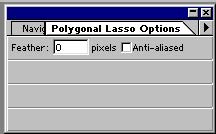

To get to the options menu, either double-click on the selected tool or choose the file-card tab top on the appropriate palette. Note that for me to be able to turn my anti-aliasing off in my Marquee option, I had to select the circular marquee first. This may just have been a glitch in my system, but I say this in case you may find you have to do this as well.
We are now going to play Photoshop Sandwiches with your newly unzipped grid, the RGB desk images from the sprites, and the .bmp texture image!
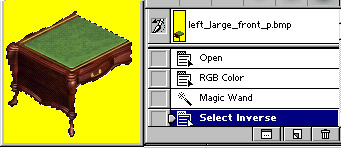
Go to your two front desk images, and using the Magic Wand, click anywhere in the yellow, right click & select inverse so that the lil ants pick up the desk image - as on the left below:
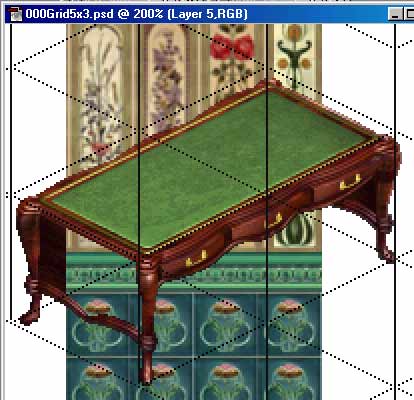
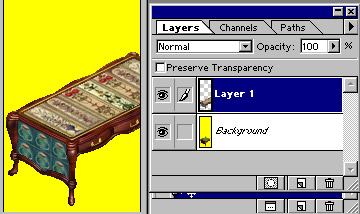
We are now going to Ctrl+c copy and Ctrl+v paste the desk inbetween the two layers of the grid. To do this, have the background layer highlighted as in the picture - anything you paste here will make a new layer on top of the background but underneath Layer 1 (the transparent grid).
So pasting our desk between them will look like this:
Move the half desk image around a bit, to see how you can move between the layers without affecting the other layers. Now position it in the box so that it will line up with both the grid and the next part of the desk. Because we have checked the Just Change Colors option when exporting, lining this half desk up precisely with the grid is not so important as lining it up precisely with the other part of the desk, but this is a good habit to get into for when you come to make your very own original multi tiled objects.
Do the same with the second part of the desk. I like to get up close and personal when lining up my images, so use the zoom tool here to your heart's content. You will note that we have now made a new layer 3, which sits on top of layer 2 but underneath layer 1 - the transparent grid.
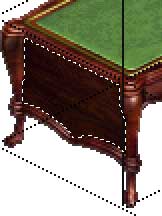
 If
the grid dots are getting in the way, click the little eye icon on Layer
1 to temporarily make this invisible. The layer is still there, and will
become visible again when you click the empty box where the eye icon should
be. I have drawn a little diagram to demonstrate this function for the
moment which you will see on the left, but I will go more into detail
on this in later tutorials as it is a very useful option indeed.
If
the grid dots are getting in the way, click the little eye icon on Layer
1 to temporarily make this invisible. The layer is still there, and will
become visible again when you click the empty box where the eye icon should
be. I have drawn a little diagram to demonstrate this function for the
moment which you will see on the left, but I will go more into detail
on this in later tutorials as it is a very useful option indeed.
Now this is where the fun REALLY begins!
Stage Two
Lasso, copy, paste, skew, scale, merge - all
in a day's work for a ceramic tiler.
 Let's
start off with the side of the desk section in Layer 2. Highlight Layer
2 in your Layers Palette, and using the polygonal lasso tool I am going
to mask off the sections I don't want to retexture such as the wooden
trim and the legs. The easiest way is to zoom right in and highlight the
plain side like so:
Let's
start off with the side of the desk section in Layer 2. Highlight Layer
2 in your Layers Palette, and using the polygonal lasso tool I am going
to mask off the sections I don't want to retexture such as the wooden
trim and the legs. The easiest way is to zoom right in and highlight the
plain side like so:
Then right click / select inverse / ctrl+c copy / ctrl+v paste so that we have yet another layer in our sandwich, Layer 4, and place the new desk section exactly on top of the Layer 2 desk section like so:
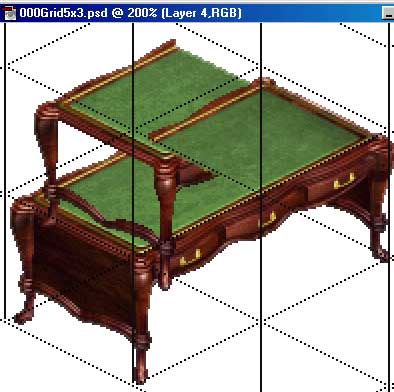
Move this new section around a little, and see how it falls between the two halves of the desk. Are you beginning to see more about how layers work? Let's have a little break to recap on what layers we have made and how they work:
Layer 1 is the top layer of our sandwich, and on our layers palette, it stays at the top. The converse applies to the Background layer - this is the bottom of the sandwich, and on the layers palette it stays at the bottom. The name (Layer 4, Background, Layer 1 etc) of the layers inbetween do not determine their position within the sandwich, so by just looking at the name/layer number they look as if they are not in order. To put a new layer in our sandwich, we lay it on top of the one below. So, if I were to paste another layer now, it would come on the palette on top of the highlighted 4 and underneath 3 but be called Layer 5.
Confusing? Think about our tracing paper book again, remembering that although the page names and the images on them are not constant, the first page in the book will always be the first page, the second page will always be the second page and the last page will always be the last page, even if the names and images change.
Here are the key points about layers:
- The number of the layer shows the order in which you created it.
- The position of the layers in the palette show their position in the sandwich.
- The highlighted layer is the one you are currently working on. You can highlight any layer at any time to work on it individually.
- To paste a new layer on top of another layer, simply highlight the one you want to have directly underneath the new one before pasting.
The true beauty of working like this will become apparent in a moment when we place an image between two layers and merge some of the layers together to become one layer.
OK, time to go back to our desk, and move the new layer 4 so it fits exactly on top of the original desk image so it once again looks like this:
Highlight layer 2 in your Layers palette and go to your new texture image, select all & ctrl+c copy. Paste this on top of layer 2 but underneath layer 4, so the image looks like so:
Can you see what has happened? We are working between the layers with our new texture. Now you can decide which part of the new texture you want for the side of the desk. I am going to use the lower blue & green tiles for the sides, and the coloured sets for the top of the desk, but of course you may choose otherwise. Simply erase the parts you don't want to make the image smaller and easier to work with. Don't forget, you can use your eraser in all safety, as you are working only in this one layer - so long as Layer 5 remains highlighted in the layers palette. The desk pieces should all remain intact.
 At
the moment, these tiles are of no use to us at all, as they are not only
too large but are facing forward and not at the 45° angle needed for
the game. We need to grab them using the Edit menu, then Transform,
then Scale, followed by Edit/Transform/Skew.
At
the moment, these tiles are of no use to us at all, as they are not only
too large but are facing forward and not at the 45° angle needed for
the game. We need to grab them using the Edit menu, then Transform,
then Scale, followed by Edit/Transform/Skew.
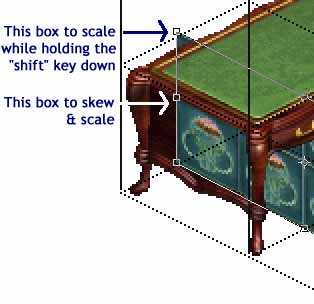
This gives us a boundary box around the image, with little boxes at strategic points. Remember, we did this with the pictures for our easel and our bricks for our tree planter. To keep the proportions correct, you need to use these boxes.
It is also a good idea to scale a little bit down after skewing to retain the correct proportion.
And the grid is there for a reason too! While skewing the image, it is a good idea to move the image to one of the dotted lines - this will help no end in getting the precise angle you need. Skew and scale the image, erasing any excess until you are happy with the result, and once you are completely satisfied, we can merge this together.
 Merge
this together, bun? But I don't want the grid pattern all over my desk!
Don't worry, that won't happen as we are not going to flatten the image
completely - just a part of it.
Merge
this together, bun? But I don't want the grid pattern all over my desk!
Don't worry, that won't happen as we are not going to flatten the image
completely - just a part of it.
Up until now, to get rid of layers, we have either deleted them or flattened the entire image. There is a feature in Photoshop called "Merge" which allows you to just flatten one, two, three or as many layers as you like - while still preserving the other layers.
Go to your menu bar, select Layer and you will see that out of all sorts of options, near the bottom there is one called Merge Down. There is also a handy keyboard shortcut listed for it - Ctrl+E.
Here are the key points about layers once again - and you will see I have added a new point:
- The number of the layer shows the order in which you created it.
- The position of the layers in the palette show their position in the sandwich.
- The highlighted layer is the one you are currently working on. You can highlight any layer at any time to work on it individually.
- To paste a new layer on top of another layer, simply highlight the one you want to have directly underneath the new one before pasting.
- To merge a layer with another one, ensure that both the layers are next to each other in the palette, choose the one on the top, and Ctrl+E to merge them down into one layer.
Highlight Layer 5 - the new texture layer - in your Layers Palette.
We are
going to merge down with Layer 2 - the first part of the desk, so now
press Ctrl+E to Merge Down. You will not see any difference in
your image, but look at the difference in your layer palette now:
To finish the first part of the desk, highlight Layer 4 and using the Polygonal Lasso, mask off the sections we don't want to retexture such as the wooden trim. The easiest way is to Lasso off the green top like so....
 ....and
press delete. The image doesn't look any different! That is because we
are now looking at the green top of Layer 2.
....and
press delete. The image doesn't look any different! That is because we
are now looking at the green top of Layer 2.
Now go back to your texture image, select all & ctrl+c copy.
Again,
paste this on top of layer 2 but underneath layer 4, so the image looks
like so: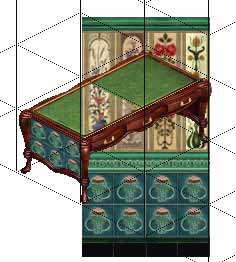
We have done the same as we did before - created a new Layer 5 between Layers 2 & 4. Once again, working on Layer 5 choose what part you would like to have on the top of your desk, erase the rest and Edit/Transform/Scale, followed by Edit/Transform/Skew until you get the pattern you are looking for. Don't forget, the grid lines are there to help you skew your pattern to the exact angle needed to look right in the game - and actually make skewing very easy indeed if you just drag the skew boxes to the relevant grid line!
If you highlight Layer 3 (the second part of the desk) and carefully erase the green top, you will probably expose more of the new Layer 5 texture as well. Copy and paste the Layer 5 texture underneath layer 3 until you are satisfied with the result. Mine looks like this and eventually made it up to 10 layers in trying to get a symmetrical pattern on the top of the desk:
And now we are going to merge these layers down. Here is our key point of merging again:
- To merge a layer with another one, ensure that both the layers are next to each other in the palette, choose the one on the top, and Ctrl+E to merge them down into one layer.
 If
we needed to keep the two halves of the desk separate, it would be perfectly
safe to merge down the layers on the first part of the desk to Layer 2,
but you will note that for the second part of the desk the layers there
are BELOW Layer 3, and we are merging down, not up.
If
we needed to keep the two halves of the desk separate, it would be perfectly
safe to merge down the layers on the first part of the desk to Layer 2,
but you will note that for the second part of the desk the layers there
are BELOW Layer 3, and we are merging down, not up.
Well, as we exported our desk as "Just Change Colors", this doesn't really matter. We can paste whatever we like into our yellow sprite, TMog will only pick up the original desk half shape on importing.
Not only that, but as we are keeping the desk the shape it is in any event, on the sprite we can use the layers function and that lovely yellow to our advantage.
So for now, we can
safely merge the whole lot down, with the obvious exception of Layer 1
(the grid) and the Background layer. Highlight Layer 3, and starting there,
press Ctrl+E until you are left with only three layers - Layer 1 (the
grid), Layer 2 (the desk) and Background.
 With
Layer 2 highlighted, go to your menu bar and Select/All to get
your lil running ants to go round the outside of the page, and open up
your two front sprites again.
With
Layer 2 highlighted, go to your menu bar and Select/All to get
your lil running ants to go round the outside of the page, and open up
your two front sprites again.
 Of
course, because we exported our desk as "Just Change Colors",
we don't even have to do this sandwiching. We can paste whatever we like
into our yellow sprite, TMog will only pick up the original desk half
shape on importing, but the purpose of these tutorials is not just to
get you to the finished product, but to show you ways of using Photoshop
& TMog to help you in this stage and get you used to the commands
needed for the next stage. :o)
Of
course, because we exported our desk as "Just Change Colors",
we don't even have to do this sandwiching. We can paste whatever we like
into our yellow sprite, TMog will only pick up the original desk half
shape on importing, but the purpose of these tutorials is not just to
get you to the finished product, but to show you ways of using Photoshop
& TMog to help you in this stage and get you used to the commands
needed for the next stage. :o)
 With
BOTH methods however, it IS important that you match up the new desk exactly
with the old one. This will ensure that you get a lovely smooth tiling
of the pattern between the two halves of the desk, and with no yellow
to be seen in the game. Don't be afraid of using the zoom tool to get
in as close as you need.
With
BOTH methods however, it IS important that you match up the new desk exactly
with the old one. This will ensure that you get a lovely smooth tiling
of the pattern between the two halves of the desk, and with no yellow
to be seen in the game. Don't be afraid of using the zoom tool to get
in as close as you need.
It's now time to change the colour mode back from RGB to Indexed / Selective (image/mode/indexed/selective) and save under the original name. Import this back into TMog, and take a look at your lovely new desk front view!
![]()