
The A Channel #1
By Bunny Wuffles
 This
tutorial consists of several steps, all hopefully easy to follow, and
I am assuming you followed all the previous tutorials. If you didn't,
you really should go back and take a look because I will be making assumptions
and using terminology of steps and processess learned in those first lessons.
This
tutorial consists of several steps, all hopefully easy to follow, and
I am assuming you followed all the previous tutorials. If you didn't,
you really should go back and take a look because I will be making assumptions
and using terminology of steps and processess learned in those first lessons.
I use Photoshop 5.5, but I think the basics are pretty much the same (if not easier) in PSP. I am assuming that you may not be too familiar with many of the Photoshop tools I am using - so forgive me in advance if I sometimes sound a little too basic ;o)
During the course of all this, you will learn what the A channel does and how it can make your original-made single-tiled objects appear sharper in the game.
Alpha (or "A") channels (or A Sprites) do a few different things to your object as you will find out during the course of this and later tutorials. For our first look at this new topic, we will look at using them in improving the quality of the edges of your new shaped objects. By now, I am sure you will have started to notice that some things you download look sharper and clearer in the game than others, and that objects you make in a new shape look a little fuzzier than things you just do a plain & simple recolour on.
For example, take a look at a sofa from the original game next to a matching chair that I am currently working on to go with the Maxis Matches themes.
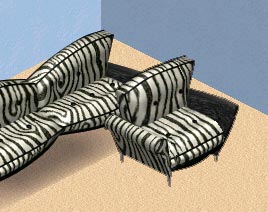 What
a lovely well defined edge the sofa has. That is because their A channels
are perfectly made. Now look at my work-in-progress chair next to it.
Ew, fuzzy edges galore. Ew ew ew. Not only that, but the whole object
looks a little, well, fuzzy, indistinct, not very well defined.
What
a lovely well defined edge the sofa has. That is because their A channels
are perfectly made. Now look at my work-in-progress chair next to it.
Ew, fuzzy edges galore. Ew ew ew. Not only that, but the whole object
looks a little, well, fuzzy, indistinct, not very well defined.
OK, now we know the problem and are experienced in making objects, let's start to look at our own A channels to considerably improve what we make from now on.
I have said this before, and no doubt will say this again, but there are probably as many ways of doing this as there are object makers.
The way I am going to show you here is the method I am starting to use, which I have learned from a combination of tips, trial & error, experimenting and reading other tutorials on Alpha Channels - of which two of the best I have so far found on my travels are here:
![]() PSP users should certainly have a look at Kiri's site as her excellent
illustrated tutorial is written especially for PSP whereas mine of course
is for Photoshop.
PSP users should certainly have a look at Kiri's site as her excellent
illustrated tutorial is written especially for PSP whereas mine of course
is for Photoshop.
![]() A small but perfectly
formed Photoshop tutorial - find under Special Features / Tips n Tools.
A small but perfectly
formed Photoshop tutorial - find under Special Features / Tips n Tools.
Still with me? OK, let's take a closer examination of why we should look at A channels in the first place.
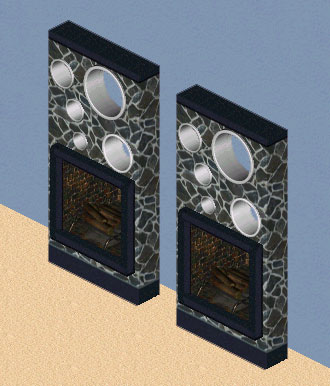 I
recently made an animated fireplace to go with the KnotaRockFaux theme,
and as you can see from this in-game screenshot of my original sitting
next to the unaltered clone I made for this tutorial, like all my stuff,
it has fuzzy edges. It
is particularly apparent at the top and bottom of this particular object,
possibly because it is dark and shown against a light background.
I
recently made an animated fireplace to go with the KnotaRockFaux theme,
and as you can see from this in-game screenshot of my original sitting
next to the unaltered clone I made for this tutorial, like all my stuff,
it has fuzzy edges. It
is particularly apparent at the top and bottom of this particular object,
possibly because it is dark and shown against a light background.
Now here's a screenshot of the same two fireplaces after I finished the improvements to the A channel on the clone. I am sure I don't need to tell you which one I altered and that you will agree that there is a significant difference in the quality.
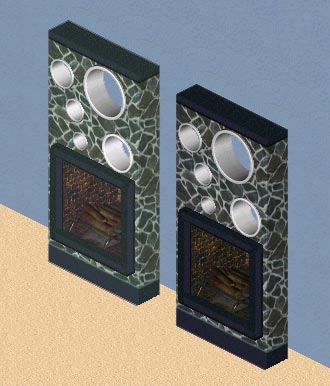
The object itself is slightly more well-defined, and the edges are not blurry at all. So let's get down to what we have to do to achieve this considerable improvement of the quality of our objects.
Because this animated fireplace object also needs serious Z buffer work at the time of writing this tutorial, I am not including it for use. You should therefore use an object of your own or any other existing fuzzy-edged object from your game, but for the purposes of illustrating this tutorial I am going to use the fireplace. Whatever you choose, it should be a single tiled object only. We will cover multi-tiled objects in a later tutorial as there are some slight differences in method with them.
OK, time to open up Photoshop and Transmogrifier. Find the object you are looking for, select it, and if you want to keep the original as it is (or if it is Read Only or in a .far file), press Clone Object File, check that your cookie number is there (if you have one), hit the ok button and give your object a new name where as usual Tmog will clone the object & you get the usual nice green message "Transmogrifier Successfully Finished Cloning!". If you are confident at altering the object without cloning it first (and it is not read-only or in a .far file) just go straight to the export options.
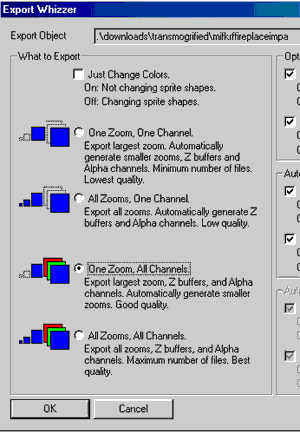
Now it is time to export the sprites. Normally, as we are not changing the shape of the object, we would leave the "Just Change Colours" box ticked and export that way.
But in order to pull out the A channels from the object, we now need to uncheck that box and check the "One Zoom, All Channels" box. As you can see from the description, this will export the largest zoom, the Z buffers and the Alpha channels. TMog will handle the others which is just fine. The smallest zoom is too small to see whether an object is fuzzy or not, and for now we will leave the medium zoom as it is.
Hit the ok button on the Export Whizzer, and choose the folder you normally use in the "Save As" window that pops up. Once you've found the folder in the list, click "save". This may take a little longer than exporting usually does because we are exporting more sprites to our folder than usual.
Once again you should get a whole load of gobbledegook with the "Transmogrifier Successfully Finished Exporting!" message at the bottom, with an ok button which you can click now.
We are now finished with the TMog for the moment, so you can minimise it (or close, depending on the performance & speed of your compy). We are now ready to play in Photoshop :o)
In Photoshop, go to File, Open and find the folder you made. You should then be presented with a huge amount of options, looking something like this:
![]() There
are lots of folders here because it is an animated object, but depending
on what you have chosen to amend, there may well be less (or more!) than
this. However many folders you have, when you open
the first folder, sprite0500 in my case, for an object with only two views
(front and back) where normally we would expect to see two sprites, we
instead see a long list like this:
There
are lots of folders here because it is an animated object, but depending
on what you have chosen to amend, there may well be less (or more!) than
this. However many folders you have, when you open
the first folder, sprite0500 in my case, for an object with only two views
(front and back) where normally we would expect to see two sprites, we
instead see a long list like this:
![]()
A closer look will tell you that we now have three different .bmp files for the front view and three for the back view. Normally, we only have files ending in _p.bmp - which are our familiar P sprite with the lovely lovely yellow background. But now we have files of the same name but ending in _a.bmp and _z.bmp. As you would expect, these are the A sprite and the Z sprite respectively, which are also known respectively - but not respectfully - that is a different matter altogether :o) - as the Alpha Channel or A Channel and the Z Channel or Z Buffer.
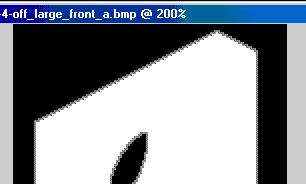
In this particular tutorial we are not interested in the Z sprites OR the P sprites, so you can leave them alone. If you want to take a look, please do, but we are not going to do any alterations on them today. But we ARE interested in the two sprites ending in _a.bmp, so I am going to open the two files Castle-4-off_large_back_a.bmp & Castle-4-off_large_front_a.bmp, which look like this:
![]() EEK!
This doesn't look anything like a fireplace, bun! It's black, and white,
and nothing like an object from my sims game!
EEK!
This doesn't look anything like a fireplace, bun! It's black, and white,
and nothing like an object from my sims game!
That is because, strictly speaking, this ISN'T the fireplace. The A Channel is actually a nifty lil' storage area in the image's file for non-visible picture elements. Think of it as your picture's own little private filing cabinet. The white areas are the areas that are visible in the game. The black areas are the areas that are invisible in the game. And the grey areas are, as the phrase implies, a little bit of both - in other words, neither visible nor invisible. Transparent. Or fuzzy.
In graphics in general - and not just in TMog - the A Channel is a portion of each pixel's data that is reserved for transparency information. It is really a mask - it specifies how the pixel's colours should be merged with another pixel when the two are overlaid one on top of the other. Different parts of the object have different levels of transparency depending on how much we want the background to show through.
If you have had a look at Raveena's PSP transparency tutorial, you will see that she works in the A sprite to make a window look as if it has semi-transparent glass in it, and we will look at recreating this effect in Photoshop in a later tutorial. For now, we are going to harness this transparency effect to stop the edges of our object from being fuzzy.
The first
thing to note is when you look at the colour mode, it is indexed. 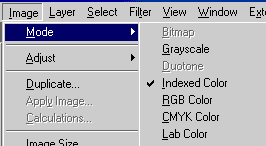
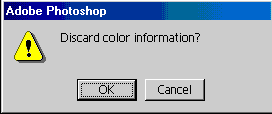
With our P sprites, we have always changed the colour mode to RGB. With the Alpha Channel, we are using a different method of working, and this time we need to change the colour mode to Grayscale. Tick the Grayscale option and......
 .....
this message should pop up.
.....
this message should pop up.
Yes, it is ok to do this, there is no colour information as such in the Alpha Channel so click OK.
Now it's time to make sure our tools are configured in the way we want them to work. We are only going to use the Magic Wand tool in this exercise, and it is going to look different to how we normally use it.
Previously,
our Magic Wand has looked like this: 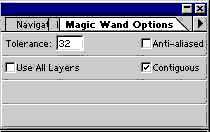
But now
we need to uncheck the box marked Contiguous  and I have also reduced the Tolerance down to 10. Can't remember how to
bring this options box up? Double-clicking any tool in the display bar
will bring up its Options palette if it is not already shown on your screen.
and I have also reduced the Tolerance down to 10. Can't remember how to
bring this options box up? Double-clicking any tool in the display bar
will bring up its Options palette if it is not already shown on your screen.
The key phrases which are important to using our Magic Wand tool in this exercise are "being in actual contact : touching along a boundary or at a point" & "touching or connected throughout in an unbroken sequence".
And now it's time to get up close and personal with our image. I am using a zoom of 200% but you use whatever you need to be able to see that there are three distinct colours in our image - black, white and grey.
 We
are going to use our magic wand to select the grey, as this is the bit
which controls the fuzziness of the image. As you can see, there is a
grey line around all the edges of our object. You can imagine that an
elaborate object like a tree would have LOTS of grey. If we used the magic
wand in the traditional way, it could take a long time to select all of
it.
We
are going to use our magic wand to select the grey, as this is the bit
which controls the fuzziness of the image. As you can see, there is a
grey line around all the edges of our object. You can imagine that an
elaborate object like a tree would have LOTS of grey. If we used the magic
wand in the traditional way, it could take a long time to select all of
it.
Click carefully with your magic wand on some of the grey and see what happens - which should look something like this one below:
 You can see the running ants around the edge and around the hole in the
middle. Because you have the Contiguous option turned off, you have selected
ALL the grey areas in the entire image.
You can see the running ants around the edge and around the hole in the
middle. Because you have the Contiguous option turned off, you have selected
ALL the grey areas in the entire image.
Just for a moment, unclick, and turn the Contiguous option back on. Now click carefully on some of the grey again - which this time should produce a result like this:
 You
can see the running ants around the edge but not around the hole in the
middle or anywhere else. Because you have the Contiguous option on, you
have only selected the parts of the grey that are touching each other
- or in other words, that are contiguous. Or, as per our dictionary definition
above, you have only selected the parts that are "... in actual
contact : touching along a boundary or at a point" & "touching
or connected throughout in an unbroken sequence".
You
can see the running ants around the edge but not around the hole in the
middle or anywhere else. Because you have the Contiguous option on, you
have only selected the parts of the grey that are touching each other
- or in other words, that are contiguous. Or, as per our dictionary definition
above, you have only selected the parts that are "... in actual
contact : touching along a boundary or at a point" & "touching
or connected throughout in an unbroken sequence".
OK, theory time over, let's get to work again. Turn the Contiguous option off, click on some of the grey to select all of the grey areas, so your image once again looks like this...
...as
now we are going to make that grey lighter. Remember I said above that
"the white areas are the areas that are visible in the game, the
black areas are the areas that are invisible in the game & the grey
areas are, as the phrase implies, a little bit of both" ? Well, now
we are going to make the grey areas lighter so that they are still visible
in the game but not too visible that they have the jagged edge that our
two-pixel stepped angle creates.
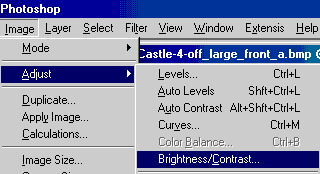 Go to the action bar, select Image / Adjust / and Brightness/Contrast...
which should
bring up an options box like this:
Go to the action bar, select Image / Adjust / and Brightness/Contrast...
which should
bring up an options box like this:
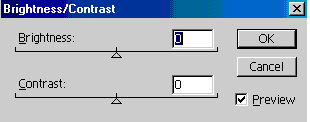
Make sure you have the Preview option ticked, as this will allow you to see what you are doing in real time to the image you are doing it to. You can either use the slider bars with this facility, or type in predetermined levels. You can play about with this to your heart's content to find the perfect looking A channel grey for your particular preference, or you can just move the slider bar to 75 / type 75 in the Brightness box which is what I am going to do.
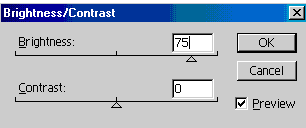
I am leaving the Contrast box at 0.
Press OK, then deselect the running ants from your image, which now looks something like this:
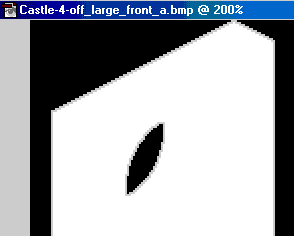 Can
you see the grey looks a little lighter than it did before? Just to compare
the two, here below is what it looked like a moment ago:
Can
you see the grey looks a little lighter than it did before? Just to compare
the two, here below is what it looked like a moment ago:
That difference in grey might not look a lot here, but believe me it will make a GREAT difference in your game.
We are not finished just yet; if we left it like that it would still look "stepped". Click anywhere in the black, right click and "Select Inverse" to select the fireplace shape.
Go back
to your action bar, select Filter / Blur: 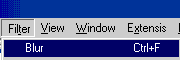 and your image should then look like this:
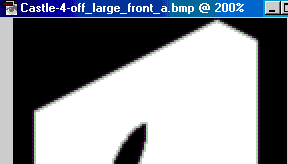 Can
you see that the grey is now not quite as defined as before? This will
give a nice smooth edge to your object without looking as fuzzy as it
did before.
Can
you see that the grey is now not quite as defined as before? This will
give a nice smooth edge to your object without looking as fuzzy as it
did before.
And the very good news is that we are almost done now!
Back to your action bar, and select Image/Mode/Indexed - where you will find that unlike when we Index our RGB images, this time there is no Indexed option for you to select.
Now you can Save your image, and do exactly the same process for the other view / views of the object, depending on what kind of object you have chosen to amend.
Now you have done all your A sprites, it is time to import our object back into TMog as usual. Once you have done that, we can close down TMog, open up our game, and see if we can play spot-the-difference.
Let's look once more at our two fireplaces before and after.
That is much better quality, better defined in the game, and will look better next to default objects or those made by other artists who edit their Alpha Channels. Which is now us! From now on, we are going to edit our Alpha channels in all objects we make. Aren't we? Yes, bun, we are. Good :o)