
 In
this workshop, you will learn
how to
use the Sims Transmogrifier to make your paintings "backless"
so they can only be seen on a front view. I am assuming you have no prior
knowledge of using TMog. You can do
this in Photoshop, Paint Shop Pro, or I should imagine, even using Windows
Paint.
In
this workshop, you will learn
how to
use the Sims Transmogrifier to make your paintings "backless"
so they can only be seen on a front view. I am assuming you have no prior
knowledge of using TMog. You can do
this in Photoshop, Paint Shop Pro, or I should imagine, even using Windows
Paint.
You can get the Transmogrifier from the link on the previous page.
Because I use Photoshop, those will be the screen shots & instructions I am using, but I am sure that your prior knowledge of your favourite paint package will suffice to be able to do these steps for yourself using the equivalent commands in those tools.
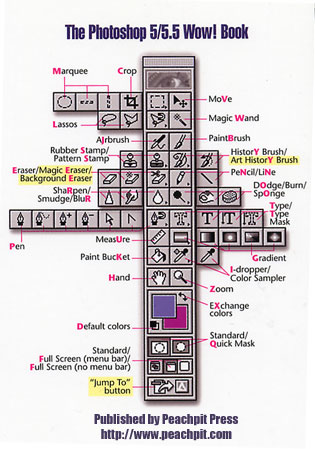
Here's a handy guide to some of the Photoshop tools. I am not being paid by them to say this which is a great shame, but nevertheless I really can't recommend the Peachpit press WOW! books highly enough. They may be a little more pricey than most, but they take things step by step, are in full colour AND come with a tutorial disk. One day I will upgrade both Photoshop book and program to version 7, but as I have no real need to at the moment, I am sticking with 5.5.
You should also note that if you put your objects in a .FAR file, you cannot alter them without taking them out of their .FAR file first. Also, if your objects are "Read Only" you should make them readable first.
OK, one more thing. Opening up the Transmogrifier will take a LONG time if, like me, you have many objects. To make this process much quicker, I have given some step-by-step instructions on my Housekeeping page, which I suggest you read, and then create a new temporary folder to move out the objects you want to amend.

Right, I am assuming now that you have a "stuff to amend" folder with all your paintings, tapestries etc in there. You should also make another new folder (mine is called "sparestuff") as what we are going to do will generate a number of files which we can safely delete once we have finished the process. This is much easier done if they are all together!
I am going to demonstrate what to do by using one of my own paintings. I suggest you do the same for the first time you attempt this, to make it easier to follow exactly what I am doing here. I have enclosed the painting in the BunnyWufflesTutorialKit and it's called mifpalmhouselargepainting1.iff (pictured below) which you should now install in your new folder BEFORE you open up the Transmogrifier.
Open up TMog, which when ready should look something like this:
You will notice that as you scroll down the object list on the left hand side, the description in the white box will change. You may also notice that sometimes, the four buttons may sometimes become "greyed out" and the script above change. If all your objects are "Read Only", you will find that happens. I am going to deal with editable objects only here for the start. I will deal with "Read Only" ones in a later workshop. You can tell which is which from the script on the top right hand side of the TMog screen.
 If
you don't know from the file name what the object looks like, press the
View Object... button on the bottom right hand corner.
You will get a picture of the entire object, which on this particular
file looks like this:
If
you don't know from the file name what the object looks like, press the
View Object... button on the bottom right hand corner.
You will get a picture of the entire object, which on this particular
file looks like this:
I apologise for the poor quality of the picture, but I am trying to keep my bandwidth down :o)
Move the
slider bars to view the object at the different zooms and rotations you
see in the game. You can also look at the individual tiles in the pick
list at the top of the page. Once you have finished looking, click OK.
You can see from the main TMog screen that this object is Editable, making
this a very simple process indeed.  I
am now assuming you have found the object that you wish to alter, and
if so, press the Export Object File... button.
I
am now assuming you have found the object that you wish to alter, and
if so, press the Export Object File... button.

If your TMog screen looks like this, press OK. Make sure that you save this to your sparestuff folder.
Press "save" and all sorts of gobbledegook will pass before your eyes! Ignore this - we are more interested in the message that "Transmogrifier Successfully Finished Exporting!" and especially with the OK button which you can click now.
We are now finished with TMog for the moment, so you can minimise it as we are now ready to play in Photoshop or your preferred paint package. :o)
In Photoshop, go to File, Open
and find the folder you made.
 Open
up this folder, and you will find two subfolders inside:
Open
up this folder, and you will find two subfolders inside:
These two folders represent the two tiles this painting takes up in the game. Open up the sprite 0200 folder.
Take a look at both these images. These are called "Sprites" and represent one square in the game. The one we are going to play with is the one called Vegas-2-tile-1_large_back_p.bmp so you can close the other one and ignore it :o)
Use the eyedropper / colour sampler tool to select some of that lovely yellow into your Foreground colour box. Now, select your Pencil tool and choose a lovely big brush. Now colour in the back of the frame so that it's all gone.
However you select shades in whatever paint program you may be using, it is VITALLY important that you use the same exact shade of yellow as the rest of the picture. Any slight variation will not make the back invisible but even worse, will actually give you a yellow back to your painting.
Once you have finished colouring in, press Save and close the image. Now open up the other folder - sprite0201. Select the image Vegas-2-tile-2_large_back_p.bmp and colour in this one as well. Press Save and close the image.
Bring up the TMog again, as we have now finished in Photoshop.
 Press
the Import Object File... button, which will bring up a
confirmation screen like the one below:
Press
the Import Object File... button, which will bring up a
confirmation screen like the one below: It
should automatically select the correct .XML file to import, as it has
done here, so press "open" and once again all sorts of gobbledegook
will pass before your eyes!
It
should automatically select the correct .XML file to import, as it has
done here, so press "open" and once again all sorts of gobbledegook
will pass before your eyes!
Ignore this.....
 .....because
we are more interested in the wonderfully mis-spelt message that "Transmogrifier
Successfulluy Finished Importing!" and especially with the OK button which
you can click now.
.....because
we are more interested in the wonderfully mis-spelt message that "Transmogrifier
Successfulluy Finished Importing!" and especially with the OK button which
you can click now.
Press the View Object... button on the bottom right hand corner. You will get a picture of the entire object as before, only this time when you rotate it with the slider bars, two of the views will now look like this:
Which is what we want, as this means the object will not be visible from the back. You can close TMog and Photoshop, and the next time you play your game, take a look at your newly amended object!
If you are satisfied with the result, you can safely delete both the file folder and the .xml file from your main sparestuff folder - you won't need these to enjoy the object in the game, and if you want to amend the object in any other way, we can just make new ones as we did before.
Your sims will not be bothered at the change, but I am sure that this will enhance your gameplay, and also give you the confidence to try one of my tutorials for making your OWN objects :oD