
Transparent Windows Tutorial
By Raveena
This is a tutorial for a transparent window using TMog and PSP 7.
 First
let me say that this tutorial assumes you know something about making
objects and are familiar with PSP so I will not go into a lot of detail
about TMog or PSP.
First
let me say that this tutorial assumes you know something about making
objects and are familiar with PSP so I will not go into a lot of detail
about TMog or PSP.
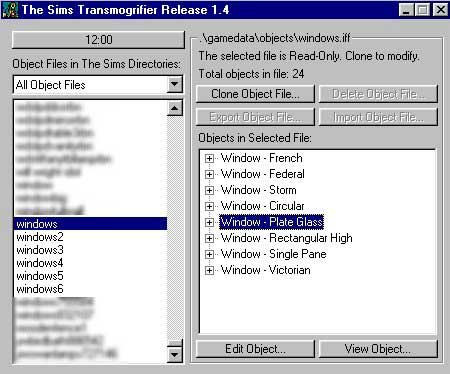
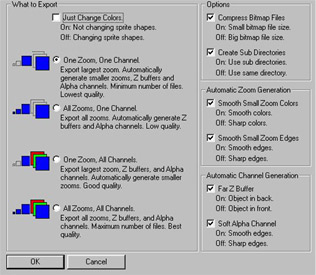
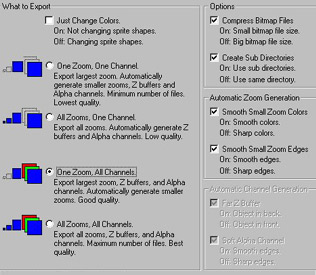
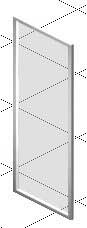
1. Clone the Plate glass window (Pic 1) and export using the setting "One Zoom One Channel" (Pic 2). You'll have to unclick Just change colors first.
2. In PSP open the back view of the window. There is only one view. Go to Colors and change the colors from 256 to 16 million.

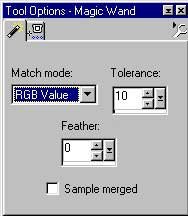
Use the magic wand and click on the center of the window in the yellow part. You'll have to use a very low setting on the magic wand or it'll go into the white of the window. A setting of 10 should just grab the yellow part.
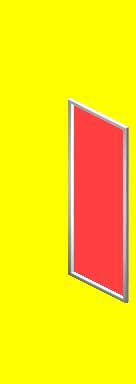
Fill it with any bright color like red. This won't be the final color but we are doing this to make it easier in a later step.
3. Change the colors back to 256 and save the bmp and import it into TMog. You won't see anything but a solid color window for now.
4. Export it again using the setting One Zoom All Channels.
5. You now have an A and Z bmp added to the P sprite.
6. Open your A sprite in PSP and you'll notice it's pure white but has a light grey, thin border around the outside and also maybe on the inside. Now you'll see why we made the center of the P sprite a bright color.
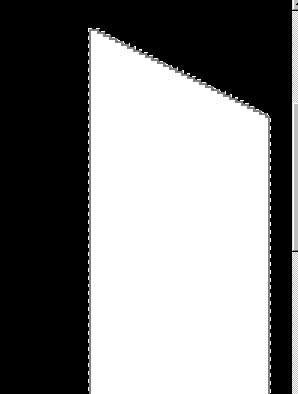
7. Open your P sprite and copy the whole thing yellow and all. Click on your A sprite and paste the P sprite as a new layer. (CTRL L) This is very important. Make sure you paste as a new layer because we're going to delete it when we're finished. The P sprite will change to shades of grey because it's on a greyscale background.
![]()
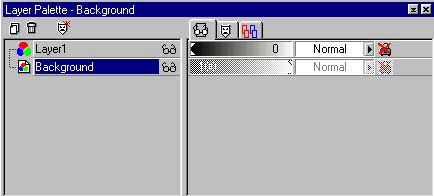

9. Grab your magic wand again and click in the dark grey part of the P sprite. Now this is very important. Go to your layers menu, lower the opacity of Layer 1 back to 0 and click on the background layer. We want this fill for the background layer only. Find the color 120 in your colors menu. It's 8 down from the right and 8 over. Grab your fill tool and click in the center of the selected area. You'll get the exact area that we want on the A sprite. This will give the transparancy we want for the window.
 11.
We have to change that ugly red that we used in the P sprite so open
it up again, unless you already have it open. Increase colors to 16 million.
Click on the red part with your magic wand and pick a color you want for
your glass. A nice light grey or light blue will work out well. Fill the
red part with your color. Use CTRL D to remove the selection. Change back
to 256 colors and save it. Import back into T-mog and your window is finished.
11.
We have to change that ugly red that we used in the P sprite so open
it up again, unless you already have it open. Increase colors to 16 million.
Click on the red part with your magic wand and pick a color you want for
your glass. A nice light grey or light blue will work out well. Fill the
red part with your color. Use CTRL D to remove the selection. Change back
to 256 colors and save it. Import back into T-mog and your window is finished.