Making something completely new!
By Bunny Wuffles
|
Finally, I am also taking a different approach to the graphic aspect of this tutorial - I am going to leave you more or less alone to construct your image at the appropriate time - with a couple of pointers along the way. By now I guess you are more concerned with getting your lovingly constructed images into Transmogrifier successfully rather than making the image itself. I will, of course, show you various stages of my object along the way for you to compare (or laugh at). As you know by now, I use Photoshop 5.5, but I think the basics are pretty much the same (if not easier) in PSP, and I assume pretty much the same in later versions of PhSh. However, as always, I am assuming that you may not be too familiar with many of the Photoshop tools I am using - so forgive me in advance if I sometimes sound a little too basic, especially as you are now an advanced user! ;o) I have said this before and I will say it again, but there are probably as many ways of making a new object as there are object makers. Some use different methods to achieve the same effect, some know short cuts that others don't; and some utilise any combination of those and more. This tutorial shows the way I make my new stuff, and by no means am I trying to imply that these are the definitive and only ways of doing this - rather, just an easy way to start you off on your own mogging adventure. During the course of all this, you will learn quite a few new things! First and foremost, you will learn how to make an entirely new multi-tiled object from scratch. We are also going to learn a bit more about our A channels & Z buffers, and how to use Bil Simser's great utility Sim Explorer to view & check downloaded objects. We will also learn how to fix the stray white pixel effect that sometimes occur in medium & small zooms. As always, we will also be learning some new Photoshop techniques along the way. |
||||||||||||||||||||
|
Introduction |
||||||||||||||||||||
|
Have you ever surfed the web and looked at decor and furniture sites, thinking "oh I wish I had that XYZ for my sims" and then excitedly posted your find on a wish list forum knowing that every object maker under the sun will love that picture too and take up the challenge - and then checked the thread a few days later to find a bewildering total of no posts in reply? I don't wish to burst any bubbles or stifle any enthusiasm here, but during the course of this tutorial you will begin to find out why that is. Pictures
are still useful to the object maker, and indeed we are going to use
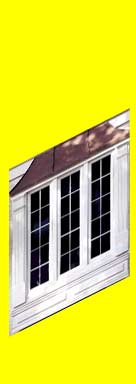
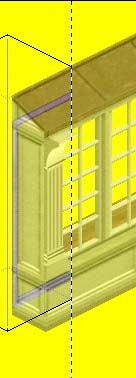
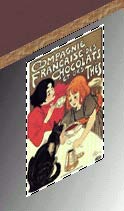
one for this tutorial. So, let's find our picture. And here it is, and surprise surprise but it's a window! You may not want to specialise in building items like I do, which is fine - but I would urge you to do this tutorial anyway as it will teach you the principles of making a multi-tiled new object from scratch - and you may learn a few more Photoshopping tips as well. What a very nice window this is, and from what you have read on my Oriel window page you will be able to tell me that this is a casement window :o) This is a high quality .jpeg file which you will need for this tutorial, so right-click on it and Save Picture As in your normal images folder. You will also find it in the BunnyWufflesTutorialKit2 folder where you will be not at all surprised to learn it glories in the name of casement.jpg. |
||||||||||||||||||||
|
So, what we do is take the picture, scale it and skew it in Photoshop to the correct angle, paste it onto a window sprite that we cloned earlier and Robert is your proverbial Uncle. But what on earth happened? The picture looks lovely and three dimensional, but the moment we skewed it, it has gone all flat and - well - nasty. And that, my dear friend, is why you will find your wish list furniture page thread has gone sadly unanswered. OK, this is a little bit extreme, but all the same, making an object from a picture is not as easy as one might think. Once you have tried it for yourself and found this out the hard way, if you are like me you will then revisit every wish list you ever went to and apologise abjectly for your innocence.
|
||||||||||||||||||||
|
Seeing as you are reading this bit, I assume you DON'T want to make an object like that and you have NO idea how proud I am that you have made this crucial decision. This window can still indeed be moggified, even though there is a lot more work involved in making an object like this. But don't lose heart. Sometimes you can find a picture which is perfect for siminising so don't give up totally on image searching - or asking other object makers to have a go. Inspiration may well come even if the picture itself is not suitable for direct moggery. So join along with me and if you take things slowly, step by step, do what I tell you to do when I tell you to do it and don't try to jump ahead - you too will have a casement window to be extremely proud of :o) Once you know what to do, it is having the patience to actually do it each time which sorts out who is going to be a great object maker and who isn't. And we are going to be GREAT object makers, aren't we? Yes bun, we are. Good. This bunny NEEDS new objects for her game! |
||||||||||||||||||||
|
Preparation |
||||||||||||||||||||
|
Now I know by now you will find this extremely hard to believe, but I like to find as many short cuts as possible. I love making objects, but if there is an easy way and a hard way to get the same results I will try to choose the easy way each time, so if there is a free-to-clone item available which might help me achieve the object I have in mind, then I will happily use it. In previous tutorials, I stressed how important it is to keep your freely cloneable items in a separate folder (or folders) than non-cloneable ones, and this is because we are going to look through these now to see if there is anything we can use to help us make this window. In the BunnyWufflesTutorialKit2 you will find a folder marked "other items". Inside this is the wonderful Bil Simser's Sim Explorer program which you should now unzip and install. We are going to use this to look at our objects in close-up. This program, like all sim utilities, is very resource-hungry. I therefore recommend that to avoid it crashing, you have the minimum of objects in your game folders. So you now need to do your normal preparations like taking all your downloaded objects out of your folders and storing them in a safe place. I give full instructions on this in previous tutorials. Now, move some of your free-to-clone folders into your Game Data/User Objects folder. I have a fairly good idea where I am going to find something I know I definitely want so I have only loaded up one folder - Marina's Sims. Before using one of your archived Free-To-Clone items, It is always a good idea to check on a site to see if their terms have changed since you last used any of their objects in moggery. Thankfully, if you look at Marina's terms (under Help) you will see that the items she has made are still freely cloneable with due credit, so long as you don't intend using the object for donations or a pay / subscription site. Please consider making your own items freely cloneable to help fledgling and even advanced object makers like ourselves. New bases are always fun to work with! |
||||||||||||||||||||
|
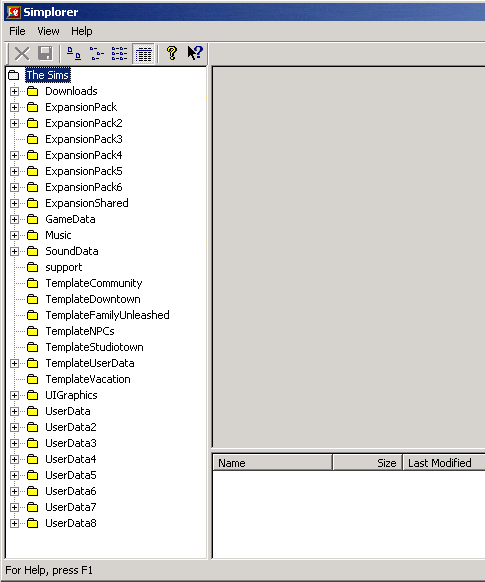
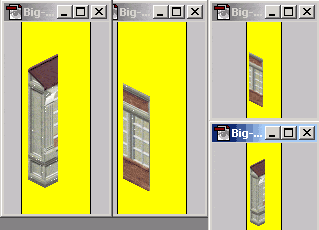
Start up Sim Explorer, and it should look something like this. It may differ a little to yours as I actually use the first version; the second version had some improvements but I never bothered to upgrade as I liked this version so much. You will see that the screen is divided into three windows - on the left is a list of all the folders within The Sims main folder, and on the right are two windows which should currently be blank. You may need to enlarge the lower one - on my other computer it is squished down right to the bottom unlike here where I have at least an inch of space. You can resize all three windows in this way if you need to.
|
||||||||||||||||||||
|
For now, double-click UserObjects and there is my Marina's Sims folder. Double-click the free-to-clone folder you have put there and let's explore! |
||||||||||||||||||||
|
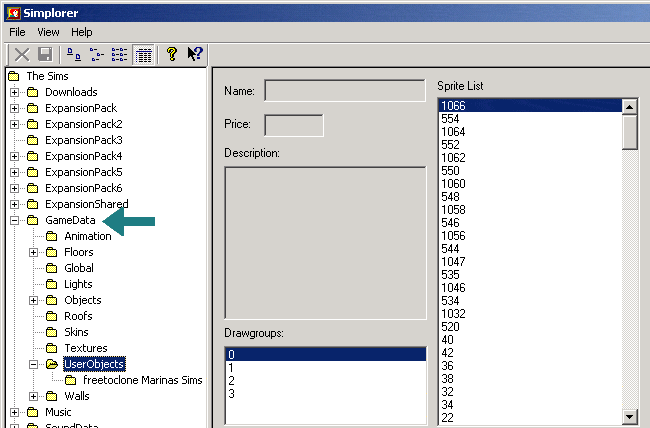
*However, if this happens to a downloaded object in one of your object folders you need to remove the object to take a closer look as it is highly likely this object is corrupted in some way. Looking at the offending object through Transmogrifier may confirm the corruption (or hopefully lack thereof). I have been told that some hacked objects look like this through SimExplorer, but in my own experience, when a sprite list is displayed rather than a picture, the object is unusable. I use SimExplorer routinely after downloading new objects to check if they are corrupt or not. I find it much more reliable than EliSims or anything else I have tried. |
||||||||||||||||||||
|
The picture is much clearer than the one you see in Transmogrifier, and as you can scroll through the objects a lot quicker, I find Sim Explorer a much better utility to view my objects than Transmogrifier.
|
||||||||||||||||||||
|
There is also another very good reason I love this program so much and that is because when I find an object I want to use I can either take a screenshot without having to edit the grid background, or I can even make a copy of the object for my current folder as the filename is right there for me to reference. Best of all, SimExplorer does not load all the objects up in the same way that Transmogrifier does, so you can even move or copy objects from the folder you are currently exploring without quitting the program. Having said that, it is IMPORTANT to note that you cannot move or copy the object that you are currently viewing / is highlighted in SimExplorer. So if I want to move or copy mswallpillerwhite.iff I need to scroll down to at least the one above or below BEFORE attempting to move or copy it.
|
||||||||||||||||||||
| So I have now copied my mswallpillerwhite.iff file from my large free-to-clone folder into UserObjects as this is the only one I need. I make copies so that once I finish a TMog session I don't have to worry about remembering where to move objects back to. On more than one occasion while mogging I have deleted an object by mistake and now that we are losing more and more Sims1 sites almost on a daily basis, losing objects is not a good thing to do. | ||||||||||||||||||||
|
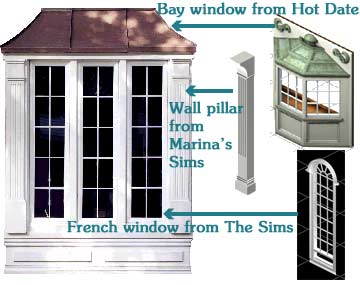
Let's go back to our window image and see how we can siminise it. Having done admittedly little research, I still concluded that the top roofing bit is similar to the top of the Bay Window from HD (though I may alter this a lot if I use it at all), the window shape is similar to both the Bay Window and the French Window from the original The Sims, and the casing either side of the window lights is very similar to Marina's white wall pillar. The bottom panel of the window is also very similar to the Bay Window too. |
||||||||||||||||||||
| We are now going to make a jigsaw puzzle out of all these bits and pieces! Remember the pine-tree-in-planter tutorial, where we took a pine tree sprite and lots of bits of bricks and put them together to make a pine tree in a brick box? We are going to build this window in much the same way. | ||||||||||||||||||||
|
Generating Editable Files |
||||||||||||||||||||
|
So, open up TMog and Photoshop, and away we go! Remember, wayyy way back I suggested that you have a folder of sprite maps to keep for reference at a later date? You are going to export some sprites into that folder right now, so we can have a look and play around with them - if they aren't already there of course. Find the Hot Date Bay window and the French Window, clone them with a name like SpritesWindow so that you can easily find the object to delete later on (assuming that you won't want two of the same object in your game) and export using All Zooms, One Channel. You also need to do this with Marina's pillar, which is called mswallpillerwhite.iff. And now to find a suitable object to clone.......... |
||||||||||||||||||||
|
Clone it and give it your name. As always, I am giving mine a name starting with "bun" to identify it as being mine - and keeps all my own objects together in TMog. Because it's a window and I am going to put this on my Oriel page, I will call it "bunoricasement". As we learned before, giving your object a descriptive name makes life a lot easier when you are looking for it at a later date - and of course makes life a lot easier for your downloading audience as well for compiling shopping lists or in generally organising objects. :o) |
||||||||||||||||||||
|
And now it's time to export the sprites. Let's do this in a different way than before. We are changing the sprite shapes, so uncheck the Just Change Colors box, but this time check the One Zoom, One Channel box. We will be exporting the A and Z sprites later but for now because we want a nice sharp A channel, uncheck the Soft Alpha Channel box. We will be doing some other work in our A sprites later, so we can also get rid of any unwanted blockiness at that point. Unchecking this box now however ensures we get a nice sharp edge to the bits of the object which meet up in the X & Y co-ordinate, and not a fuzzy brownish-yellow edge in the middle which we would get if we had left it checked. |
||||||||||||||||||||
|
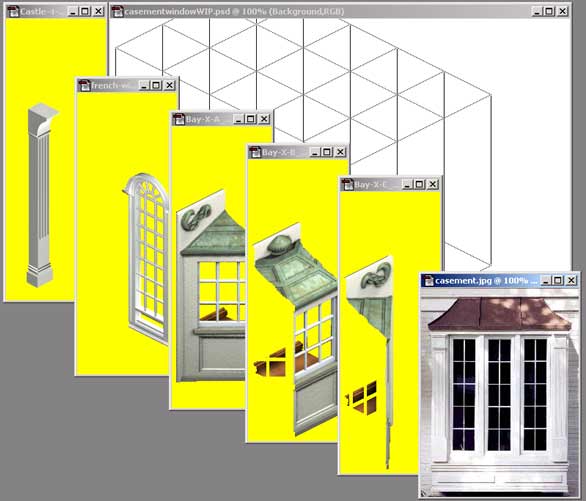
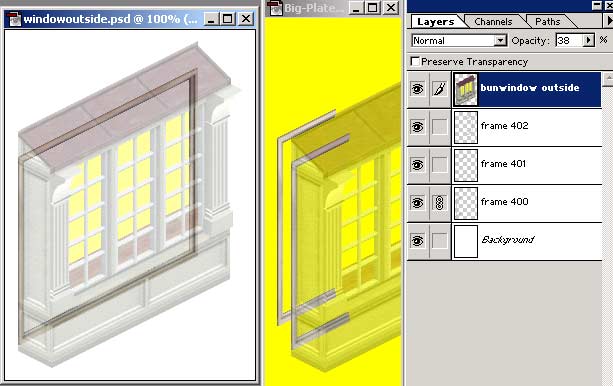
And now to Photoshop & what files to have open. We will be using the file called 000BWGrid5x3.psd from the BunnyWufflesTutorialKit, and I would recommend that you copy and save it under a new name - perhaps casementwindowWIP.psd (WIP being Wufflese for Work In Progress) because this may well become a large file or you may want/need to do this in more than one session. I always give my temporary work in progress files a similar name as it makes it very easy to use Windows Explorer to find all files marked *WIP.psd at a later date to delete, and still have the pristine original to use at any other time. You need to have the following files open:
You will probably
find it useful to use the Thumbnails option in locating these files.
|
||||||||||||||||||||
 And
here are the files to have open. And
here are the files to have open. |
||||||||||||||||||||
|
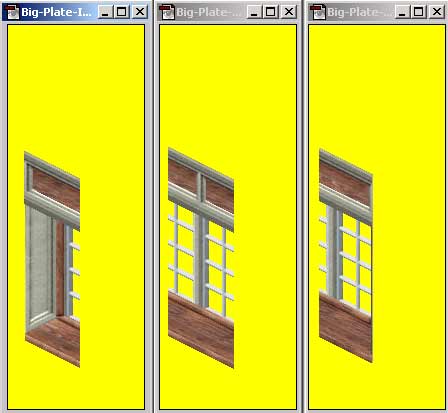
The sprites that begin with 04.. are the ones we are concerned with, and each folder contains two sprites; one for the front view of the window for that tile, and one for the back view. Open the first three folders (0400, 0401, 0402) and open all the sprites inside them which are the front view - they should have names like Big-Plate-In-Lt_large_front_p.bmp.
You should now have three sprites open which when pasted together would make a front view of the window.... |
||||||||||||||||||||
|
The P Sprites - Front View |
||||||||||||||||||||
|
|
||||||||||||||||||||
|
And now you can minimise or even close your sprites because we will not be needing them for quite some time. We are going to make a jigsaw! Get up close and personal with your window frame pieces, and match them up EXACTLY anywhere under the grid. In fact, we don't really need the grid at the moment so we can make it invisible. Can't remember how? See the little "eye" next to the layer name? Click on it and watch the layer vanish! You will recall by now that the layer is still there, only not interfering with our view. A bit like a backless picture in the game, I suppose ;o) I am also going to rename the grid layer so I don't do anything to it by mistake. OK, mine looks rather
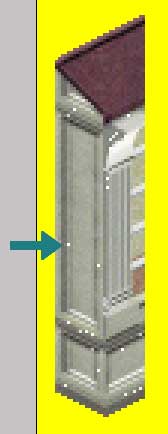
like this and I hope yours does too: And while we are looking closely at this fine specimen, just take a look at those pixels on the right hand bit. Good heavens, what WAS the creator thinking? Pixels missing, some very shoddy two-pixel stepping along the inside bottom - now tell me YOU can't make objects better than Maxis can! :oD Right, save your file because now we are going to make a jigsaw puzzle over this frame. |
||||||||||||||||||||
|
As I said above, I am going to leave you more or less alone during this part. I am not expecting you to make your images in exactly the same way as I make mine, but there are a couple of things you should note:
If you are really not confident in making your own images and/or want to follow this tutorial with the same images I use, I have put the completed outside and inside images in the BunnyWufflesTutorialKit2 folder (under "images") so you can join in the cutting up at the appropriate time. Whichever way you are going to go, here are edited highlights of the steps I took along the way which hopefully you may find useful. |
||||||||||||||||||||
|
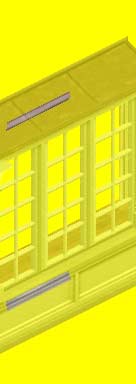
I also used the window images from the bay window rather than the French window - they just looked better and more importantly, fitted better. The grid helped me greatly in getting the angles exactly right, and don't be afraid to move the grid about to help you make precise angles too. This is not quite my finished image - for instance, you can see that I kept the yellow of the windows intact. I haven't decided yet on what I want the inside of this window to look like, neither have I made up my mind on how transparent I want the window. These are things we can do later, and leaving the yellow where it is will remind me where I want the transparencies when I come to working on the A channels. OK, now we have done the front (or outside) graphic, save your casementwindowWIP.psd file and let's look at the inside view. |
||||||||||||||||||||
|
The P Sprites - Back View |
||||||||||||||||||||
|
Now, the inside of this casement window is unknown territory to us. We can only guess as to what it looks like, and for me, the nearest I guess is the inside of the Hot Date Bay Window. But as this is entirely up to our imagination, we can do what we want, so I am going to do a combination of the look of this bay window and the exterior of the casement that we have just done. |
||||||||||||||||||||
|
And once again the sprites that begin with 04.. are the ones we are concerned with. Open the first three folders (0400, 0401, 0402) and then all the sprites inside them which form the back view - they should have names like Big-Plate-In-Lt_large_back_p.bmp. |
||||||||||||||||||||
|
You should now have three sprites open which when pasted together would make an inside view of the window, and once again we are going to copy and paste them into a casementwindowWIP.psd file. As we will be using some of the same images from the front view only flipped horizontally, my new file will be generated by using the Save As command and giving it a new filename. Mine will be imaginatively called casementwindow2WIP.psd. This means we have all the necessary bits and pieces we used before, and we can move them about with impunity, knowing that all our hard work from the front view is safe and sound and untouched in the casementwindowWIP file which we saved before saving it as our new file. However, there are some images we need for the interior of the casement window, and I thought you might like to make it from a different wood to that of the bay window. |
||||||||||||||||||||
|
You don't have to use any of them of course! But they are there if you want them for this or any other project. I am going to be using part of the English Aged Oak for this particular window. |
||||||||||||||||||||
|
Once again you can see that I spent some time cutting and pasting these images before getting them to be the final size, but as you can see, some of them are just from the front view but flipped horizontal. Now I am happy that this is the image I want for the final inside of the window, I can go back to the front view again and just alter one or two things. The angle that we view objects in the Sims means that from the outside view of the window we can see part of the way inside, so we need to be able to see some of the wooden windowsill and part of the inside of the side walls. |
||||||||||||||||||||
|
I also erased some of the yellow using the magic wand in the parts of the window where we can see inside - I don't need a transparency here so I don't need the yellow. So by now you should have a finished image of both the outside and inside of this window. We need flattened images of both of these so we can cut them into three sections for importing into Transmogrifier. Until we have completed this window in Transmogrifier, we cannot be sure we won't alter it in some way, so we still need all the bits and pieces you cut out and used. So, in your casementwindowWIP.psd files, click the eye to make any layers not part of the finished window invisible until you are left with the white background and window image bits only. Flatten the image using Merge Visible, and select all & ctrl-C copy. Go back on your history palette to the time just before you flattened the image, and ctrl-V paste. You should still have all the layers intact, and this new layer as the full window with a white background. With the magic wand, click anywhere in the white and delete it so you have the window image alone. Don't forget to save your files!
|
||||||||||||||||||||
|
If you did not make your own images and are using the same ones as I am, you will need them for this next stage, so find and open them in the BunnyWufflesTutorialKit2 folder under "images" where you will see they are called windowinside.psd and windowoutside.psd. They are lined up exactly as mine with the P sprite window frames below them on separate layers, ready for the next section. You should also open up the zbbsbilandbun.psd template file as some of the single grids will help in getting the angles right for cutting up the image. |
||||||||||||||||||||
|
The P Sprites - Getting Ready for Transmogrifier |
||||||||||||||||||||
|
Open all the sprites inside them which form the front view - they should have names like Big-Plate-In-Lt_large_front_p.bmp. Convert these sprites from indexed to RGB.
|
||||||||||||||||||||
|
We now need to cut our image up in to three pieces, and to help us do this, we are going to learn a neat new trick in Photoshop! We are going to use our copied window frame images and our new window image to position the new window in exactly the right place in the P sprite. I am going to use the windowoutside.psd file to demonstrate this (as there are less layers to fiddle about with!). |
||||||||||||||||||||
|
You can see the layers palette on the window file that the window image is highlighted (the active layer) and the three frame layers are inactive. The active layer is denoted by a paintbrush in the box next to the eye - and of course the highlighted name.
But the empty boxes next to the inactive layers have a very useful tool which we should now activate. Click on the empty box on the "frame 400" layer.... |
||||||||||||||||||||
|
....and it should now look like this. This little chain is called the "link" tool, and has now temporarily linked this layer to the active layer. Whenever we do certain things to the active layer, we also now do to this layer - until we click the little chain image and unlink the file. We are going to use this link of the window frame image to match up exactly with the same image on our P sprite, and the chain will drag along our new window image so that also ends up in the same place. As we can't see the frame layer, use the Opacity tool to make the active window layer almost invisible so we can see this in action as we now drag the window image linked to the frame 400 layer into the appropriate P sprite, using the Move tool. |
||||||||||||||||||||
|
We can see the two window frames perfectly clearly, and only a vague image of the new window which will enable us to line up the two frame images - and the window - perfectly. You may well need to use the zoom tool to a larger magnification to ensure you have them lined up pixel-perfect. You can use the eye to turn on and off the layer visibility of the window or frame layers to check. Just don't click on the chain. |
||||||||||||||||||||
|
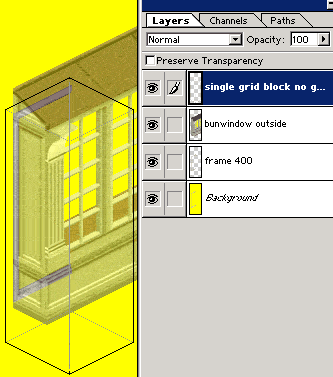
I am now satisfied that the frames are lined up perfectly, so I can now restore the opacity of the window image to 100 and unlink the frame by clicking on the little chain. Actually, I am going to change the opacity to 60 for the moment as I still want to see the frame underneath to help me cut a portion out of the whole window frame into a manageable size for this one sprite. Now, this is where many object makers differ. I don't know any hard and fast rules to this (though there may well be some out there somewhere) but I try to divide the new image into as equal portions as possible for the number of sprites while also trying to match the boundary points of the existing image in the P sprite. From the zbbsbilandbun.psd template file click on the layer called "single grid block no gaps" and shift-drag it over to our P sprite. |
||||||||||||||||||||
|
Our P sprite should now look something like the one on the left. Reposition the grid so that the right hand side touches the very right hand tip of the frame image (see below). |
||||||||||||||||||||
|
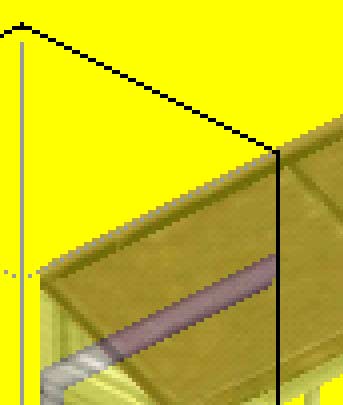
It should be positioned to the right of the frame, and you should ensure that it does not overlap. Now, using the marquee tool, select the whole area of the window to the left hand side of the grid. You could have done this without the grid, but at smaller zooms it is much easier to see the solid black line of the grid than the three grey pixels of the frame edge. (A point to note - if we were mogging a smaller image, we would use this grid a little differently, using the paint bucket to fill the grid and then use inverse selection to delete the unwanted portion of the image. You can see that this image is bigger than the grid so we can't do that here.) |
||||||||||||||||||||
|
We are getting rid of the unwanted image for this particular sprite, so with the ants gaily running their marathon, highlight the window image layer, then right-click & select inverse, and press delete. Deselect the ants, turn the grid layer invisible, return the opacity on your cut-down window image to 100 and this sprite is almost finished. We need to be absolutely certain that none of the original frame image encroaches on our shiny new window. So, make the frame 400 layer invisible (or delete the layer), create a new layer just above the Background layer, sample the lovely yellow with the eyedropper and use the paint bucket to fill the new layer. All you need to do now is index the image and save it, and that's our first piece of the window finished! Don't close this sprite just yet though - we want to keep the history palette as we are going to use the cut-out window to help place the middle section accurately. |
||||||||||||||||||||
|
I think I can safely leave you to repeat this process with the middle sprite - but don't forget for this we are using the frame 401 layer. You should stop at the point where you are about to drag the grid template across as we are going to use a slightly different method this time. Your image should now look something like the one on the left here. Now, using the history palette on your previous sprite image, go back to just before you indexed and saved it, and select the cut-out window image. Drag it across to this middle layer and position it exactly on top of the window image you have linked. Your image should look something like this one on the right here. You will see that you have dragged the end piece too - this is a portion of the layer outside the sprite size and so we did not delete it (or indeed, need to delete it) when using the running ants. This is good, as it will help no end in positioning this window exactly on top of the linked image. With the magic wand, click outside the window image on this layer, then right-click/select inverse. While the ants are running around with wanton abandon, select the near-invisible layer and press delete. Once again, we have deleted the portion of the window we do not want for this particular sprite, and you can return the opacity of the remaining bit to 100. |
||||||||||||||||||||
|
Again, we need to be absolutely certain that none of the original frame image encroaches on our shiny new window. So, make the frame 401 layer invisible (or delete the layer), create a new layer just above the Background layer, sample the lovely yellow with the eyedropper and use the paint bucket to fill the new layer. Index and save this sprite. Once again, repeat this process with the final sprite - but don't forget for this we are using the frame 402 layer and stop when you are about to drag the grid template across. Drag the cut-out window image from the first sprite over to this one, and you will see that you have the final amount of this window to put in place! This time round, you can therefore make the transparent layer invisible once you are sure they line up. After making the new solid yellow layer you can index and save this final front sprite. And shall we dare to import this back into Transmogrifier to have a first look at our shiny new window? Oh yes please bun! |
||||||||||||||||||||
|
Well, it sort of looks like a window. Not to worry, this is fine for the moment. Once we make the inside window sprites we can then play with the X and Y co-ordinates to fix this. It is at that point where we will then re-export the object to fix it in place and go on to make some A and Z channels. So, for the moment, marvel at the fact that we have done two out of the four rotations of this object and are well on our way to completion! |
||||||||||||||||||||
|
So, in Photoshop, open up the interior view sprites of your cloned window and let's start the second set of rotations. Once again, repeat this process as we are going to do this in exactly the same way as we have just done the front views, but you need to note that the frame image numbers are reversed. Start with the image on the far left - sprite 402. Are you finding it just a little quicker each time you do this? I know I did on my first time with a multi-tiled object where there are a lot of repetitive actions - and on my second time I didn't even need to use my references much. Honestly, it does get much quicker each time. |
||||||||||||||||||||
|
...and this is how it looks in Transmogrifier!
The more observant among you will have spotted that in Transmogrifier, we still have part of the original window frame showing alongside our shiny new window.
|
||||||||||||||||||||
|
Take a little look in the 0403 folder at the sprites therein. Yes, you guessed it - more windowframe. We are going to leave these alone (much to your relief) as they will help us in our next stage - lining up our window in the X and Y co-ordinates. |
||||||||||||||||||||
|
The X & Y Co-ordinates - or Jigsaw Puzzle Pt. 2 |
||||||||||||||||||||
|
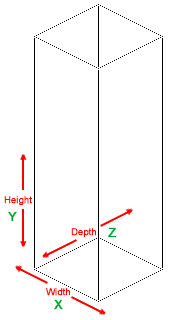
Once we have exported the object, we will not have to move the object in the X and Y channels again - exporting it fixes it in place. But if you position your object perfectly and then for some reason import it again, the X and Ys will revert to their original state and we have to start all over again. The X and Y channels are not fixed unless we either leave this object alone or export it. One final point - you can see that because we used a lot of the yellow in our image, TMog has made some A channels for us already as we can see through the window panes. They are very sharp and precise - that is because we unchecked the Soft Alpha Channel box when initially exporting the sprites. This is great, and you can even leave them as they are if you like. But as we want our window to look really good and professional, we are just going to go back and customise them a little. And yes, TMog has made some Z buffers too - but you will see they are not as good as they could be, and will most certainly cause bleed-through in the game. Finally, here's our little line drawing from previous tutorials to remind us that the Y co-ordinate handles the height of the object from the floor, and that the X co-ordinate handles the width - or whether the object sits to the right, left or centre in the grid. |
||||||||||||||||||||
|
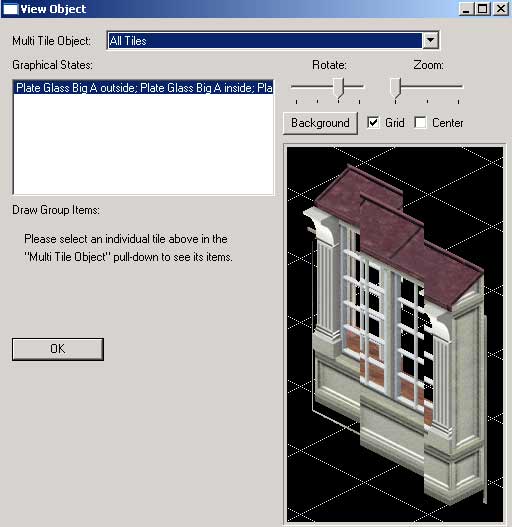
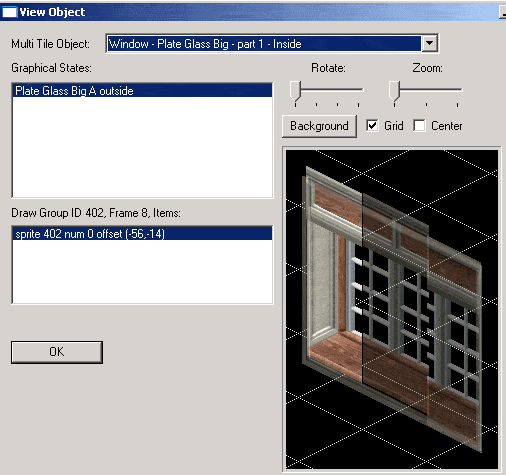
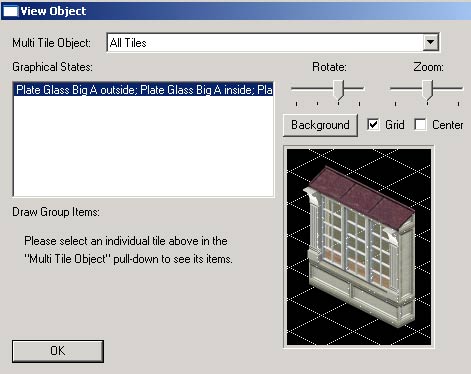
So, using the windowframe left over in Transmogrifier from our unused 0403, 4 & 5 sprites, let's start to line up our new pieces so that they match up exactly to each other. To do this, click on the arrow to activate the pull-down menu where it says Multi Tile Object: All Tiles.
|
||||||||||||||||||||
|
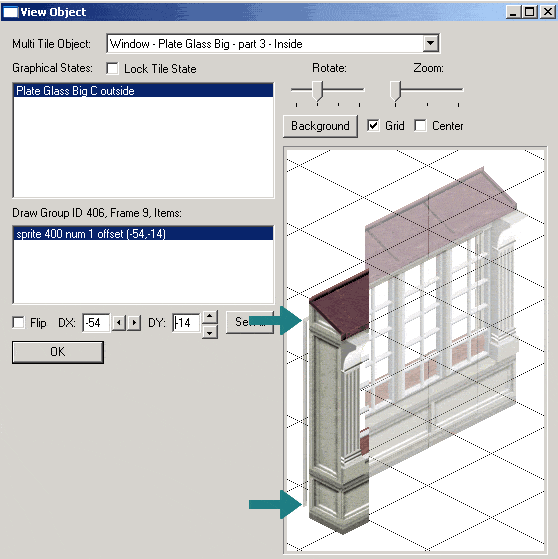
Each option highlights one part of the image. If you cannot see this properly, click anywhere in the black background grid image in TMog to turn it to white. Some of the options will relate to the frame. As they are in the exact position they need to be, we do not need to alter them. Once you have the piece you want to start with highlighted, click the highlighted part in the window called "Draw Group ID 402, Frame 8, Items:" This will bring up your X and Y co-ordinate boxes, where we can use the arrows to move the sprite around. Can you see that there is a thin brighter coloured line on part of the image where the centre and far right windows meet? That is because they are overlapping in the X co-ordinate so one of them will have to be moved in the X as well as the Y. |
||||||||||||||||||||
|
Once each sprite is in place to your satisfaction, don't forget to press the "Set All" button to set the sprite in place in the smaller zooms - and once again, appreciate the light relief that dear ol' Don provides us with in his pop-up box. I found that this inside view was easier to place than the front view. I don't know about you, but for the front view I had to compare mine with my casementWIP file to make sure I am getting it right. I moved the window image slightly away from the frame in the screenshots below so you can compare it too. And as you can see, I had to move the image down quite considerably. But once I have this in place (I need to move it sideways along the X axis as you can see), the others will be easy to place next to it.
|
||||||||||||||||||||
|
|
||||||||||||||||||||
|
|
||||||||||||||||||||
|
Although your friend and mine Don Hopkins has provided us with that wonderful "Set All" button, sometimes a little adjustment of our own is necessary on the smaller zooms. I found that I needed to tweak just one sprite in the middle zoom, and two sprites in the smallest zoom. You will also note, alarmingly, that your object has developed a strange case of the mog measles in the smaller zooms. Unfortunately, Transmogrifier does not like shades of grey (I guess it prefers the less interesting life) and sometimes does this to a large extent - or not at all. Don't worry too much about this as we can - and will - deal with this easily enough later. For now, let's get these X and Y placements right so we can get on with our Z buffers. Once you are happy with your placements, you can export the object in the usual way with One Zoom, All Channels. As I said above, once we have exported the object, we will not have to move the object in the X and Y channels again as exporting it fixes it in place. But don't forget - if you import it again now you have it perfect, the X and Ys will revert to their original state and we have to start all over again. The X and Y channels are not fixed unless we either leave this object alone or export it. |
||||||||||||||||||||
|
The Z Buffers |
||||||||||||||||||||
|
Let's ring the changes and do the Z buffers next. It's time to open up your game and see your lovely new window in all its nearly finished glory! Firstly though, I am assuming that you have done your normal preparations like taking all your downloaded objects, walls & floors out of your folders and storing them in a safe place, so that TMog and the game will load very quickly for testing and retesting your object. I give full instructions on this in previous tutorials if you want to refresh your memory. You will also need to install the folders from the BunnyWufflesTutorialKit containing walls and floors in a folder called Bunmogwallsfloors. Put them straight into your main walls & floors folder where you can move them out again when you just want to play the game. Keep Photoshop open because you will be taking screenshots, and don't forget to close Transmogrifier otherwise your game will not load any objects. If it even loads up at all. |
||||||||||||||||||||
|
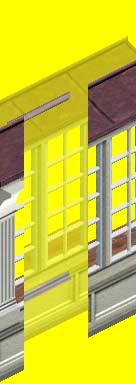
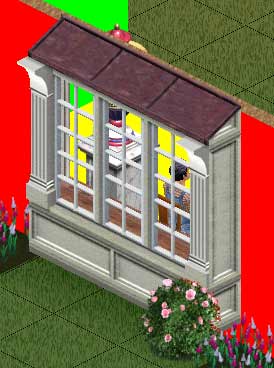
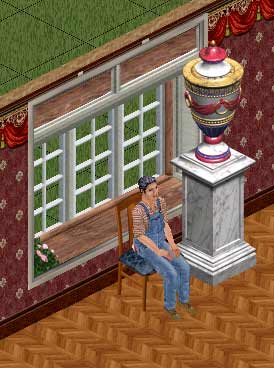
And this isn't looking at all bad. The window, not the decor that is. No massive z bufferage problems except for that suspicious looking rosebush. But as this window sticks out from the wall, we wouldn't put such a large item under it anyway. It would never grow for a start!
Well, this is looking very good indeed. Again, not the decor I hasten to add - but the window. I can only see two problem areas - that rosebush and two small areas above the window frame. There is no bleeding with either the statue or MCT on his chair, and where the window meets the walls appears to be pixel-perfect.
Now let's give MCT a treat, eh? Instead of his usual home decor, let's put down some more realistic wall and floor coverings and have a look to see what our window will look like in OUR sim world. |
||||||||||||||||||||
|
All in all, this is a reasonably good object for our first try! Those A channels are great too - no problem with seeing through the window. Except that the window looks as if it hasn't any glass in it! Many windows in our game look like this, and if this is the look you like, then you can leave the A channels as they are. But as this is a tutorial, we are going to glaze those windowpanes and use the A channel to make them transparent. |
||||||||||||||||||||
|
Have you identified a problem area on my screenshots above that I haven't yet mentioned? Don't worry if you haven't spotted it - I often forget to check this one myself.
Take a look from the other rotation... |
||||||||||||||||||||
|
There is actually another problem area we haven't yet looked at. The rosebush was a ridiculous item to try to put under our window admittedly, but when putting a low item under it we can see that there is still a z buffer problem.
|
||||||||||||||||||||
| So let's fix them!
You need to take screenshots of your window against the bright colour wall where there are problem areas. Don't forget to delete the floors and take the screenshots in a mode where the floor grid is showing. Save these screenshots in Photoshop as we need them to help us fix the problems. Cast your mind (or your browser) back to our first look at Z buffers where, to identify exactly which part of the Z buffer to alter, we used a combination of screenshots, object images and z buffer templates. Here's a small reminder of the steps we took: |
||||||||||||||||||||
|
||||||||||||||||||||
|
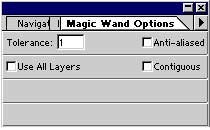
We are going to do much the same now only using a template from the zbbsbilandbun.psd file.So, close down your game and once it has finished uninstalling, load up Transmogrifier. Then, in Photoshop, open the P and Z sprites from the first three folders (0400, 0401, 0402). Change (if you need to) your Magic Wand options to the lowest tolerance, and turn off the Anti-aliased and Contiguous options. I am going to work on the front view first, and will minimise the back (or inside) view sprites for the moment. Convert the relevant Z buffers from indexed into Greyscale, and put your P and Z sprites side by side to each other. Mine look like this: |
||||||||||||||||||||
|
Now let's make pixel sandwiches. Your screenshot is the background image, on which you need to drag or paste various images from the sprites and the zbbsbilandbun templates file. Because I am still a kind bunny (if a hard taskmistress) you will find a file illustrating the steps I took to amend this first sprite in the BunnyWufflesTutorialKit2 folder. You will be not at all surprised to learn it basks in the fairly obvious name of sprite1layers.psd. |
||||||||||||||||||||
|
I will take you through it step by step below as this is the method I use to alter my Z buffers, and so I would ask you to follow this along with me as I talk about each function. The pictures shown here are much smaller than the ones you should now have open in Photoshop! To follow this yourself with your copy of the file, make sure you only have the layers exposed that I talk about in each screen - all other layers should be made invisible. |
||||||||||||||||||||
|
||||||||||||||||||||
|
All the above seems rather fiddly, but honestly, it soon becomes a matter of routine and you do get quicker each time. If once I have copied the Z buffer over and it is still wrong, doing this set (or part of this set) of actions again and again will eventually fix it.
|
||||||||||||||||||||
|
So, off you go and fix those Z buffers, and we'll meet up again once we have done them completely so we can then look at doing.... |
||||||||||||||||||||
|
The A Channels |
||||||||||||||||||||
|
Our window is looking fine, isn't it! But there is something else we could do to it to improve the overall look and that is put some glass in those windowframes. |
||||||||||||||||||||
|
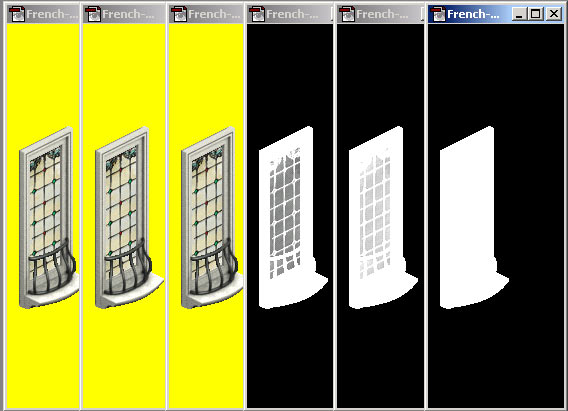
On my "Windows Windows Windows" page there are several sets of windows (what else, on a page devoted to windows?) among which is this set of stained glass "leaded lights" French style windows. Did I say windows? * This trio of windows are all of the same design but with different transparancies - one is almost completely clear, one is completely opaque for privacy and the third one is somewhere inbetween. This was all controlled in the A channel, where you will recall from previous tutorials that the darker the image, the more transparent it is in the game - so if part of the image is pure black you see nothing and if part of it is pure white it is totally opaque. The degrees of grey are what makes the A channel come into its own, and that is what we will use for our glass panels.
* This paragraph was sponsored by the word "windows" |
||||||||||||||||||||
|
You can see that the three windows are identical in the P sprite, but the differences come in the A channel where the part of the image which is translucent glass starts off grey & gets progressively lighter until the last one - where the whole image is solid white. So in the game, the first window will be fairly transparent, just as in the far left in the game screenshot above. The centre window is only slightly transparent as you can (sort of) see from the screenshot. The right hand window is completely opaque in the screenshot. Now let's compare this P sprite with our new window. |
||||||||||||||||||||
|
You will remember that I kept the yellow of the windows intact as I wanted them to be completely transparent in my first draft of this window. If we were to alter the A sprite to shades of grey now, we would just get some of that familiar muddy yellow we all love so much. We need some kind of an image there in the P sprite for us to make transparent in our A sprite.
I am the first to admit that it looks rather uninspiring, but don't forget we will not see it much once we have our transparancy sorted in our A channel.
|
||||||||||||||||||||
|
Can you see that the wooden sill and inside wall are now obscured by a layer of translucent "glass" - but oh how the solid glass looks strange behind the rest of the window. But as those are the parts that will be controlled with the A channel, it will look better once the A channels are finnished so let's go and do just that. So now, in Photoshop, open up all your sprites for the front views and convert the A & Z sprites from indexed to Greyscale. Have your casementWIP.psd file open too, as this is where we will be editing the image to end up looking something like the one on the left here. You will also be using your zbbsbilandbun.psd file on your Z buffers so you need that open too. Whatever option you decide upon, the image for the glass should now be a new layer in your casementWIP file. Hopefully all your layers are preserved because some of the image needs to go behind the window frames but above the wooden sill, and some of the image needs to go behind all of the window. Play around with the glass, and once you are satisfied, flatten & copy the relevant parts of the image to the relevant P sprites, then index and save them. Don't forget to use the history palette to restore your casementWIP file to the pre-flattened state to preserve all your layers! We now need to fill in the gaps in our Z buffer where the glass is going to go. If we do not do this, the glass image will not show up in the game no matter WHAT we do to our A channel. The game will not distinguish between these gaps and the part of the Z buffer which needs to be pure white.
|
||||||||||||||||||||
|
Inbetween your Background and Layer I, shift/drag the "Z buffer far large" layer from the zbbsbilandbun file so it snaps exactly into place. Now, go to Layer 2 (your P sprite image) and click anywhere where the yellow should be. Press delete, and with the ants still marching on, go to the "z buffer far large" layer and also press delete. Make the rest of your Layer 2 invisible or delete it, and you can now index and save the Z buffers. You may see that the new glass image z buffer is lighter than the rest - that shouldn't make much of a difference in the game. |
||||||||||||||||||||
|
|
||||||||||||||||||||
|
Let's now work our glass magic on our A channels. I don't know how you want to go about this, but I used my magic wand to select all the white, copy and pasted it to make a new layer, then made a new layer inbetween the background and the white image, and randomly selected some grey and just used the pencil to draw under the white in the places where the glass should go. |
||||||||||||||||||||
|
|
||||||||||||||||||||
|
That grey on the A channel may be too light or even too dark for my tastes but it will be easy enough to change it using the history palette and a different shade of grey. |
||||||||||||||||||||
|
And here is our finished large view front window in Transmogrifier. You can see some of the texture which for me is fine because old casement windows of this type often had imperfect glass (see my Windows Windows Windows page). As this depends on what image you used in the P sprite and a little on the shade of gray in your A channel, yours might not look like this. You might not even want this effect, so just repeat the process using a different image - or even a solid colour in place of the glass. Tweak your Ps and As until you are satisfied, then work the same magic on the back views - not forgetting the Z buffers of course. As from the back view we don't see any of the inside of the window, you won't need the layer where you change the opacity. Import your super new object into Transmogrifier and marvel at its beauty.
|
||||||||||||||||||||
|
Now look at it in the middle and small zooms. EEEK!! My dear friend, I am sorry to have to tell you that your object has been afflicted with the Mog Measles..... |
||||||||||||||||||||
|
The "Mog Measles" - A Miracle Cure, of sorts |
||||||||||||||||||||
|
Now, I love Transmogrifier. I love Don Hopkins. I would have his babies if he wanted babies and I didn't already have a hubby. But for some reason unknown to me, his otherwise splendid utility Transmogrifier does not like grey in its P sprites. Light grey, dark grey, inbetween grey - no thanks. Not liking that one bit. So, as we made a largely grey object, my medium zoom looks like this and it is my guess that yours does too:
EW. Ew ew ew. Thankfully, there is an easy but fiddly way to fix this*.
*You KNEW I was going to say that didn't you? Admit it, I don't mind being so pre-diddely-ictable. |
||||||||||||||||||||
|
You will recall that I said above that although we can now use that wonderful "Set All" button, sometimes a little adjustment of our own is necessary on the smaller zooms. I found that I needed to tweak just one sprite in the middle zoom, and two sprites in the smallest zoom. Adjust what you need to on the X and Y co-ordinates now in those smaller zooms if you didn't do it before, as we are going to fix it in place by exporting our object for the final time. In a way we have never done before!
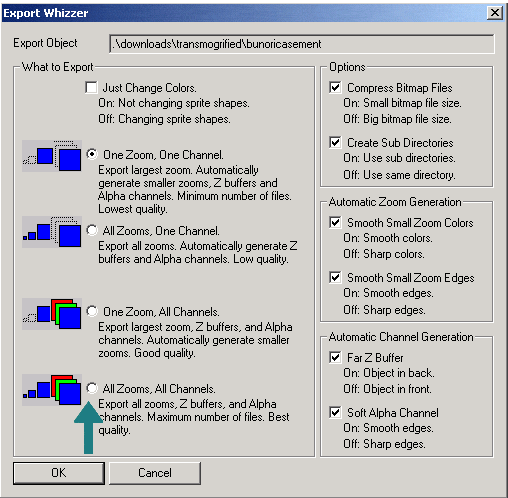
Now uncheck the "Just Change Colors" button and right at the bottom of the list, you will see that we get an option called "All Zooms, All Channels". As TMog rightly says, using this option will export all the zooms of all the channels, so in our sprite folders in Photoshop, we will have an absolute plethora of files to play with - and some will be very tiny indeed. One more thing to note before you go ahead and export - take a look at the Soft Alpha Channel option we used above. The moment you select an export option, this button will be greyed out. But due to some little quirk I guess, this sometimes still means you get fuzziness in the parts of the object which join together. So what I do is uncheck that option before I select which Export option I take. Uncheck that option, then select All Zooms, All Channels, and click OK to export your object! |
||||||||||||||||||||
|
In Photoshop, take a look inside your sprite400 folder, where you will now see six sets of files where before you only had two sets. And as they say in the filename, along with your large zoom sprites, two sets are now for the front and back medium zooms, and two sets for the front and back small zooms. Mercifully, we need not look at the A or Z channels for curing the mog measles - so just open up all the medium and small P sprites. We don't even need to convert them to RGB for this exercise, all of which is why I say this is a miracle cure. It could not be simpler. |
||||||||||||||||||||
|
Magnify the image up to your preferred large zoom, and, using the eyedropper tool, select a shade of grey from the pixel next to the offending bright white measle. Curing these measles is as simple as this - use your pencil tool on the one pixel setting, and just colour in those offending white pixels with the appropriate shade of grey.
Once you are satisfied you have all the measles cured, save your file and move onto the next one, then do the same with the relevant P sprites from the 0401 and 0402 folders. After you have finished pencilling all your measles (I said pencilling, not penicillin - antibiotics do not help in curing or preventing measles in either life or Transmogrifing) save your P sprites, and in TMog, import your object for the last time, and take a good look at those smaller zooms... |
||||||||||||||||||||
|
...where you will find measle-free windows!
So, your object is finished apart from the renaming, repricing and composing your description. We covered that in detail in the last tutorial, but once again let me say that the only thing I would specify here is that you add to the description the following information:
And don't forget to press the "Set All" language button when you have finished! |
||||||||||||||||||||
|
Haven't we come a long way from the brown chair tutorial? I hope that you have enjoyed our time together and learned tons of shiny new stuff about Transmogrifier and Photoshop. Now you can make excellent quality objects all on your own without me, please feel free to go ahead and do just that! Sims1 diehards like me (and you if you have come this far) need a constant supply of new objects and since the advent of Sims2, more and more object makers have neglected or even abandoned Sims1 completely. Do please consider making a website for your objects. There are still ways of getting your stuff out there for free - POBS forums, or do consider opening a Yahoo Group with a GeoCities website for the images. Whatever you decide to do, good luck in your Sims Career, and don't forget to let me know where your shiny new stuff can be downloaded! |
||||||||||||||||||||


|
![]()
 This
is a slightly different tutorial to the others. It still consists of
several steps all hopefully easy to follow but because I am assuming
that you now have experience in basic Transmogrifier and Photoshop,
you will find that I am using a lot less illustrations at each step
- especially if it is something we have done several times in the past.
I am assuming you followed all the previous tutorials; if you didn't,
you really should go back and take a look because I will be making assumptions
and using terminology of steps and processes learned in those first
lessons.
This
is a slightly different tutorial to the others. It still consists of
several steps all hopefully easy to follow but because I am assuming
that you now have experience in basic Transmogrifier and Photoshop,
you will find that I am using a lot less illustrations at each step
- especially if it is something we have done several times in the past.
I am assuming you followed all the previous tutorials; if you didn't,
you really should go back and take a look because I will be making assumptions
and using terminology of steps and processes learned in those first
lessons.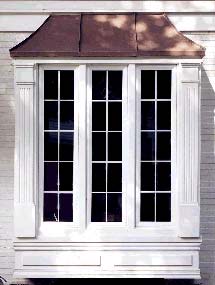

 Double-click
on Game Data, and lists like this should appear in the top screen of
SimExplorer. This is nothing to worry about - SimExplorer is trying
to read a Maxis file (walls, I think) and not having much luck*
Double-click
on Game Data, and lists like this should appear in the top screen of
SimExplorer. This is nothing to worry about - SimExplorer is trying
to read a Maxis file (walls, I think) and not having much luck*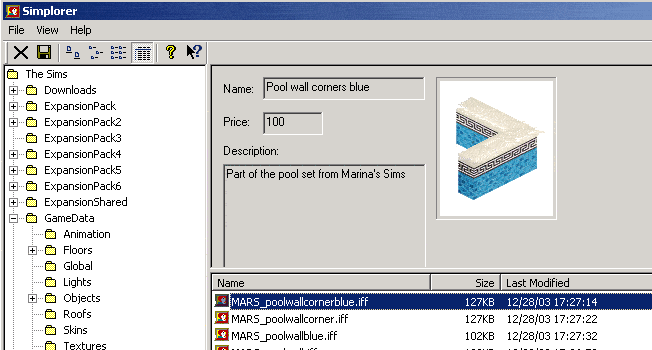 In
the bottom window we now have a list of objects within that folder,
and when you scroll down them a picture and description will appear
in the top window.
In
the bottom window we now have a list of objects within that folder,
and when you scroll down them a picture and description will appear
in the top window.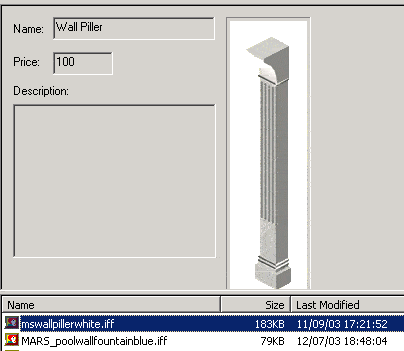
 I
am fairly confident that you have everything from
I
am fairly confident that you have everything from  .........and
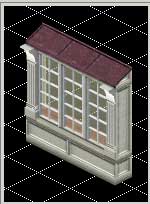
after looking through Transmogrifier, I have identified this as being
the best candidate. It has two views; an inside and an outside, and
is three tiled so the window will be in similar proportion to the picture.
.........and
after looking through Transmogrifier, I have identified this as being
the best candidate. It has two views; an inside and an outside, and
is three tiled so the window will be in similar proportion to the picture.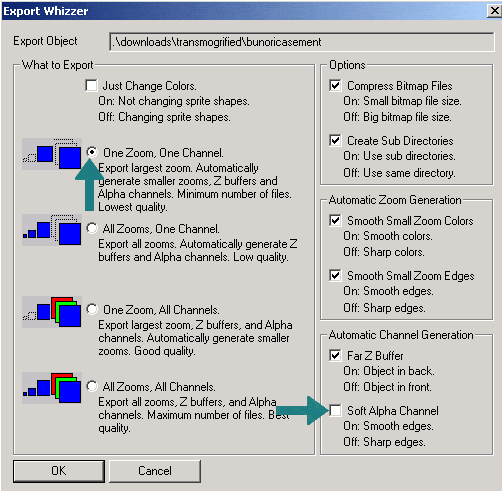
 We learned
how to do this last time - the Thumbnails selection is in the drop-down
menu in the View options box marked here:
We learned
how to do this last time - the Thumbnails selection is in the drop-down
menu in the View options box marked here: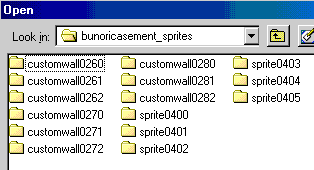 Finally,
in Photoshop, you now should open the sprites you just cloned for your
new window. Don't panic at all those folders inside - most of them are
the custom wall cut-outs which we can and should safely ignore in this
tutorial.
Finally,
in Photoshop, you now should open the sprites you just cloned for your
new window. Don't panic at all those folders inside - most of them are
the custom wall cut-outs which we can and should safely ignore in this
tutorial.  ....And
paste them we are going to do! With your magic wand, click anywhere
on the yellow, right click and select inverse, and copy & paste
the window frame image INBETWEEN the layers on your renamed 000BWGrid5x3.psd
file (to do this, have the Background layer highlighted). Do the same
for all three sprites in order, so that you end up with your grid file
looking like this with Layer 2 being the left hand bit, Layer 3 the
middle bit and Layer 4 the right hand bit:
....And
paste them we are going to do! With your magic wand, click anywhere
on the yellow, right click and select inverse, and copy & paste
the window frame image INBETWEEN the layers on your renamed 000BWGrid5x3.psd
file (to do this, have the Background layer highlighted). Do the same
for all three sprites in order, so that you end up with your grid file
looking like this with Layer 2 being the left hand bit, Layer 3 the
middle bit and Layer 4 the right hand bit: 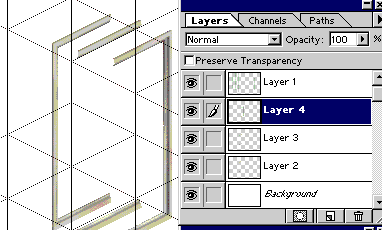

 Obviously
I spent some time cutting and pasting these images before getting them
to be the final size, but as you can see, most of them came from the
Bay Window images, Marina's Pillar, and I chopped and shaped the red
roof from the Casement.jpg image. I tried using the green roof from
the Bay window, but I couldn't get it to look how I liked - so that
picture was doubly useful after all!
Obviously
I spent some time cutting and pasting these images before getting them
to be the final size, but as you can see, most of them came from the
Bay Window images, Marina's Pillar, and I chopped and shaped the red
roof from the Casement.jpg image. I tried using the green roof from
the Bay window, but I couldn't get it to look how I liked - so that
picture was doubly useful after all!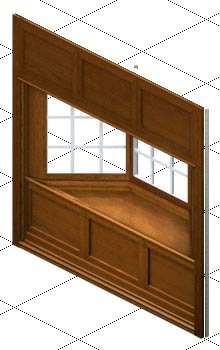
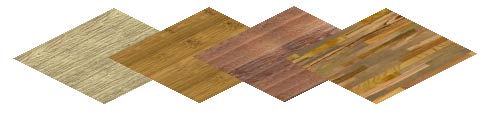 So
because I am a generous bun and have left you to much your own devices
for this tutorial, I have another present for you in the BunnyWufflesTutorialKit2
folder under "images". This is called woodtextures.psd
and consists of ...well... four wood textures skewed and proportioned
to the Sims in various ways.
So
because I am a generous bun and have left you to much your own devices
for this tutorial, I have another present for you in the BunnyWufflesTutorialKit2
folder under "images". This is called woodtextures.psd
and consists of ...well... four wood textures skewed and proportioned
to the Sims in various ways. 
 So
all I did was copy the windowsill from the inside view, flipped it horizontally
and moved it into place. I also did the same with the side wall piece.
So
all I did was copy the windowsill from the inside view, flipped it horizontally
and moved it into place. I also did the same with the side wall piece.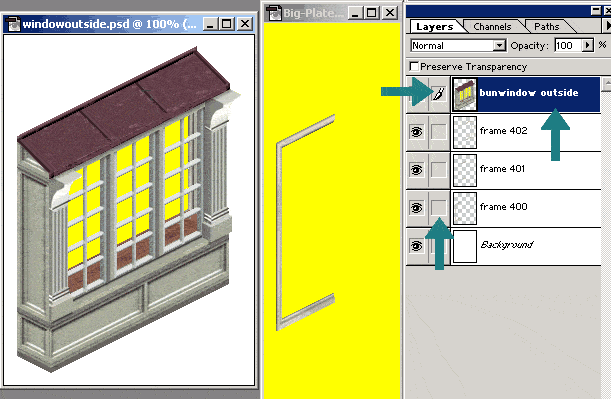 So
here we have our windowoutside.psd
So
here we have our windowoutside.psd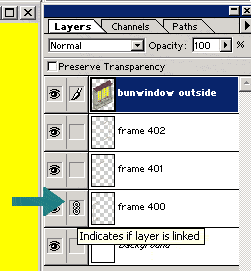
 You
can see that by dragging in this way I have left the originals where
they are in the windowoutside.psd file, and dragged the two layers we
need into the Big-Plate P sprite file.
You
can see that by dragging in this way I have left the originals where
they are in the windowoutside.psd file, and dragged the two layers we
need into the Big-Plate P sprite file.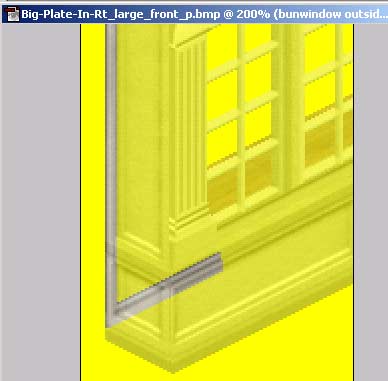

 OK,
this is how my interior window divided up....
OK,
this is how my interior window divided up....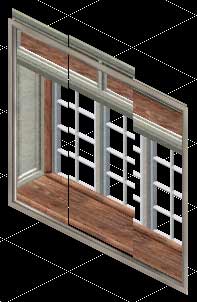
 Cast
your mind back to the time we exported the sprites and I said "Let's
do this in a different way than before". You will recall that we
unchecked the Just Change Colors box, but checked the One Zoom, One
Channel box. Doing it this way allows us to make an initial object,
position it correctly in the X & Y channels, with which once we
are satisfied can then be exported in the usual way with One Zoom, All
Channels so we can make our own A and Z channels.
Cast
your mind back to the time we exported the sprites and I said "Let's
do this in a different way than before". You will recall that we
unchecked the Just Change Colors box, but checked the One Zoom, One
Channel box. Doing it this way allows us to make an initial object,
position it correctly in the X & Y channels, with which once we
are satisfied can then be exported in the usual way with One Zoom, All
Channels so we can make our own A and Z channels. 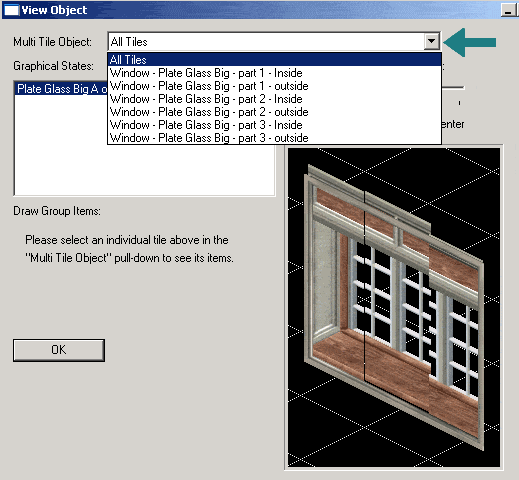
 However,
the window sprite on the far right is lined up perfectly with the unused
window frame - exactly as it is in our casementWIP file, and so I will
line the other sprites up next to this.
However,
the window sprite on the far right is lined up perfectly with the unused
window frame - exactly as it is in our casementWIP file, and so I will
line the other sprites up next to this.
 Welcome,
if you will, to the garden of our old friend Mr Chair Tester. I trust
he won't mind modelling this lovely window for us instead of a chair.
Welcome,
if you will, to the garden of our old friend Mr Chair Tester. I trust
he won't mind modelling this lovely window for us instead of a chair.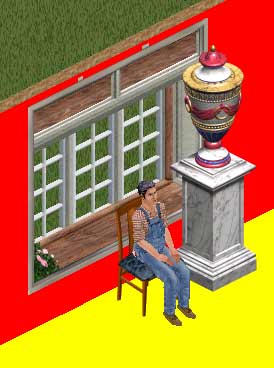 Let's
take a look inside MCT's lovely home.
Let's
take a look inside MCT's lovely home.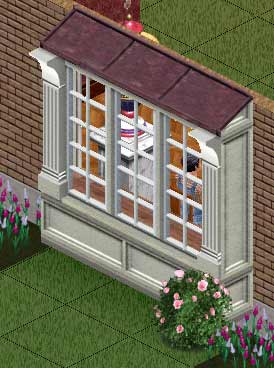
 Oh
yes, very nice indeed. Well, apart from that rosebush. And the two bits
on the top.
Oh
yes, very nice indeed. Well, apart from that rosebush. And the two bits
on the top.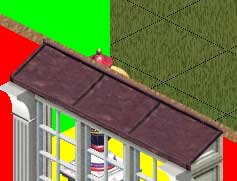
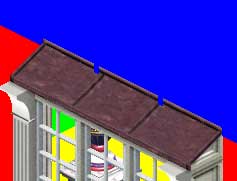 The
roof part of the image is slightly higher than the wall. By looking
at the upstairs wall we can see if this causes any Z buffer problems
- and as you can see from the image on the right, yes it does.
The
roof part of the image is slightly higher than the wall. By looking
at the upstairs wall we can see if this causes any Z buffer problems
- and as you can see from the image on the right, yes it does.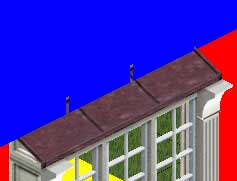 ...where
you will see that it really does have a problem.
...where
you will see that it really does have a problem.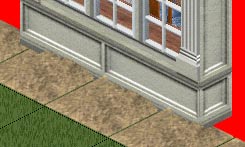


 My
screenshots file is minimised but you can see that the zbbsbilandbun
templates file is open next to the sprites I am about to edit.
My
screenshots file is minimised but you can see that the zbbsbilandbun
templates file is open next to the sprites I am about to edit.
 Let's
just take a moment to look at the different transparencies I used for
the above three objects.
Let's
just take a moment to look at the different transparencies I used for
the above three objects. It
is up to you what kind of image you want. You could replace the yellow
with a solid grey or light blue or even a bright colour if you want
a stained-glass effect. I like to use a real glass image sometimes,
and this is what I will do here by using the image on the right - you
can use it too if you like by right-clicking and Save As. I didn't include
it in the Tutorial kit.
It
is up to you what kind of image you want. You could replace the yellow
with a solid grey or light blue or even a bright colour if you want
a stained-glass effect. I like to use a real glass image sometimes,
and this is what I will do here by using the image on the right - you
can use it too if you like by right-clicking and Save As. I didn't include
it in the Tutorial kit.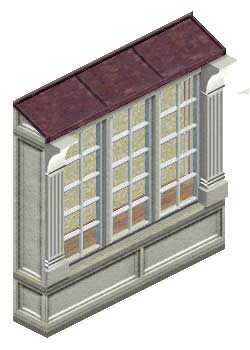 There
is part of the window transparency you will NOT be controlling with
the A channel - and that is the part of the glass you see the windowsill
and right hand wall through. What I do there is still use my new glass
layer (whether solid colour or an image) and use the Opacity option
to make it see-through. I took the opacity down to 78% but that is a
matter of personal taste.
There
is part of the window transparency you will NOT be controlling with
the A channel - and that is the part of the glass you see the windowsill
and right hand wall through. What I do there is still use my new glass
layer (whether solid colour or an image) and use the Opacity option
to make it see-through. I took the opacity down to 78% but that is a
matter of personal taste.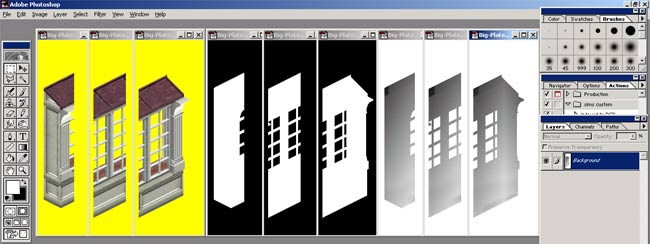 So
my P, Z and A sprites went from this....
So
my P, Z and A sprites went from this.... ....to
this.
....to
this.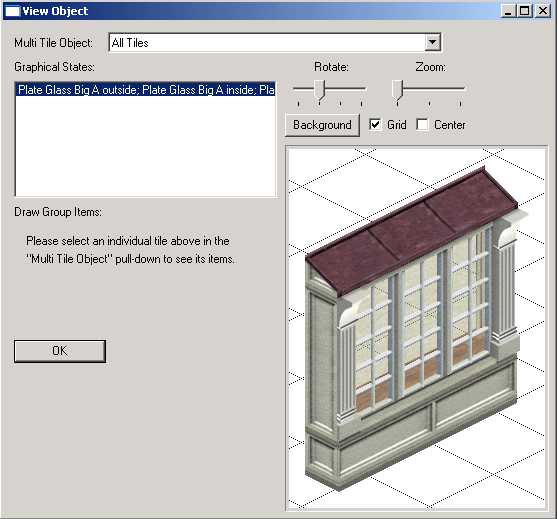
 In
Transmogrifier, find your object and click the "Export Object File"
option.
In
Transmogrifier, find your object and click the "Export Object File"
option.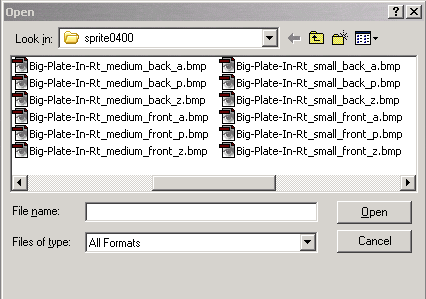
 These
are the front and back views from sprite0400, and you can just about
see some measle activity going on.
These
are the front and back views from sprite0400, and you can just about
see some measle activity going on.