
X & Y Offsets & first steps in
the Z Buffer
By Bunny Wuffles
|
Again, unlike most of the earlier tutorials, there is a bit more general reading and theory which needs to be done before we get "down and dirty" with the pixels, so I suggest you print this tutorial off to paper, take a glass of your favourite beverage, clear your mind and sit down somewhere quiet, nice and comfy and read this through first. I use Photoshop 5.5, but I think the basics are pretty much the same (if not easier) in PSP, and I assume pretty much the same in later versions of PhSh. However, as always, I am assuming that you may not be too familiar with many of the Photoshop tools I am using - so forgive me in advance if I sometimes sound a little too basic ;o) During the course of all this, you will learn more about why objects sometimes bleed through walls and other objects, and more importantly how to stop them doing it. |
|
The way I am going to show you here is the method I am starting to use, which I have learned from a combination of tips, trial & error, experimenting and reading other tutorials on Z buffers from both sim sites and graphics sites / books in general. There are probably as many ways of making a correct z buffer as there are object makers. Some use different methods to achieve the same effect, some know short cuts that others don't; and some utilise any combination of those and more. This tutorial shows the way I am learning to make my z buffers and by no means am I trying to imply that these are the definitive and only ways of doing this - rather, just an easy way to start off. To start with, there is a tutorial here on my very own site which is essential reading as a clear introduction to this subject - the "Z Buffers Basics" picture below will link you there if you haven't already read it. |
|
No - this is not going to be a treatise on the metaphysics of language (well, not from now on anyway) but that sentence is: "the area furthest away from the viewer is the farthest corner of the tile — the lightest greys." And that's when I understood that we are dealing now with flat objects but with three dimensional properties while the purpose of the whites, greys & blacks are not too dissimilar to those in the A buffers in their invisible relationship to the P sprite. |
|
Maybe they are trying to disguise the fact in as arcane a language as possible that once you realise a few simple truths, Z buffers are NOT DIFFICULT to understand and manipulate. Sure, they are fiddly and can take a long time to get exactly right - but that is not through lack of knowing what to do but more of having to keep tweaking a shade of grey, re-importing the object, closing TMog, firing up the game, taking screenshots, closing the game, firing up TMog, tweaking a shade of grey, etc. to retest the object after each & every little tweak.
|
|
Once you know what to do, it is having the patience to actually do it each time which sorts out who is going to be a great object maker and who isn't. And we are going to be GREAT object makers, aren't we? Yes bun, we are. Good. So, remember with our A sprite we learned that "in graphics in general - and not just in TMog - the A Channel is a portion of each pixel's data that is reserved for transparency information. It is really a mask - it specifies how the pixel's colours should be merged with another pixel when the two are overlaid one on top of the other." |
|
In fact, there are three buffers which handle this information - two are adjusted in TMog itself and the third in an image editor as a greyscale sprite. This little line drawing of our TMog grid box from a previous tutorial will help you remember which is which: X Width Information (handled in TMog) Y Height Information (handled in TMog) Z Depth Information (handled in a greyscale sprite) |
| We will need to look at this a lot closer later on in this and further tutorials, but for now I am sure you will be relieved to learn I am now going to give the theory a bit of a rest for the moment as we can now get on with starting some actual editing itself. |
|
Firstly, I have included the partially made object we will be editing, called mifzbuftutpntg.iff. We are going to take things step by step, and it will be much easier to follow if you are doing the exact same things at the exact same time as I am to the exact same item. Put this object in your Downloads\Transmogrified folder. Secondly, there is a set of seven walls and floors for your usual game walls and floors folders. These are not attractive but are incredibly useful in that they allow us to check the positioning of both the object and its Z buffers in the game. They are priced at 1 simolean so they are easy to find, and are in a folder called Bunmogwallsfloors which contains two subfolders (one for walls, one for floors) which you can put straight into your main walls & floors folder and can move them out easily enough when you just want to play the game. Finally, there is a file called bunnewtemplates.psd for your usual image editing folders (I generally store mine in a folder in "My Documents/SimMoggingStuff/Templates") with two rotations of a grid similar to the ones in Step 5 ("Dress Up A Desk") and two rotations of a wider-than-one-tile Z Buffer template based on the ones created by m'honey Bil Simser. We will be using all of these items in various places during this tutorial, so download and install them now before you have either Photoshop, TMog or your game open. |
|
|
|
While we are talking about putting things in folders, for this type of exercise we need both the game and the Transmogrifier to load & unload as quickly as they possibly can. What I do when I am mogging (rather than playing) is take EVERYTHING I have downloaded out of the game temporarily and store it away from the main Sims folder (I use a folder in "My Documents" called "Sims Stuff"). This includes the copy Expansion Pack .far files I won't be using, and also walls and floors with the sole exception of the Maxis default ones and the ones in the zip above - try it yourself as I am sure you will be surprised at what a difference in loading time this alone makes. In fact, the only things I leave in my game during a mogging phase are my own TMogged objects so that they don't cause any object ID conflicts with each other, the wall and floor templates referred to above and anything I have downloaded from a free-to-clone site which I am cloning at that particular moment. I also use a special lot in the game while I am making an object so that I don't get any "Missing Objects" messages and can bulldoze safely once I am ready to test the object in the game properly. I don't have any downloaded skins in my game at present, but I believe that they don't affect the loading time so you can leave your own skins folder alone. The folders to check for temporarily removing downloaded objects are:
|
|
The bad news is that unfortunately you will not be able to use it in your game until we have amended it considerably, because currently, it looks alarmingly like the picture on the right. Believe it or not, but the painting is supposed to be just above the table, on the same square. You will be loading up your game and taking plenty of screenshots from now on to help you with the placement of your object in TMog - and to save repeating myself every time I am just going to assume that each time I show a screenshot of the object in the game in this tutorial that you have taken one yourself at the same point. To take a screenshot in the game, press the Print Screen button on the top of your keyboard, minimise the game, go back to Photoshop, create a new file 800x600 and Ctrl-V Paste the screenshot to the new file. Each screenshot you take can be a new layer on this same file. I generally call this file something like "pictureingameWIP.psd" because these become large files and giving them all a similar name makes it very easy to use Windows Explorer to find all files marked *WIP.psd at a later date to delete. WIP is Wufflese for Work In Progress :o) |
|
While talking about screenshots, for this exercise you should ensure that when you take the screenshot, you are in Build mode or a mode which shows the grid squares on the grass, and that any flooring next to your wall is only one or two tiles deep at the most, so that we have some grid squares in the screenshot to work with - this becomes essential later on in the tutorial. Finally, I'm sure I don't have to remind you but I will anyway - you must have TMog closed when you open up the game otherwise your object won't show up, and you must have the game closed when you open up TMog otherwise your object won't load up. But if the memory/speed of your computer allows it, it is best to keep Photoshop loaded up and open all the time as you will be taking screenshots of both TMog and the game. OK, back to our object and I'm sure this won't be the first object you have downloaded or even made which looks similar to this, but by the time you have finished this tutorial, it will be the first object with these problems that you have amended so that it looks perfect. So now you have this stunningly well crafted object in your normal game folder, open up Photoshop and Transmogrifier. Find the object you are looking for - which revels in the glorious name of mifzbuftutpntg, select it, where you should see that the file is Editable. If for some reason it is not, you will have to clone it and give it a new name first. |
|
The height looks pretty obvious, but because the clone is wider than the actual base painting, the width will have to be checked as well. When I say width, I am actually talking about the placement in the grid - you will see what I mean in a moment. |
|
In TMog, click "View Object" and click on the grid background to turn it black. This will help us get a better look at the object's white frame. Note that the object is backless so two rotations are empty.
|
|
I'm sure you know this by now, but here's a reminder anyway - the top slider bar shows the four rotations of an object in TMog and the lower shows the object in the three zooms - close, medium and small.
|
Can you see at the
bottom left of the TMog screen we have two option bars marked X Offset and
Y Offset?  These
relate to the placing of the object relative to the grid square in the game.
Sadly, I cannot give you any tables of what offset values are optimum for
what object, because I have rarely found they are similar twice, and that
is after much labourious writing of them down and comparing. Instead, we
need to develop a good "eye" for what is correct placement - and
this does come fairly quickly you will be glad to hear. And you will also
be glad to hear that because we are working on the same object cloned from
the same base, hopefully our offset numbers should be the same in this particular
exercise. One of your shiny new wallpapers will help us in this as well
- you will see this in action later below. These
relate to the placing of the object relative to the grid square in the game.
Sadly, I cannot give you any tables of what offset values are optimum for
what object, because I have rarely found they are similar twice, and that
is after much labourious writing of them down and comparing. Instead, we
need to develop a good "eye" for what is correct placement - and
this does come fairly quickly you will be glad to hear. And you will also
be glad to hear that because we are working on the same object cloned from
the same base, hopefully our offset numbers should be the same in this particular
exercise. One of your shiny new wallpapers will help us in this as well
- you will see this in action later below. |
|
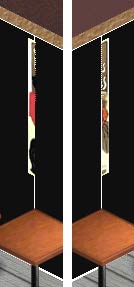
We are dealing with two rotations of this picture, and as you can see, both are higher on the wall than they should be (though one a little lower than the other), while the one on the right seems to be at more or less the correct width and the one on the left is way out on the width. Can you see how the picture in TMog relates to the width placement of the object in the game? From the little line drawing I did above, you will recall that the width information is controlled by the X offset, and the height information is controlled by the Y offset. We don't know as yet what Z buffer management we need (or need not) do as this will be changed each time we change the X or Y offsets. That is why it is important to make any X or Y changes FIRST, because once we start working on the Z, we don't want anything to change that halfway through. Believe me. |
|
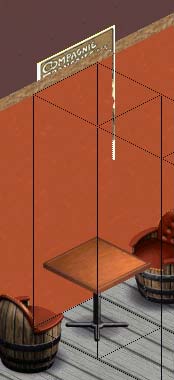
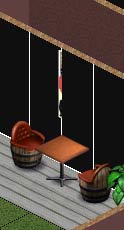
To make positioning the object in the game a lot easier, I use a wall texture which I have included in the zip above, which is basically a black wall with a one pixel line of white at either side & the top and two at the bottom. This will help us work out exactly where the centre of the tile is for the placement of the picture, and you should wallpaper your test area with it. Let's have a look at our picture in the game with this wallpaper loaded:
We will go on to use some of the other equally attractive walls later on when we are fixing our Z Buffers.
So now to start, let's alter the X or width information, and I am going to start on the one which is most out - the left hand view. |
|
At present, it is showing at -60, and hopefully yours should show that too. To alter this information, use the little arrow keys - and you will see the image moving in relation to its placement on the grid each time you make a change.
For the moment, I am pretty sure that -70 is a good place to leave the X, so now I am going to look at the other rotation to find it only needs a slight tweak - which I do to -7. |
|
|
| The reason I chose -70 and -7 for my X Offsets is as simple as this - I just looked at the placement of the picture next to the dots just below it, and made sure there were a symmetrical number of dots at each side of the centre square. This was easier to do against the black background because of the white and cream edges of the picture. |
|
. Let's have a look at what difference this slight alteration makes to our object in the game - where you can see it is now almost the mirror image of the right hand view. You can also see now that the object looks to be a little higher than before because of the camera angle we are working at. But for the moment, the X Offset placement looks good. Or is it? Even with this wall to help us, I usually check in my screenshots a little more carefully.
You can see from the picture on the right that I have gotten up close and personal with my screenshot - I enlarged it using the magnifying glass tool to 200% and drew a white line exactly corresponding with the edges of the picture. From this we can see that the X Offset is still out a little on both, the left hand one more than the other. There isn't anything we can do to alter the right hand view, because TMog doesn't handle fractions, but the good news is that it won't make any difference in the game so long as the other view matches. I am therefore just going to alter the X Offset on the left hand view one more notch towards the left, bringing it to -71. We can also see at this magnification that there is a little yellow fuzzy line at the top of the picture. This is something we will deal with later on. Also I am not concerned at this stage with adjusting the smaller views - we will do those in a moment as there is a handy quick and simple formula we can use. Finally, the fact that the object appears to be behind the wall is also something we will tackle once we are completely satisfied with the positioning for the height and the width. Now we are satisfied with the width placement of the object, let's now adjust the height placement by moving the Y Offset downwards. |
| We want the object to be the same height at both rotations, so whatever number you decide upon for one offset should be the same number for the other offset. You can actually highlight the offset number and type one in - but do not forget to put in the minus sign (-) where necessary otherwise the object will REALLY be out of place. From the screenshots below you can see I have now chosen a -100 placement for my Y Offset. This is a quite arbitrary figure based on experience and guesswork. |
|
|
|
This is what the newly amended object looks like in the game, and you can see that changing the X Offset to -71 has made a difference to the left hand rotation. However, at -100, the Y Offset is still a little bit too high so I am going to change it again, this time to -88 (again by guesswork) for both rotations.
Let's check in the game again. All this loading and unloading the game and unloading and loading TMog is tedious but necessary, and you can now see why I say take as much stuff out as you can to make loading the game as quick and finding your object in TMog as simple as possible. |
|
That's a lot better. I am happy with having the poster that high up the wall, so I am content with this. To recap then for this close zoom view: The left hand placement is X Offset: -71 and Y Offset: -88 The right hand placement is X Offset: -7 and Y Offset: -88 We now have to repeat this process for the medium and small zooms, but you will be pleased to hear that there is a magic formula for this - which is basically halve the values for the middle and halve them again for the small (but because TMog doesn't work in fractions, I tend to round the number up where needs be). OK, it isn't magic as such, more like mathematics, but as both practices are just as arcane and strange to me, it may as well be.
|
|
Don't be afraid to use your calculator for this - I have to do it, others probably have to do it so you are in reasonably good company - and nobody else ever need know you had to do it. Can't find the calculator on your computer? In Win 98 go to Start/Programs/Accessories/Calculator. For want of a better term and the fact that I love takeaway food too much, I call this process "Half 'n' Half" (for those of you not initiated into the finer points of ordering Chinese Takeaway food in the UK, "Half & Half" is common parlance for a combination of a small portion of fried rice and a small portion of french fries). And it is as simple as this: |
|
You will recall that from the close zoom view:
Therefore, for the medium zoom view, you halve these values so that:
And finally, for the small zoom view, you halve these values again so that:
You can see I rounded some numbers up because as I said above, TMog doesn't work in fractions. |
|
Apart from the fact we can only see part of the object of course, but that is what we are going to tackle now. Now we have finished adjusting the X and Y Offsets, we can now export the object to adjust the Z buffers, as they control the depth of the object. Before you close the game, change the wallpaper to the plain green one and take a screenshot of the left hand view at the largest zoom. Paste and Save this image in your picturewip.psd file. Depending on the colour of the object we are mogging, you could use the plain black, yellow, white, red or the blue walls - whichever is fine so long as there is a marked contrast with the object, because for this next step we need to know exactly what is part of the object and what isn't part of the object in the screenshot. |
|
Here it is, and this green is really not a nice colour! But it is a colour which does not appear in the painting at all, and we are going to use that to our great advantage in our very first attempt in editing a Z buffer. You should have Photoshop open, and also now TMog open, and our next step is to export the sprites of the object to our normal editing folder so we can open them with Photoshop. Are you absolutely satisfied with the placing of the object on the X and Y Offsets in the game? Now is the time to make absolutely sure that you are, because once we have exported the Z buffers, anything you do to the X and Y offsets from then onwards will adversely affect all the work done on the Z buffers. |
|
Go into TMog and click "Export Object File" which takes you as usual to the Export Whizzer options. As we need to export our A sprites (or A Channels) and our Z sprites (or Z Buffers) you should: UNCHECK "Just Change Colors" CHECK "One Zoom, All Channels" And then press OK. Save the .XML file (and the folder it makes) to your normal editing folder, and as always, at the end of the tutorial once the object is completely finished and you are happy with it in your game / for your site, you can delete the folder and .XML file to save disk space. |
|
Once you get the usual gobbledegook and the message that Transmogrifier successfully finished exporting, it is time to go into Photoshop and have a look at what lurks within the sprite folder. |
|
|
|
The files will all open in a cascade in Photoshop, where we can now start to take a closer look at them for the first time. |
|
The second thing you will notice is that six of the files are just a completely solid colour - the NW and the SW views. That is because the painting is backless with nothing in the P Sprite for those two views, so nothing was generated in the A or Z sprites for those views either. You can close these down as we won't be needing them at all. |
|
|
|
You should now have open and not minimised in Photoshop the following files:
We used the NE grid from the bunnewtemplates.psd file so it should still be open from when we lined it up with our screenshot earlier and we are now going to do something nifty with your newest screenshot, the NE wider-than-one-tile Z buffer template layer and the NE view P Sprite. We are going to make a Z buffer sandwich! This may look fiddly, but take your time and do exactly what I say when I say to do it, and you will get the same results as I do :o) AND it gets quicker & easier every time - honestly. I can do this in almost no time now, but the first time I did my own Z buffer it took me almost 15 hours. With this template, it will still take a fair bit of time to set up and tweak into perfect position, but nowhere near 15 hours, believe me! |
|
Here is part of my screenshot. You can see at the bottom right hand corner the grid dots which we are going to use in the next step.
Now drag across the layer from the mifnewtemplates.psd file called "NE Wider Than One Tile Z Buffer". Line it up on top of this screenshot with the top of the Z buffer image against the top of the wall and the grid dots EXACTLY matching the dots on the bottom right hand corner of the screenshot.
Which should end up looking like..... |
|
Now you need to go
into your NE view of your P sprite, click anywhere in the yellow with
your Magic Wand tool, right click and "Select Inverse" and paste
the image of the painting on top of this Z buffer layer. Move it roughly
into position. (To remind you, this is how your Magic Wand options should look at the moment): |
|
My picture is roughly in the position it should be, and is on top of the Z buffer layer. But this means we cannot see the screenshot, and we now need to move the picture image EXACTLY into the same place as it should be in the screenshot, while leaving the Z buffer image in the same place. To do this without moving or deleting our Z buffer layer which needs to be sandwiched between the screenshot and the P sprite image, we can use a nifty tool in our layers pallette called "Layers Visibility".
|
|
The layer is still there, but we have just made it invisible for the moment, enabling us to move Layer 4 (the P sprite image) so that it lines up exactly with the painting image on the screenshot. |
|
I used the top right hand corner of the P sprite painting to match up with the top right hand corner of the painting which shows through the wall in the screenshot at a 300% zoom to be absolutely certain. Once you are completely sure that the P sprite painting image is in the EXACT (I cannot say this word enough) place as the one in the screenshot, we can now make the Z buffer layer visible again. Just click the empty box where the eye icon was, and the eye icon will reappear along with the Z buffer layer. |
|
Now we need to select the part of the Z buffer layer which corresponds with the P sprite picture layer. With layer 4 highlighted on your Layers palette, click anywhere outside the picture image with the Magic Wand tool, right click and "select inverse".
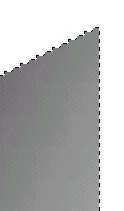
Now highlight the Z buffer layer again on your Layers palette and press Ctrl-C. This will copy the shape of the picture but from the Z buffer layer, which you can now Ctrl-V paste on your tile-1_large_ne_z.bmp file. Which should look something like......
|
|
The Z buffer sprite is in an Indexed state, which means we are not working in layers. The moment your running ants stop doing their marathon, the image is fixed into place and can only be moved by using the history palette to go back and reselect. Again,
these images must line up exactly. To do this, I use the magnifying glass
zoom tool to go up to 400% and line up the upper right hand corners with
each other. Once you are satisfied that they are lined up correctly, use the marquee tool to deselect the running ants, and save the new z buffer sprite. Import the object back into TMog, close TMog and let's have a look in the game to see what we have done to our object. A nailbiting moment, this! |
|
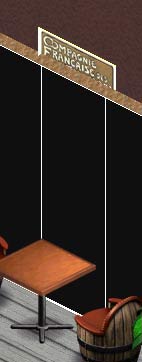
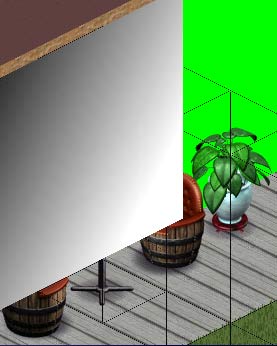
We also
need to check that the Z buffer isn't too strong that it makes the picture
bleed through any objects placed in front of it, and for this I use a
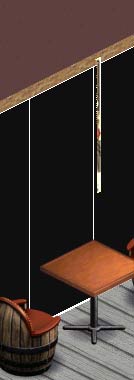
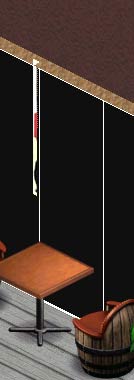
tall object from the game itself to check. The Tragiklowna Urn is pretty tall and it looks like nothing is bleeding through at all. If you followed everything I did above at the same time I did it, there is no reason why YOUR z buffer shouldn't be as good as this as well. Which is now why I am going to leave you on your own to do the SE view. While you are in the game, take a screenshot of the SE view and follow the instructions above once more using the SE files instead of the NE ones. Just to remind you where to start from in all the instructions above, it is the part which starts off like this...... |
|
You should now have open and not minimised in Photoshop the following files:
...so away you go! |
|
And now, let's take a look at the object with a proper wall behind it: |
|
If this really bothers you, you can go into your A sprites and alter this as per the A Sprite tutorials previous to this one. I don't actually think it is that noticeable so for the moment I am leaving it like this. If it bothers me during the game, I will go back and sort it out later. However, you may want to try a selection of different walls behind the picture now just to see if there is any problem with it. |
|
Before you close down the game, there is one more portion of the Z buffer we need to check. Because the object is backless, the back rotations won't poke through the walls simply because there aren't any there to poke through. But because the picture is high up the wall, we need to check on the upper floor to see if it pokes through the ceiling. |
|
So all there is to do now is edit the description of your painting in TMog, and woohoo, you now have a shiny new painting base for all your posters! And now I have a confession to make..... |
|
.....which is that of course, the easy way to have done the SE Z buffer would be to simply copy, paste and flip over the NE Z buffer you made first, but to get experience in doing this it was much better to do all the above steps again but this time on your own. Which is why I didn't tell you this before now. |
|
|
|
You have now gained valuable experience in editing your X and Y Offsets, and made your very first Z buffer. The next tutorial will reference back to this one quite heavily, as we go on to making a completely brand new object with both new A and Z buffers for the first time. |


|
![]()
 This
is a much longer tutorial than some of the previous ones, through necessity.
But like the others, it consists of several steps all hopefully easy to
follow, and I am assuming you followed all the previous tutorials. If
you didn't, you really should go back and take a look because I will be
making assumptions and using terminology of steps and processes learned
in those first lessons.
This
is a much longer tutorial than some of the previous ones, through necessity.
But like the others, it consists of several steps all hopefully easy to
follow, and I am assuming you followed all the previous tutorials. If
you didn't, you really should go back and take a look because I will be
making assumptions and using terminology of steps and processes learned
in those first lessons. 
 I
had a look on Google to see what tutorials for graphic design in general
(not sim sites) had to say on the subject of Z buffers - and oh boy is
there a lot of stuff to be said, plenty of which makes NO sense to the
layman whatsoever. Some of the definitions out there seemed to require
a degree in spatial physics to understand them.
I
had a look on Google to see what tutorials for graphic design in general
(not sim sites) had to say on the subject of Z buffers - and oh boy is
there a lot of stuff to be said, plenty of which makes NO sense to the
layman whatsoever. Some of the definitions out there seemed to require
a degree in spatial physics to understand them.  Well,
a similar thing is going on here in the Z buffer. In graphics in general,
especially 3D graphics, the Z Buffer is a portion of each pixel's data
that is reserved for distance information. Again, it is a mask, and this
time it specifies how far from the eye (or "camera") a particular
pixel should appear. Koromo said in the tutorial linked to above that
"you, as the viewer, are somewhere high in the air looking down at
a constant angle" and this viewing point is a concept which I often
think of as "the camera" - as if we are the movie director,
the sims are the cast, and the furniture are the props. Although we are
not strictly speaking working in 3D graphics, the same principles are
needed to deal with the interaction of one object with another - and for
all intents and purposes, that is 3D.
Well,
a similar thing is going on here in the Z buffer. In graphics in general,
especially 3D graphics, the Z Buffer is a portion of each pixel's data
that is reserved for distance information. Again, it is a mask, and this
time it specifies how far from the eye (or "camera") a particular
pixel should appear. Koromo said in the tutorial linked to above that
"you, as the viewer, are somewhere high in the air looking down at
a constant angle" and this viewing point is a concept which I often
think of as "the camera" - as if we are the movie director,
the sims are the cast, and the furniture are the props. Although we are
not strictly speaking working in 3D graphics, the same principles are
needed to deal with the interaction of one object with another - and for
all intents and purposes, that is 3D.
 But
first, you need to find and install some files from the BunnyWufflesTutorialKit
as it contains some of the tools we will be using throughout this
tutorial.
But
first, you need to find and install some files from the BunnyWufflesTutorialKit
as it contains some of the tools we will be using throughout this
tutorial.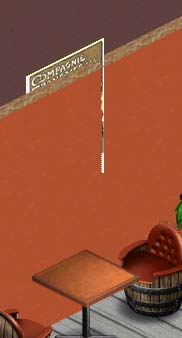 OK,
now we are all prepped up, it's time to look at our object. The good news
is that this is a new painting base on which the words can be read from
both rotations in the game, and the image is from a lithograph by Theophile-Alexandre
Steinlen, advertising the Compagnie Francaise des Chocolats et des Thes
(from Maitres de l'Affiche), dated 1897 and pictured above. I acquired
the image in a job lot of a huge amount of varying images I recently bought
the licence to.
OK,
now we are all prepped up, it's time to look at our object. The good news
is that this is a new painting base on which the words can be read from
both rotations in the game, and the image is from a lithograph by Theophile-Alexandre
Steinlen, advertising the Compagnie Francaise des Chocolats et des Thes
(from Maitres de l'Affiche), dated 1897 and pictured above. I acquired
the image in a job lot of a huge amount of varying images I recently bought
the licence to. Now
before we export any sprites, we are going to do any adjustments we think
may be necessary to the height and the width of the object first.
Now
before we export any sprites, we are going to do any adjustments we think
may be necessary to the height and the width of the object first.
 Before
we move any Offset angles, let's also have a look at the object in the
game with our handy grids from the zip above dragged and placed in position
on top (lined up with the grid lines showing on the grassy part of the
screenshot). This will hopefully have a bit more meaning to us than just
seeing the image in the TMog view.
Before
we move any Offset angles, let's also have a look at the object in the
game with our handy grids from the zip above dragged and placed in position
on top (lined up with the grid lines showing on the grassy part of the
screenshot). This will hopefully have a bit more meaning to us than just
seeing the image in the TMog view.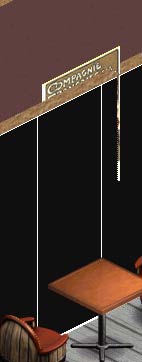
 Well,
that's much better. OK, not nearly so attractive, but this will make life
a lot easier in determining whereabouts the picture should go on the width
placement - the X Offset.
Well,
that's much better. OK, not nearly so attractive, but this will make life
a lot easier in determining whereabouts the picture should go on the width
placement - the X Offset. I
have altered it by ten clicks on the left hand button, taking the X Offset
to -70. But although I have not touched the Y Offset button, the image
looks to be in a different placement to before - this is because we are
working at an angle.
I
have altered it by ten clicks on the left hand button, taking the X Offset
to -70. But although I have not touched the Y Offset button, the image
looks to be in a different placement to before - this is because we are
working at an angle.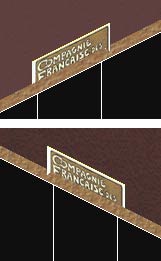
 Check
in the game to see that the smaller views and rotations are all OK, and
from this screenshot, all would appear to be well.
Check
in the game to see that the smaller views and rotations are all OK, and
from this screenshot, all would appear to be well. Incidentally,
the only reason I say take a screenshot of the left hand view is because
that was the one I just happened to take a screenshot of myself. We are
mostly concentrating on one view for some time now, and it makes things
a lot easier to follow if you are following the same rotation as I am.
You should also ensure that when you take the screenshot, you are in Build
mode or a mode which shows the grid squares on the grass, and that any
flooring next to your wall is only one or two tiles deep at the most,
so that we have some grid squares in the screenshot to work with.
Incidentally,
the only reason I say take a screenshot of the left hand view is because
that was the one I just happened to take a screenshot of myself. We are
mostly concentrating on one view for some time now, and it makes things
a lot easier to follow if you are following the same rotation as I am.
You should also ensure that when you take the screenshot, you are in Build
mode or a mode which shows the grid squares on the grass, and that any
flooring next to your wall is only one or two tiles deep at the most,
so that we have some grid squares in the screenshot to work with. For
my part, I am satisfied that the X and Ys are as good as I am going to
get them, so I am assuming that you are too.
For
my part, I am satisfied that the X and Ys are as good as I am going to
get them, so I am assuming that you are too. 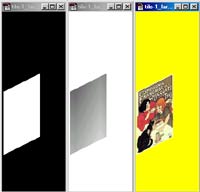
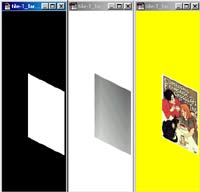 This
is what we have left open, and up until now we have been calling these
the Left view and the Right view. But now we can see from the sprite names
that the images on the left are the NE views and the ones on the right
are the SE Views, which is a habit we should try to get into. So whereas
above I said "...take a screenshot of the left hand view" I
should actually have said that we are going to work on the NE view. Just
minimise all the SE views and the NE view of the A sprite for now.
This
is what we have left open, and up until now we have been calling these
the Left view and the Right view. But now we can see from the sprite names
that the images on the left are the NE views and the ones on the right
are the SE Views, which is a habit we should try to get into. So whereas
above I said "...take a screenshot of the left hand view" I
should actually have said that we are going to work on the NE view. Just
minimise all the SE views and the NE view of the A sprite for now.
 ....this. Can you see at the bottom right hand corner the grid dots on
the Z buffer layer and the screenshot match up exactly? To make sure mine
do, I always use the zoom tool and magnify to 200% or sometimes even 300%
to be absolutely certain.
....this. Can you see at the bottom right hand corner the grid dots on
the Z buffer layer and the screenshot match up exactly? To make sure mine
do, I always use the zoom tool and magnify to 200% or sometimes even 300%
to be absolutely certain.
 Now
your screenshot should look like this.
Now
your screenshot should look like this. 
 On
the left hand view of our Layers palette, we can see that my Layer 2 (the
Z buffer template) is highlighted and the paintbrush shows it is the layer
we are currently editing. Next to the paintbrush is a little eye icon.
This is the "Layers
Visibility" function, and if you click on the little eye icon now,
the layer will become invisible on the Screenshot layered image.
On
the left hand view of our Layers palette, we can see that my Layer 2 (the
Z buffer template) is highlighted and the paintbrush shows it is the layer
we are currently editing. Next to the paintbrush is a little eye icon.
This is the "Layers
Visibility" function, and if you click on the little eye icon now,
the layer will become invisible on the Screenshot layered image. To move the picture exactly into the same place as the picture on the
screenshot, use the zoom at 200% or 300%.
To move the picture exactly into the same place as the picture on the
screenshot, use the zoom at 200% or 300%. The
screenshot file should now look something like this. If
for some reason yours doesn't, use the History palette to retrace your
steps, and follow these few steps once again, slowly and carefully.
The
screenshot file should now look something like this. If
for some reason yours doesn't, use the History palette to retrace your
steps, and follow these few steps once again, slowly and carefully.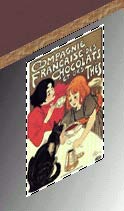 This
should set the running ants going along the edge of our P sprite picture.
This
should set the running ants going along the edge of our P sprite picture.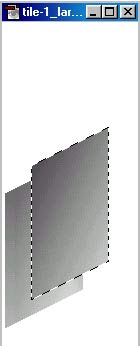 .......This.
 Well,
just look at this. We can see ALL the picture, none of it bleeds through
the wall, no nasty green shows through anywhere - all in all, a good lil
z buffer.
Well,
just look at this. We can see ALL the picture, none of it bleeds through
the wall, no nasty green shows through anywhere - all in all, a good lil
z buffer. 
 Once
you have imported your object back into TMog and go into your game to
check this rotation works ok, you should also check the medium zoom and
small zoom at both rotations. You should find that they are perfect too
because the game has generated these from the large zooms we have just
made.
Once
you have imported your object back into TMog and go into your game to
check this rotation works ok, you should also check the medium zoom and
small zoom at both rotations. You should find that they are perfect too
because the game has generated these from the large zooms we have just
made.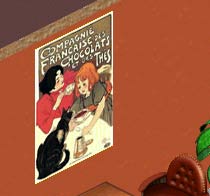 You
don't need to take a screenshot, but a close Photoshop zoom of the one
I took for this tutorial shows that there is a yellow line at the top
of the object. The object is also a little zig-zaggy along the top and
bottom.
You
don't need to take a screenshot, but a close Photoshop zoom of the one
I took for this tutorial shows that there is a yellow line at the top
of the object. The object is also a little zig-zaggy along the top and
bottom. 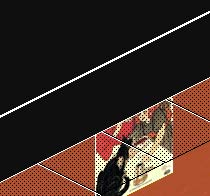 As
you can see, I have papered the upper floor with the pure black paper,
and tiled the floor with one row of the pure black floors - although I
have drawn a white line so you can actually tell the difference between
the wall and the floor on this screenshot! But with the pure black wall
& floor, If any white / cream / yellow of the painting frame did poke
through, we would have no problem seeing it. Check this again at both
rotations and all zooms - but it should be OK.
As
you can see, I have papered the upper floor with the pure black paper,
and tiled the floor with one row of the pure black floors - although I
have drawn a white line so you can actually tell the difference between
the wall and the floor on this screenshot! But with the pure black wall
& floor, If any white / cream / yellow of the painting frame did poke
through, we would have no problem seeing it. Check this again at both
rotations and all zooms - but it should be OK.