The A Channel #2
By Bunny Wuffles
 This
tutorial consists of several steps, all hopefully easy to follow, and
I am assuming you followed all the previous tutorials. If you didn't,
you really should go back and take a look because I will be making assumptions
and using terminology of steps and processes learned in those first lessons.
This
tutorial consists of several steps, all hopefully easy to follow, and
I am assuming you followed all the previous tutorials. If you didn't,
you really should go back and take a look because I will be making assumptions
and using terminology of steps and processes learned in those first lessons.
I use Photoshop 5.5, but I think the basics are pretty much the same (if not easier) in PSP. I am assuming that you may not be too familiar with many of the Photoshop tools I am using - so forgive me in advance if I sometimes sound a little too basic ;o)
During the course of all this, you will learn more about what the A channel does and how it can make objects appear see-through in the game.
Alpha (or "A") channels (or A Sprites) do a few different things to your object as you will find out during the course of this set of tutorials. For this next look at this new topic, we will look at using them in making part of an object transparent.
The way I am going to show you here is the method I am starting to use, which I have learned from a combination of tips, trial & error, experimenting and reading other tutorials on Alpha Channels. To start with, there is one here on my very own site:
 And
as Raveena is the undisputed Window and Door pinnacle to aspire to, let's
give her something to worry about. We are going to do a nice stained-glass
window. I am trying to keep this section of my site mercifully free of
the history of architecture, so I won't go into all the different types
of stained glass there are. But I am sure you know for yourself there
are three main types: one where the picture is made of lots of little
bits of coloured glass all held together by strips of black lead; one
where the picture is painted on the glass with coloured translucent paint,
and ones where the image is etched on the glass with acid and looks grey/white
against the window. We are going to tackle the middle type for this tutorial.
And
as Raveena is the undisputed Window and Door pinnacle to aspire to, let's
give her something to worry about. We are going to do a nice stained-glass
window. I am trying to keep this section of my site mercifully free of
the history of architecture, so I won't go into all the different types
of stained glass there are. But I am sure you know for yourself there
are three main types: one where the picture is made of lots of little
bits of coloured glass all held together by strips of black lead; one
where the picture is painted on the glass with coloured translucent paint,
and ones where the image is etched on the glass with acid and looks grey/white
against the window. We are going to tackle the middle type for this tutorial.
 So,
first find your picture!
So,
first find your picture!
The one I am going to use is a Raphael Tuck Christmas card design from 1880, from a series called "Angel's Heads" by Rebecca Coleman, which I acquired in a job lot of licenced images. OK, OK, no more historical facts. Not on this page anyway :o)
If you want to use it as well (which I am assuming for the sake of this tutorial) the picture is a high-resolution .jpg file, which you can right-click and Save Picture As in your usual images folder.
For the sake of simplicity, we are going to use a plain framed window from the game, and I thought we could use the Plate Glass window from the original game.
So open up Photoshop and Transmogrifier. Find the object you are looking for which is under windows / Window - Plate Glass, select it, press Clone Object File, check that your cookie number is there (if you have one), hit the ok button and give your window a new name.
And as usual, TMog will now clone the object & once it's done, you get the usual nice green message "Transmogrifier Successfully Finished Cloning!"
Now it is time to export the sprites.
 This
time we are changing the sprite shape of the object as we have done in
previous tutorials (as we are adding a picture to areas that are normally
invisible in the game) but this time we now need to uncheck the "Just
Change Colors" box and export
using the setting "One Zoom One Channel". For the moment, we
are going to let TMog generate our newly created A channel for us which
we will alter later on.
This
time we are changing the sprite shape of the object as we have done in
previous tutorials (as we are adding a picture to areas that are normally
invisible in the game) but this time we now need to uncheck the "Just
Change Colors" box and export
using the setting "One Zoom One Channel". For the moment, we
are going to let TMog generate our newly created A channel for us which
we will alter later on.
Hit the ok button on the Export Whizzer, and choose the folder you normally use in the "Save As" window that pops up. Once you've found the folder in the list, click "save".
Once again you should get a whole load of gobbledegook with the "Transmogrifier Successfully Finished Exporting!" message at the bottom, with an ok button which you can click now.
We are now finished with the TMog for the moment, so you can minimise it (or close, depending on the performance & speed of your compy). We are now ready to play in Photoshop :o)
In Photoshop, go to File, Open and find the folder you made. You should then be presented with a huge amount of options, looking something like this:
![]() There
are lots of folders here because it is a window and has custom wall cut
out sprites. But we can safely leave those alone as the window image itself
lies within the folder marked
sprite0500.
There
are lots of folders here because it is a window and has custom wall cut
out sprites. But we can safely leave those alone as the window image itself
lies within the folder marked
sprite0500.
![]()
A familiar looking sight! Once you open both sprites, you will see that one has an image, and the other one doesn't. We can safely ignore the empty sprite, and just leave the plate-glass-window_large_back_p.bmp sprite open. You should also now open your angelhead picture as well.
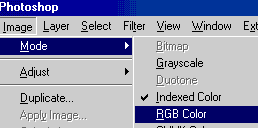 As
always, you need to convert the P sprite to RGB colour, so go to the action
bar and select Image / Mode / RGB Color.
As
always, you need to convert the P sprite to RGB colour, so go to the action
bar and select Image / Mode / RGB Color.
Now you can select your angelhead image, using the action bar Select / All, and Ctrl_C copy the angel and Ctrl_V paste it on top of your yellow window image.
Which will end up looking like this (well, I hope not exactly like this as this is a low-quality GIF file to help preserve bandwidth):
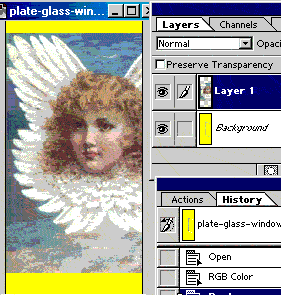 As
you can see from the Layers palette, we have created a new layer on top
of our P sprite. We now need to resize and skew the angel picture to fit
inside the frame of the window, which I will leave you to do as you by
now must be very experienced in this.
As
you can see from the Layers palette, we have created a new layer on top
of our P sprite. We now need to resize and skew the angel picture to fit
inside the frame of the window, which I will leave you to do as you by
now must be very experienced in this.
OK, I realise some of you may have just jumped straight into here without doing the past tutorials.
So at this point if you don't know how to resize and skew, I would advise you to go back and look at the Easel tutorial which gives full illustrated instructions on how to go about doing this.
I have done mine now, and she is a little thinner than in the original picture, but even with the distortion, I think she still looks lovely (despite the poor quality screenshot below) so I won't go back and do any alterations to the picture:
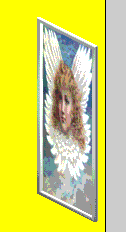
If you would rather have a chubbier little angel head, you could always go back to the original picture and play around with resizing the head and wings, or adding more sky - whatever you would be happy with. For me, I am very happy with this new slimline version, and can only hope that when it is MY time to ascend to the realms of the heavenly host, I will lose as much weight as quickly as she did.
As we are happy, we can convert her back to indexed mode so TMog can read her, so go to your action bar and select Image / Mode / Indexed Color.... then choose Selective. Somewhere in this process as usual you will be prompted to flatten the image, which is fine. Save her under the same name as before - plate-glass-window_large_back_p.bmp - and we can now import her back into TMog.
DON'T close the image in Photoshop - leave it open, as we are going to be using the history palette in our next stage. As you may know, the moment you close the image, we lose the steps in the history palette which will make things a bit tricker in our next steps to say the least. You can minimise the image if you like, but do NOT close it.
Now we have imported her back into TMog, our angelhead will now look like this.
If you like, you can actually leave her like this. The object will still behave like a window, will still let light into your simmies' rooms.
It looks like a perfectly respectable object, and no doubt we have downloaded similar in our time. No doubt we will make others which would be better left like this.
But as we are skilled object makers now and especially as this is a tutorial on the Alpha Channel, let's go on to improve our window as we go on to make our angelhead semi-transparent.
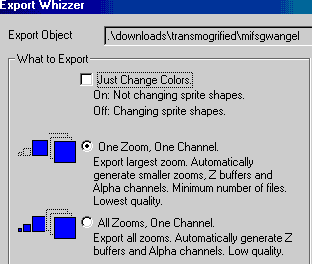
 To
do this, we need to export the
sprites again, but this time we want to export the Alpha channels so we
can edit them.
To
do this, we need to export the
sprites again, but this time we want to export the Alpha channels so we
can edit them.
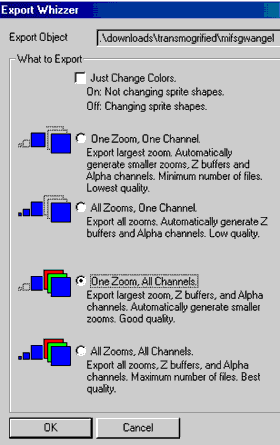
In order to pull out the A channels from the object, we now need to uncheck the "Just Change Colors" box and check the "One Zoom, All Channels" box.
As you can see from the description, this will export the largest zoom, the Z buffers and the Alpha channels. TMog will handle the others which is just fine.
Hit the ok button on the Export Whizzer, and choose the folder you normally use in the "Save As" window that pops up. Once you've found the folder in the list, click "save". This time should take a little longer than last time as we are exporting more sprite images.
Once again you should get a whole load of gobbledegook with the "Transmogrifier Successfully Finished Exporting!" message at the bottom, with an ok button which you can click now.
We are now finished with the TMog for the moment, so you can minimise it (or close, depending on the performance & speed of your compy). We are now ready to play in Photoshop :o)
In Photoshop, go to File, Open and find the folder again. Again, there are lots of folders here because it is a window and has custom wall cut out sprites. But we can safely leave those alone as the window image and its Alpha Channel lie within the folder marked sprite0500.You should now be presented with a lot more files than last time, looking something like this:
![]() A look inside that
folder will tell you that we now have three different .bmp files for the
front view and three for the back view. When we just made our angel window
above we only had files ending in _p.bmp but now we have files of the
same name but ending in _a.bmp and _z.bmp which you will recall are the
A Sprite / A Channel / Alpha Channel and the Z Sprite / Z Channel / Z
Buffer.
A look inside that
folder will tell you that we now have three different .bmp files for the
front view and three for the back view. When we just made our angel window
above we only had files ending in _p.bmp but now we have files of the
same name but ending in _a.bmp and _z.bmp which you will recall are the
A Sprite / A Channel / Alpha Channel and the Z Sprite / Z Channel / Z
Buffer.
In this particular tutorial we are not interested in the Z sprites but we do need to alter the A sprite of the P sprite we just added our angel to, so open the file plate-glass-window_large_back_a.bmp which should look like...
![]() ...this.
...this.
As you will recall from the first A Channel tutorial, strictly speaking, this ISN'T the window from the game. The A Channel is actually a storage area in the image's file for non-visible picture elements. The white areas are the areas that are visible in the game. The black areas are the areas that are invisible in the game. And the grey areas are, as the phrase implies, a little bit of both - in other words, transparent. Or fuzzy.
If we had looked at the A sprite of the window before we put the angel on and imported it into TMog, it would have just been a white frame on a black background with a black hole in the middle. As the angel is not at all see-through at the moment, the whole window, frame AND angelhead picture are a solid white with a grey edge.
In graphics in general - and not just in TMog because Photoshop and other graphics programs use Alpha channels as well - the A Channel is a portion of each pixel's data that is reserved for transparency information. Different parts of the object have different levels of transparency depending on how much we want the background to show through.
Last time you will recall we harnessed this transparency effect to stop the edges of our objects from being fuzzy, and this time we are going to use it to make our angelhead transparent as well.
As last time, the first thing to note is when you look at the colour mode on the A sprite, it is indexed.
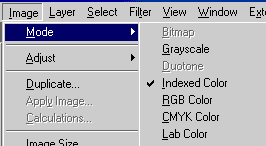
With our P sprites, we changed the colour mode to RGB. With the Alpha Channel, we are using a different method of working, and this time we need to change the colour mode to Grayscale. Tick the Grayscale option and......
 .....
this message should pop up.
.....
this message should pop up.
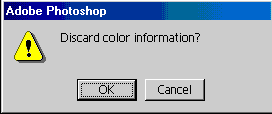
Yes, it is ok to do this, there is no colour information as such in the Alpha Channel so click OK.
Have both your sprites open now and place them exactly side-by-side. You will see why we are doing this in a moment. You can see that the P sprite has its full history palette still intact from our work in putting the angelhead on the window, but the "Indexed Color" action is selected.
![]() If you closed the image
when I told you not to, we would have lost this history palette, but because
you are a good little bunny and always do what Bunny Wuffles tells you
to do, you just left it alone.
If you closed the image
when I told you not to, we would have lost this history palette, but because
you are a good little bunny and always do what Bunny Wuffles tells you
to do, you just left it alone.
Didn't you.
Yes bun.
Good.
Because now we are going to go back on our history palette and turn the image back into an RGB one with layers by clicking the history action "Move".
You can now see from the picture below that our angelhead is back to her two layered state before we indexed the colour prior to importing her back into TMog. Don't worry, this won't affect our image in TMog unless we save the image again - which we won't be doing.
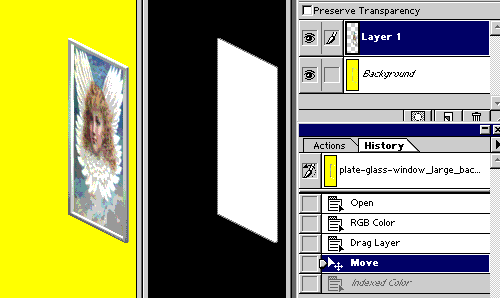
Now comes the reason why I asked you to have both your sprites open and place them exactly side-by-side.
With Layer 1 on your P sprite highlighted, place the Move tool on your angelhead, and while holding down the Shift key, move the angelhead picture onto your A Sprite. Watch in amazement as she snaps exactly into the right place!
If you tried this without holding down the Shift key, you would have had to move her into place manually, same with if you had just selected the image and done copy / paste. Don't believe me? Go back and try it for yourself.
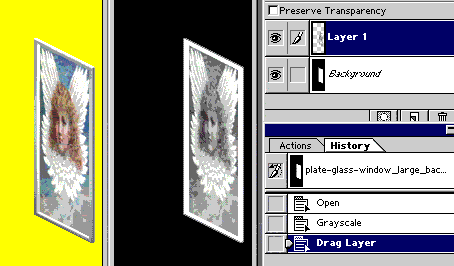
Now you can see we have two layers on our A Sprite as well as layers on our P Sprite.
And lots of shades of grey on our angel.
How much we want our angelhead to be see-through is entirely up to personal choice coupled with experience in choosing the exact grey which itself comes through many attempts of trial-&-error. You will recall that in the A Sprite, the white areas are the ones that are visible, the black areas are invisible and the grey areas are transparent. It stands to reason that the darker the grey, the more transparent the image is, and the lighter the grey, the more opaque it is.
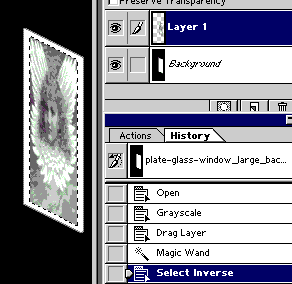
We now need to select the area behind the angel to make it transparent. Make sure that Layer 1 is highlighted, and with our Magic Wand tool, click anywhere in the A sprite. Now right-click and choose "Select Inverse". Our busy little ants should now be running around the edge of our angel image like so:
 And
with your Eyedropper tool, and bearing in mind what I said about the darker
the grey the more transparent the image is & the lighter the grey
the more opaque it is; select a sample of one of the greys from the angel.
And
with your Eyedropper tool, and bearing in mind what I said about the darker
the grey the more transparent the image is & the lighter the grey
the more opaque it is; select a sample of one of the greys from the angel.
Now, highlight the layer marked Background on your A Sprite.
Using your Pencil tool, scribble away with your newly selected grey anywhere you like on your sprite.
Anywhere, Bunny Wuffles?!
Yes. Anywhere.
You will see that nothing seems to be happening....
....Until you click the little eye symbol next to Layer 1, which will make Layer 1 invisible from view, where you should then see something like this:
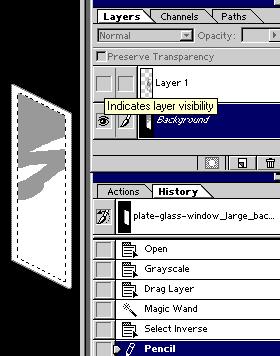 Layer 1 is still there, we just can't see it or edit it for the moment.
Clicking the little eye next to a layer temporarily renders that layer invisible to see. It will stay invisible until you click in that box again to bring back the little eye. The layer is still there all this time, but we have moved it out of the way so we can see what we are doing to the layer underneath.
And what we can see is that we have coloured in part or all of the window behind the angelhead.
Which is what we wanted to do! Hurrah!
Continue scribbling (it's fine to leave Layer 1 invisible) until you have finished the area inside the running ants. You could even use the Paint Bucket tool if you want.
However you do it, it is important that all of the area inside the running ants should be grey.
Once it is, using the Marquee tool, deselect the running ants. You can now select Layer 1, right-click and Delete Layer, as we don't need this anymore.
And now
we are left with this: 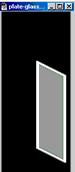 which is our picture frame in white, and our transparent window in grey.
Because we are great object makers now, we are going to defuzzify our edges (and as we are working in the Alpha Channel, we may as well because it will only take a moment). If you don't know why we are doing this, take a look at tutorial 6, the first Alpha Channel tutorial. Compare those zebra seats. And tell me which was made by a great object maker and which one wasn't.
Now you are convinced of the need to do this, it's time to make sure our tools are configured in the way we want them to work. We are only going to use the Magic Wand tool in this exercise, and it is going to look different again to how we used it in our first Alpha Channel tutorial.
Previously,
our Magic Wand has looked like this: 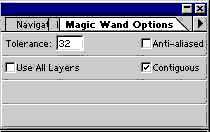
And in our last tutorial we changed it to look like this:

Can't remember how to bring this options box up? Double-clicking any tool in the display bar will bring up its Options palette if it is not already shown on your screen.
Contiguous was the Bunny Wuffle Word Of The Day in the previous A Channel tutorial, and I gave the definition from Merriam-Webster's online dictionary. The key phrases from their definition which are important to using our Magic Wand tool in this exercise are "being in actual contact : touching along a boundary or at a point" & "touching or connected throughout in an unbroken sequence". Which was not a desirable property for our last object, as it had holes in the middle which we needed to defuzzify, but in this case is essential as we don't want to alter our angelhead transparency while we are defuzzifying* the outside edge of the window frame.
*A word which you will NOT find in Merriam-Webster. Or any other dictionary. But you know what I mean.
So now, check the Contiguous box again. The tolerance you can leave; it makes no difference here.
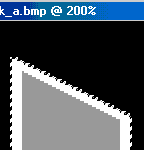
And now it's time to get up close and personal with our image. I am using a zoom of 200% but you use whatever you need to be able to see that there are three distinct colours in our image - black, white and grey.
 We
are going to use our magic wand to select the grey around the edges of
the frame, as this is the bit which you will recall controls the fuzziness
of the image.You will remember that we need to make the grey areas lighter
so that they are still visible in the game but not too visible that they
have the jagged edge that our two-pixel stepped angle creates.
We
are going to use our magic wand to select the grey around the edges of
the frame, as this is the bit which you will recall controls the fuzziness
of the image.You will remember that we need to make the grey areas lighter
so that they are still visible in the game but not too visible that they
have the jagged edge that our two-pixel stepped angle creates.
So with the magic wand tool set at Contiguous, click anywhere in the outer grey edge so that the running ants go round the outside.
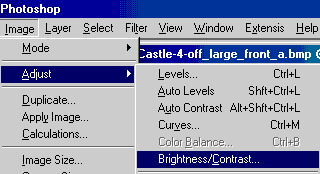 Go to the action bar, select Image / Adjust / and Brightness/Contrast...
which should
bring up an options box like this:
Go to the action bar, select Image / Adjust / and Brightness/Contrast...
which should
bring up an options box like this:
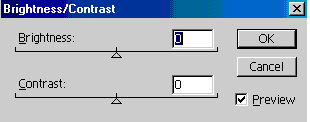
Make sure you have the Preview option ticked, as this will allow you to see what you are doing in real time to the image you are doing it to. You can either use the slider bars with this facility, or type in predetermined levels. You can play about with this to your heart's content to find the perfect looking A channel grey for your particular preference, or you can just move the slider bar to 75 / type 75 in the Brightness box which is what I am going to do.
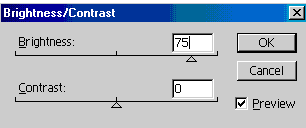
I am leaving the Contrast box at 0.
Press OK, then deselect the running ants from your image, which now looks something like this:
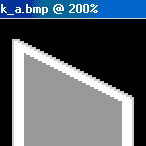 Can
you see the grey outer edge looks a little lighter than it did before?
Just to compare the two, here below is what it looked like a moment ago:
Can
you see the grey outer edge looks a little lighter than it did before?
Just to compare the two, here below is what it looked like a moment ago:
That difference in the shades of grey might not look a lot here, but believe me it will make a GREAT difference in your game.
We are not finished just yet; if we left it like that it would look "stepped".
Click somewhere in the black, right click and "Select Inverse" so that you select the whole window image.
Go back to your action
bar, select Filter / Blur: 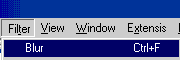 & once you deselect, it should look like this:
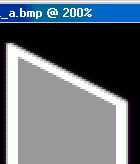 Can
you see that the edges are now not quite as defined as before? This will
give a nice smooth edge to your object without looking fuzzy in the game.
Can
you see that the edges are now not quite as defined as before? This will
give a nice smooth edge to your object without looking fuzzy in the game.
And the very good news is that we are almost done now!
Back to your action bar, and select Image/Mode/Indexed - where you will find there is no Indexed option for you to select - which is normal for this channel.
Now you can Save your image, and now it is time to import our object back into TMog as usual!
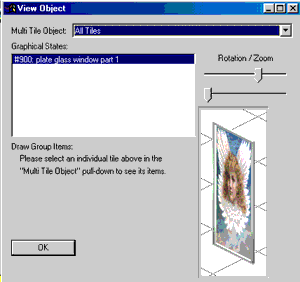
Once you have imported it back into TMog, change the description & price if you like, and take a look at the object by selecting "View Object"..... which should look something like this:
 Oh
now aren't you proud of your achievement? By golly by gum you SHOULD be.
That is beautiful, and very professionally made. The transparency is transparent,
the edges are nice and sharp without being blocky, and the whole thing
is a quality object.
Oh
now aren't you proud of your achievement? By golly by gum you SHOULD be.
That is beautiful, and very professionally made. The transparency is transparent,
the edges are nice and sharp without being blocky, and the whole thing
is a quality object.
Which you should be proud to share with the community on your very own sim site.
Why?
Because Bunny Wuffles NEEDS quality objects to download for her game.
That's why! :o)