
Masterclass # 1
In this masterclass, you will learn several ways how to get rid of any unwanted yellow bits from objects by using various Photoshop and TMog tools & settings. I am assuming that you have completed the tutorials or at least are familiar with the processes used, as I will be referring back to skills and using terminology learned at that time.
By now, as an experienced object maker, you should have a love / hate relationship with that yellow in your P sprite. Since making objects with the "Just Change Colors" box unchecked, you will have discovered that TMog picks up everything within the sprite that isn't that exact shade of yellow. In the third and fourth tutorial, you will remember that as we were starting to make entirely new objects, we needed to do certain things to our Photoshop tool defaults to help insure against this happening to us. Yet it still happened. OK, I never said I was perfect, but I did say that as I learned new skills I would pass them on, so here are a few methods from my new found skill in eliminating that yellow totally from objects.
Each method works in different ways, and I urge you to try all of them out as they also teach you different Photoshop and TMog tricks which I am sure you will find useful not only in eliminating yellow fuzz but in object making / graphics in general. Also, I am going to treat each method here as progressive, so I may refer in lesson 3 to things we learned in lesson 2, for example.
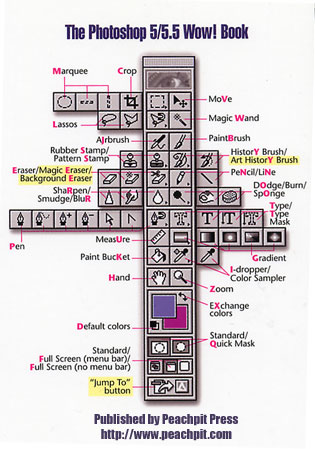
Can't remember which tool is which? Here's our reminder yet again. I am not being paid by them to say this, which is a great shame, but nevertheless I really can't recommend the Peachpit press WOW! books highly enough. They may be a little more pricey than most, but they take things step by step, are in full colour AND come with a tutorial disk.
Go back into your sprites and use our old friend the Polygonal Lasso Tool to select a random small shape of tree image, and using the move tool, copy & paste it over all the offending yellow bits. I don't recommend rubber-stamping as this can actually make the yellow bits multiply - which you don't want. It helps to have Photoshop itself open on the screen but slightly minimised, so you can see the TMog image at the same time. You can then pick out what yellow can be kept from the yellow which must go. Once you have done this to your satisfaction, save and import again into TMog. Repeat as necessary :o) "
My excuse is that these are skills I learned AFTER writing that tutorial, and I'm sticking with it. OK?
If you have given up on your object in disgust before now, I have thoughtfully enclosed one in the BunnyWufflesTutorialKit zip called buntutree.iff for you to download and install in your Transmogrified folder to use for the purposes of these tutorials. Oh, so kind a Bunny Wuffles I am. Make sure you install it before starting this tutorial.
I am going to ask you to keep this object as it is, and clone it each time so you can try all the methods I present below to give you practice in all the key skills involved. Please do try each method, as they will all teach you different aspects of Photoshop and TMog which you will find incredibly useful as you go on to create more complex objects. Don't forget to move this object out of the folder before you play the game though - I am absolutely certain you won't want it there. =:o
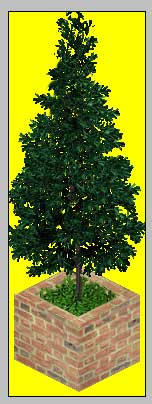
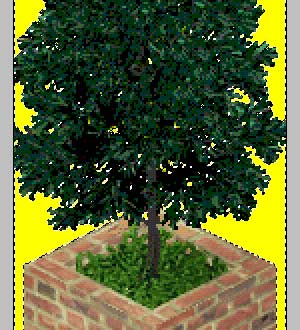
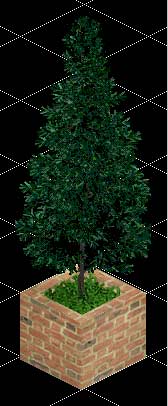
OK, here is the P
sprite for the object in question. Looks OK at the moment.... until you
look at it in TMog, when all of a sudden, it looks like this: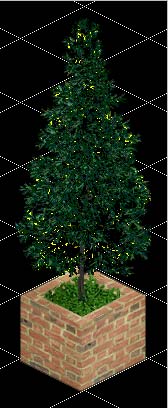
Ew.
Well, you will be pleased to see there are a number of ways to get rid of these yellow bits, and once you know the techniques you can romp merrily through your object catalogue and fix any and everything you have wanted to use but have not done before now because of the unwanted yellow bits - and also ensure you don't get any nasty yellow bits in your shiny new objects from now on.
 Method
1:
Method
1:
The tools we are going to use in this tutorial should look like this:

For a full introduction to layers, you need to look at the second tutorial:
Clone the object and
Export into your usual folder. Make sure the "Just Change Colors"
box is unchecked. We are changing the sprite shape even if it is only
a tiny lil bit. Now open up your P sprites in Photoshop. We are only going
to be working on one, as we can flip the image for the other rotation.
Select the yellow background using your eyedropper tool so that we have
it in our foreground colour swatch. Change the colour mode to RGB so that
we can work in layers. Now go to the action bar and choose Select/All
then ctrl-c copy and ctrl-p paste. 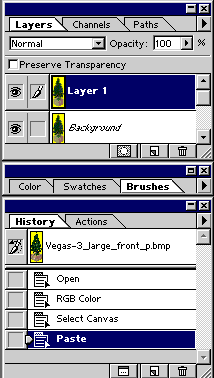 You
should now have two identical layers, one on top of another. Your image
won't look any different, but your Layer and History pallettes should
look like this:
You
should now have two identical layers, one on top of another. Your image
won't look any different, but your Layer and History pallettes should
look like this:
And now comes the fun bit. We are going to work on a layer, but without looking at it. EEK!
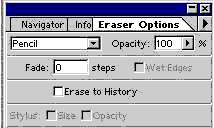
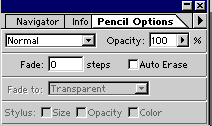
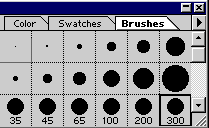
Select your pencil,
choose a nice BIG brush, and on your Layers pallette, ensure that the
Background layer is highlighted (not layer 1 as shown in the picture).
Now use that
lovely yellow to colour in to your heart's content - and you will see
no difference in your image. But take a look at your layers pallette -
notice the difference now?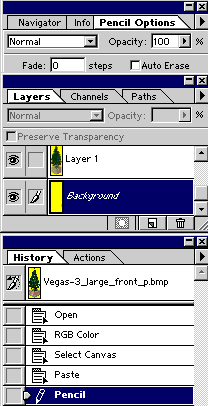
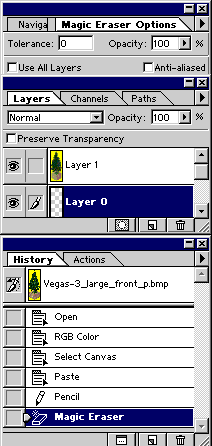
Select the magic eraser, from your eraser options. The magic eraser is wonderful - it selects & rubs out everything it picks up in one click. Everything Bun? Yes, everything. It takes you back to the transparency! There is nothing at all left once the magic eraser has done its stuff. Again, on your Layers palette, ensure that the Background layer is highlighted (not layer 1 as shown in the picture). Now click once - and again you will see no difference in your image. But take a look at your layers palette - notice the difference now?
I have two layers, Layer 0 and Layer 1.
Remember our tracing paper book from the second tutorial? On the top page we can see the whole picture, but we can amend little bits of each part of the picture by flicking through each page? Well, Photoshop layers are just like that. Wonderful things, and Lord Adobe deserves a medal for inventing them. If he existed. Which he probably doesn't. The grey & white squares are Photoshop's way of telling you that there is nothing - no colour, no image, nothing - in that particular section of an image. So why did we need to colour it in yellow? Because the magic eraser selects in a similar way to the magic wand does and not indiscriminately like the normal eraser does, just one click selected everything we want to get rid of.
Right, it's now time to start working on our Layer 1. Enlarge your image with the magnifying glass zoom tool to get a little closer to the action. Highlight Layer 1 on your layers pallette, select your magic wand, select any and all visible yellow from around the tree and the larger parts from inside the tree (these you will recall are "see through" in the game, and we want to keep these to make the tree look realistic) and delete, delete, delete! Yes, get rid of all that yellow. But don't worry about the tiny bits, we are just getting rid of the yellow we want to keep. EH? Wuffles, you've finally gone mad. Getting rid of what we want to keep? No, this is not a mad bunny speaking, trust me on this one; you NEED to get rid of what we want to keep before going onto the next stage. Notice that each time you press delete, more of the grey & white grid shows through.
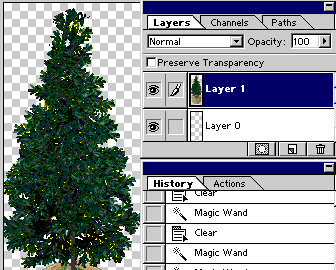
OK, this is what my Layer 1 now looks like, and yours should look similar:
Egad, lookit all that yellow. Granted, not ALL of it is unwanted, but I have decided to make my tree a little bushier in the process.
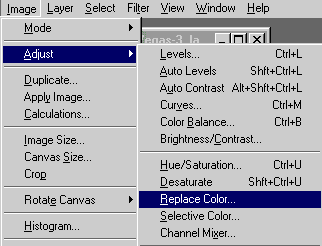 So
now I'm going to introduce you to a brand spanking new tool - the Replace
Color option. You will find this on your action bar under Image
/ Adjust / Replace Color like so:
So
now I'm going to introduce you to a brand spanking new tool - the Replace
Color option. You will find this on your action bar under Image
/ Adjust / Replace Color like so: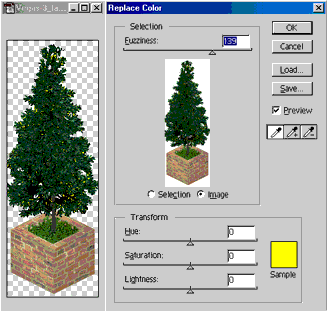 And
this will bring up a screen like so:
And
this will bring up a screen like so:
Sorry for the poor quality of this and the next images, I am trying to beat the bandwidth beastie by compressing my images as small as possible.
OK, a brief explanation of the tools involved. You will see our yellow is marked in the Sample box. That is because we put it in the foreground swatch in one of the stages above. You can use the Eyedroppers to select other colours to replace, but for this exercise, we are just going to get rid of that yellow. The Fuzziness bar at the top is our friend. Adjusting that will not only get rid of the exact shade of yellow, but the higher you have it set, the more shades of yellow it will get rid of. And it is those shades of fuzzy yellow which are truly the bane of any simmers' life. And finally, in the Transform menu we have a combination of Hue, Saturation and Lightness sliders to play with. Ensure that your Preview box is checked, and play with these last three sliders until you get the colours you are happy with. Mine looks like this:
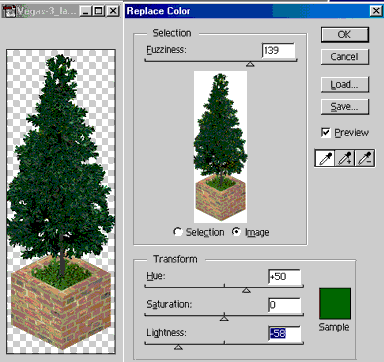
You can see on your preview that the yellow dots remain, but on your image, they are all gone - transformed into that same green in the Sample box. Press OK when you are happy.
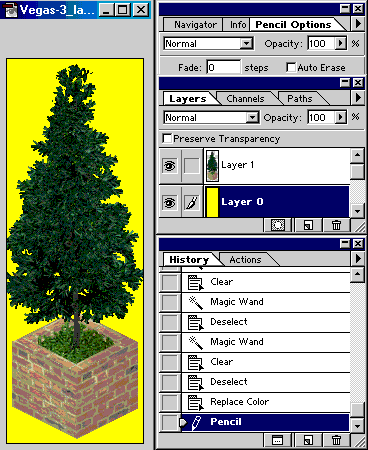
We have finished with Layer 1, so on your Layers palette, select Layer 0. Select your pencil, choose a nice BIG brush, and use that lovely yellow to colour in the whole image to your heart's content. Or you could use the Paint Bucket to fill, either way will do.
Our background layer (Layer 0) is now completely yellow, while our newly recoloured tree is free of the pernicious hue. OK, I think you know what is coming next - flatten the image, save as indexed / selective colours, and use a flip / horizontal version of this image on your other sprite, import back into TMog, and check that the yellow has all gone.
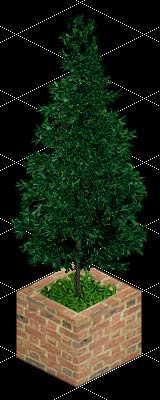 Which
it has! Woohoo, a much better tree!
Which
it has! Woohoo, a much better tree!
Method
2: The tools we are going to use in this tutorial should look like this:
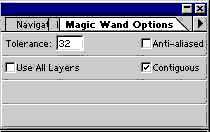
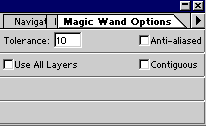
 Note
that the Contiguous option is UNCHECKED. For a full explanation of what
this part of the tool does, you need to go back to the sixth tutorial:
Note
that the Contiguous option is UNCHECKED. For a full explanation of what
this part of the tool does, you need to go back to the sixth tutorial:
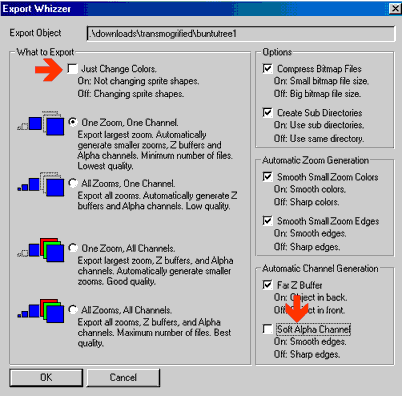
Clone the object and Export into your usual folder. Make sure the "Just Change Colors" box is unchecked. We are changing the sprite shape even if it is only a tiny lil bit. But this time we are also unchecking a new box - the "Soft Alpha Channel" at the bottom right hand corner.
This will give us nice clean edges when we reimport our object back into the game.
Which we are going to do immediately. Immediately?! Oh yes, immediately. As soon as you get the OK that the Export finished, click on Import Object file and take a look at your object......
...........which should look something like this:
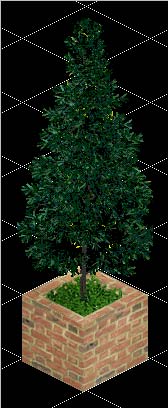 A
VAST improvement. Most of that yellow is gone already - the only bits
that remain are the smudged bits. But just lookit the edges of the object
- nice and sharp and no fuzziness. Ack! BUNNY WUFFLES!!! Why didn't you
tell me this before?! Well, you know me, I want you to learn everything
even if it means going the long way round at first. And also the fact
that I only learned this myself recently might have something to do with
it. Because we have sharpened the edges of the Alpha channel, the yellow
bits that are exactly the same colour were not fuzzy and have disappeared.
The only bits of yellow that remain are the bits from either using the
smudge tool or rubber stamp - the "off yellow" bits.
A
VAST improvement. Most of that yellow is gone already - the only bits
that remain are the smudged bits. But just lookit the edges of the object
- nice and sharp and no fuzziness. Ack! BUNNY WUFFLES!!! Why didn't you
tell me this before?! Well, you know me, I want you to learn everything
even if it means going the long way round at first. And also the fact
that I only learned this myself recently might have something to do with
it. Because we have sharpened the edges of the Alpha channel, the yellow
bits that are exactly the same colour were not fuzzy and have disappeared.
The only bits of yellow that remain are the bits from either using the
smudge tool or rubber stamp - the "off yellow" bits.
And now to get rid of those.
Open up your P sprites in Photoshop. We are only going to be working on one, as we can flip the image for the other rotation. Select the yellow background using your eyedropper tool so that we have it in our foreground colour swatch, and switch swatches (try saying THAT after a bottle of fine vintage Rioja!) and select it again so it is also in your background colour swatch.
This time we are not going to be working in layers so there is no need to change the colour mode to RGB - you can leave it as it is.
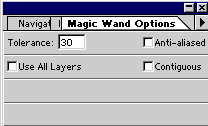
Now we need to get up close and personal with our image - use the Zoom tool to enlarge the image to at least 200%. With the Magic Wand set to the levels as above, click anywhere in the yellow of the sprite and see what happens:
 Instead
of just selecting the yellow edges around the outside of the tree, it
has also selected the pure yellow bits in the centre of the tree.
Instead
of just selecting the yellow edges around the outside of the tree, it
has also selected the pure yellow bits in the centre of the tree.
Now try it again, with the Magic Wand set to this level:
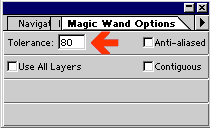
To change the Tolerance, just highlight and overtype the number.
 As
well as selecting the yellow edges around the outside of the tree and
the pure yellow bits in the centre of the tree as before, it has now also
picked up some of the off-yellow as well. It's not easy to tell from this
screenshot, but it really has picked up some extra yellow bits from last
time.
As
well as selecting the yellow edges around the outside of the tree and
the pure yellow bits in the centre of the tree as before, it has now also
picked up some of the off-yellow as well. It's not easy to tell from this
screenshot, but it really has picked up some extra yellow bits from last
time.
The higher the tolerance, the more shades of the selected colour it will pick up - like the Fuzziness bar in the Replace Color option did above. You will recall that adjusting that will not only get rid of the exact shade of yellow, but the higher you have it set, the more shades of yellow it will get rid of, and it is the same here. So, for instance, if you only want to get rid of an EXACT shade of a colour and nothing else, set the Tolerance to 1.
OK, now you have selected as much yellow as the magic wand will pick up at the moment, press delete and watch the yellow be replaced by our lovely background swatch colour. Which is also yellow.
Wuffles, have you lost your mind? Nope, just that this has now replaced a lot of the off-yellow with the pure yellow, which the importing will take care of again. However, it still won't have picked up all of the off-yellow bits. To do this, we need to do a bit of closer investigation and to use the properties of the magic wand to get rid of an EXACT shade of a colour as I said above. So set the magic wand Tolerance to 1, zoom your image up to 600% and click with the magic wand anywhere in the normal yellow.
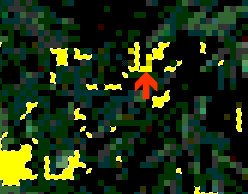 Can you see that some of the yellow pixels are unselected? These are the
offending articles which must go - the yellow bits that are not the exact
pure yellow of the P sprite. So change the tolerance on your magic wand
back up to 80 and click on one of the unselected pixels and press delete.
Can you see that some of the yellow pixels are unselected? These are the
offending articles which must go - the yellow bits that are not the exact
pure yellow of the P sprite. So change the tolerance on your magic wand
back up to 80 and click on one of the unselected pixels and press delete.
You will notice it picks up all the yellow but that's ok. Because the P Sprite yellow is set as your Background Swatch, it replaces everything selected with the correct pure yellow which TMog will take care of when importing.
Now repeat these actions again as necessary.
To recap - these are:
- Selecting the main part of the yellow with the magic wand set at Tolerance 1;
- Finding an unselected yellow pixel;
- Clicking it with the magic wand set at Tolerance 80;
- Pressing delete.
You may want to move about in your P Sprite to see a different section in extreme close-up to ensure you get all the offending off-yellow bits. One thing to watch out for is that you do not pick up parts of the brickwork or grass image as well as the offending yellow by accident. Some of the darker bits of yellow are most certainly within 80 tolerance of the lighter bits of brickwork and grass, so if this happens just use the History Palette to go back and then reset the magic wand tolerance a bit lower; 30 or perhaps 40 for instance. If you also want to get rid of some of the acidic green pixels, you may need to click on them at a very low tolerance of 4 or 5.
Once you are satisfied, do the same with the other sprite - or alternatively convert it to RGB, copy the amended sprite and paste it into the new one, edit/transform/flip horizontal, flatten, index and save. Whichever is quicker for you :o)
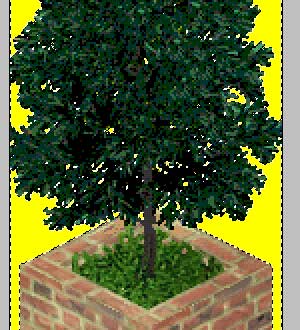
Now import the object back into TMog and take a look......
 ....poifect!
As Meowth would say. If I knew anything about Pokemon. Which of course I
don't. Well, not much anyway.Method
3:
....poifect!
As Meowth would say. If I knew anything about Pokemon. Which of course I
don't. Well, not much anyway.Method
3: The tools we are going to use in this tutorial should look like this:
 For
an explanation of what the Alpha Channel is and what it does to make transparancies
you will need to look at the seventh tutorial:
For
an explanation of what the Alpha Channel is and what it does to make transparancies
you will need to look at the seventh tutorial: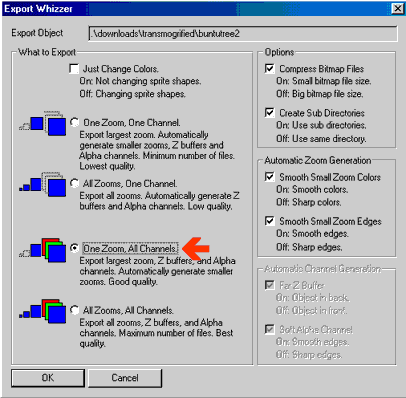
Clone the object and Export into your usual folder. Make sure the "Just Change Colors" box is unchecked. We are changing the sprite shape even if it is only a tiny lil bit. But this time we are also checking a new box - the "One Zoom, All Channels" as indicated.
This will export the largest zoom's Z buffers, Alpha Channels and P Sprites - and force TMog to create smaller ones from our newly altered ones as always.
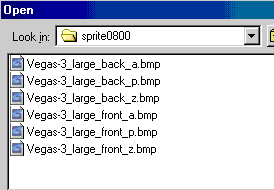 Now
this time when you go to open up your P sprites in Photoshop, you will
see they are accompanied by other images suffixed _a and _z. Not surprisingly,
these are the A sprites and the Z sprites; otherwise known as Alpha Channels
and Z Buffers.
Now
this time when you go to open up your P sprites in Photoshop, you will
see they are accompanied by other images suffixed _a and _z. Not surprisingly,
these are the A sprites and the Z sprites; otherwise known as Alpha Channels
and Z Buffers.
 As
before, we are only going to be working on one as we can flip the image
for the other rotation, so open up the first two items - the Vegas-3_large_back_a.bmp
and its corresponding _p file, which look like this:
As
before, we are only going to be working on one as we can flip the image
for the other rotation, so open up the first two items - the Vegas-3_large_back_a.bmp
and its corresponding _p file, which look like this:
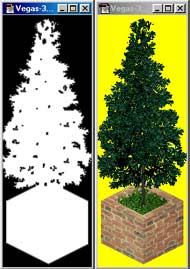
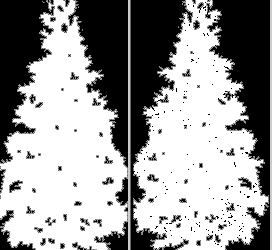
Let's concentrate on the black and white image of the tree - the Alpha Channel - for the moment. As you will recall from the A Channel tutorials, strictly speaking this ISN'T the tree-in-planter. The A Channel is actually a storage area in the image's file for non-visible picture elements. The white areas are the areas that are visible in the game. The black areas are the areas that are invisible in the game. And the grey areas are, as the phrase implies, a little bit of both - in other words, transparent. Or fuzzy.
In graphics in general - and not just in TMog because Photoshop and other graphics programs use Alpha channels as well - the A Channel is a portion of each pixel's data that is reserved for transparency information. Different parts of the object have different levels of transparency depending on how much we want the background to show through.
We are going to harness this transparency effect to make sure our yellow bits don't show in the game by making them invisible in the A sprite. You will recall from the A channel tutorials that:
- The white areas are visible;
- The black areas are invisible;
- The grey areas are transparent;
- The darker the grey, the more transparent (see through) the image is;
- The lighter the grey, the more opaque (not see through) it is.
As last time, the first thing to note is when you look at the colour mode on the A sprite, it is indexed.
With our P sprites, we changed the colour mode to RGB. With the Alpha Channel, we are using a different method of working, and this time we need to change the colour mode to Grayscale. Tick the Grayscale option and......
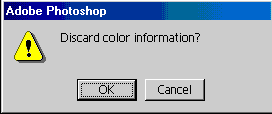 .....
this message should pop up.
.....
this message should pop up.
Yes, it is ok to do this, there is no colour information as such in the Alpha Channel so click OK.
Because we are going to be working entirely in black and white, use the eyedropper tool to change your foreground colour swatch to the black from the A sprite and the background colour swatch to the white. Now go to your P Sprite, go to Menu/Select/All and copy the entire sprite from your P sprite and paste it onto your A sprite. Which should now look like this:
Because we changed the mode to Greyscale we can work in layers, and basically, this method is a little like a cross between the previous two, because we are now going to take the magic wand tool and click anywhere on the off-white of the image where the yellow once was. Your running ants should now be doing that thing they do all around the tree image, and also around the off-white bits in the tree itself. If they aren't, check you have your Contiguous option turned OFF in your magic wand tool.
Let's hope you pasted that image on top exactly in the right place and didn't move it, because we are now going to do something rather drastic.
With the black as your foreground colour, go to your Pencil tool and choose a huge brush - I generally use 300.
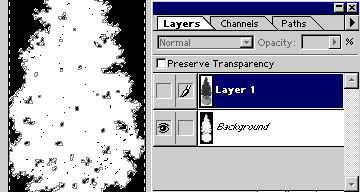 Go
to your layers palette and click on the eye icon next to your tree image
- Layer 1. This should make the layer invisible, and the running ants
should now look as if they are all over your A sprite image.
Go
to your layers palette and click on the eye icon next to your tree image
- Layer 1. This should make the layer invisible, and the running ants
should now look as if they are all over your A sprite image.
Highlight the Background layer to make it editable, and with your pencil set at 300 and the black selected, scribble away all over the sprite image. What you are doing now is colouring in with the black on the Background layer all the selected image from Layer 1. Nifty, eh?
 Deselect
and have a look. You will see a few little bits of black have appeared
where there were none before. Contrast the image with the untouched other
rotation of the A Sprite I have shown here - quite a significant change.
Deselect
and have a look. You will see a few little bits of black have appeared
where there were none before. Contrast the image with the untouched other
rotation of the A Sprite I have shown here - quite a significant change.
Remember that black makes things invisible in the game, and white makes them visible, so although the bits are still there and still very much yellow in your P Sprite, because you have altered their A Channel they will not be seen in the game.
But like the second method above, this has only eliminated the pure yellow; we also need to attack the off-yellow bits which were smudged in some way.
So click on the empty space next to Layer 1 where the eye icon should be to make the layer visible again, and highlight Layer 1 to make it editable.
Now, like the second
method above, click anywhere with your magic wand on the off-white of
the image where the yellow once was and press delete. 
Your Layered A Sprite should now look like this.
You can easily see the light parts in the tree which will be the smudgy yellow, so do the same as you did above - click on one with your magic wand, make the layer invisible**, highlight the background layer, colour in with your huge black pencil, highlight Layer 1, delete the light bits on Layer 1.
**You don't actually HAVE to make Layer 1 invisible to edit Layer 2 - like in the first method above we can work on a layer without looking at it so long as we are sure what we are doing ;o)
Keep doing this until you have got all the really light parts of the tree - but again like before, be careful you don't accidentally pick up any of the grass or brick image along the way. Feel free to enlarge the image with your Zoom tool if you want to be sure of picking up every last stray pixel, or even changing the brush size to a smaller one to avoid colouring in under the brick or grass image.
You can even change the tolerance on your Magic Wand tool if you like, but be careful not to change it too wide - there are lots of grey shades on this we need to keep!
One final word of warning - don't forget to keep changing your layers - if you accidentally press Delete while your background layer is highlighted, you will add MORE white than you started off with =:o,
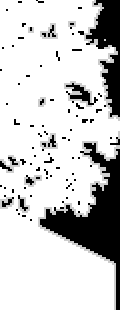
OK, my A channel now looks a lot spottier:
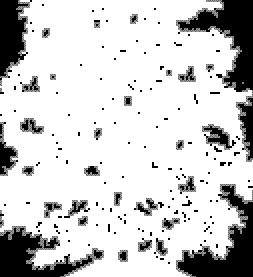 And
so should yours. Keep the eye icon blank on Layer 1 to keep it invisible
for the moment, and make sure that the Background Layer is highlighted
to keep it editable.
And
so should yours. Keep the eye icon blank on Layer 1 to keep it invisible
for the moment, and make sure that the Background Layer is highlighted
to keep it editable.
We now have one more thing to tackle before indexing and saving our image - that is the grey outlines.
Remember above, we learnt that:
-
The grey areas are transparent;
-
The darker the grey, the more transparent (see through) the image is;
-
The lighter the grey, the more opaque (not see through) it is.
If we imported this image as it is, all the grey would make the object look rather fuzzy in the game. We are going to use the technique learned in the A channel tutorial to control fuzziness - making the dark grey a lot lighter.
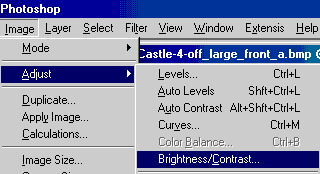 Go to the action bar, select Image / Adjust / and Brightness/Contrast...
which should
bring up an options box like this:
Go to the action bar, select Image / Adjust / and Brightness/Contrast...
which should
bring up an options box like this:
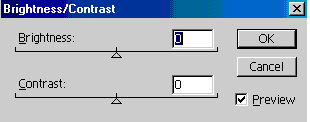
 Make
sure you have the Preview option ticked, as this will allow you to see
what you are doing in real time to the A sprite. You can either use the
slider bars with this facility, or type in predetermined levels. You can
play about with this to your heart's content to find the perfect looking
A channel grey for your particular preference, or you can just move the
slider bar to 85 / type 85 in the Brightness box which is what I am going
to do. The Contrast box can be left at 0.
Make
sure you have the Preview option ticked, as this will allow you to see
what you are doing in real time to the A sprite. You can either use the
slider bars with this facility, or type in predetermined levels. You can
play about with this to your heart's content to find the perfect looking
A channel grey for your particular preference, or you can just move the
slider bar to 85 / type 85 in the Brightness box which is what I am going
to do. The Contrast box can be left at 0.
This will only edit the portion of the picture which is highlighted - ie. the bits the little ants are running around.
 Once
you deselect the lil ants, you should be able to see a huge difference
in the shade of grey. This will make an even bigger difference in the
game.
Once
you deselect the lil ants, you should be able to see a huge difference
in the shade of grey. This will make an even bigger difference in the
game.
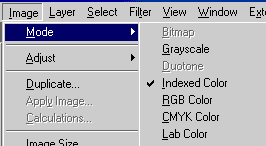
OK, we are finished
with this sprite. Go to the action bar and select Image/Mode/Indexed.
You should get a pop-up different to any other pop-up you have had from
here - 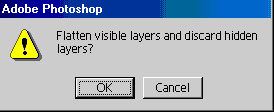
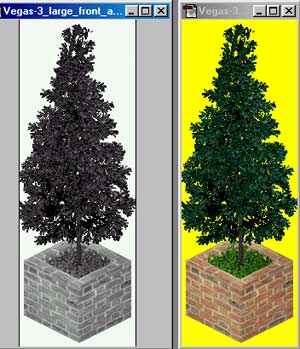
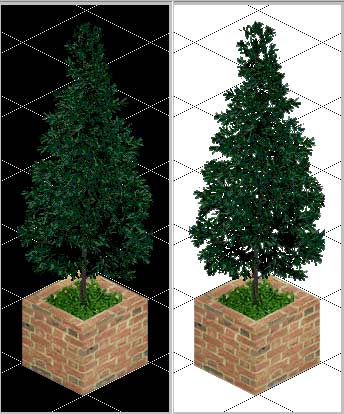 And here it is in both the black and the white background - our perfect
image.
And here it is in both the black and the white background - our perfect
image.
And the good news is, to do the other sprite all you need do is select the entire edited A sprite, copy and paste it into the other rotation, edit/transform/flip horizontal, save and import. No messing about with converting colour modes!